FABRIC RAINBOW: MIXING A CUSTOM COLOR WITH RIT DYE
There is no denying that I love color, but I am super particular about *which* color. It’s one of the reasons I love to dye my fabric before beginning a sewing project. Using dye can feel like a magic trick, and it is super easy! With a little practice careful note keeping, you can easily achieve the exact custom color of your dreams.
For this project I am showing you how to mix custom colors with Rit Dye. Rit has generously gifted me dye, and they are sponsoring this post. You can see from my Instagram story highlights that I was already a big fan and regular user of Rit, so this is an exciting partnership for me!
First things first: Every creative endeavor begins with inspiration, so I’ve gathered my color inspiration here. This will guide me as I mix colors, and help keep me on track so the finished project looks harmonious. Once I knew the range of colors I wanted, I consulted Rit’s Color Formulas page. They have recipes for over 1000 colors (!!!), and once you feel comfortable mixing different hues, you can improvise to create even more. I began taking notes of the colors I wanted to try.
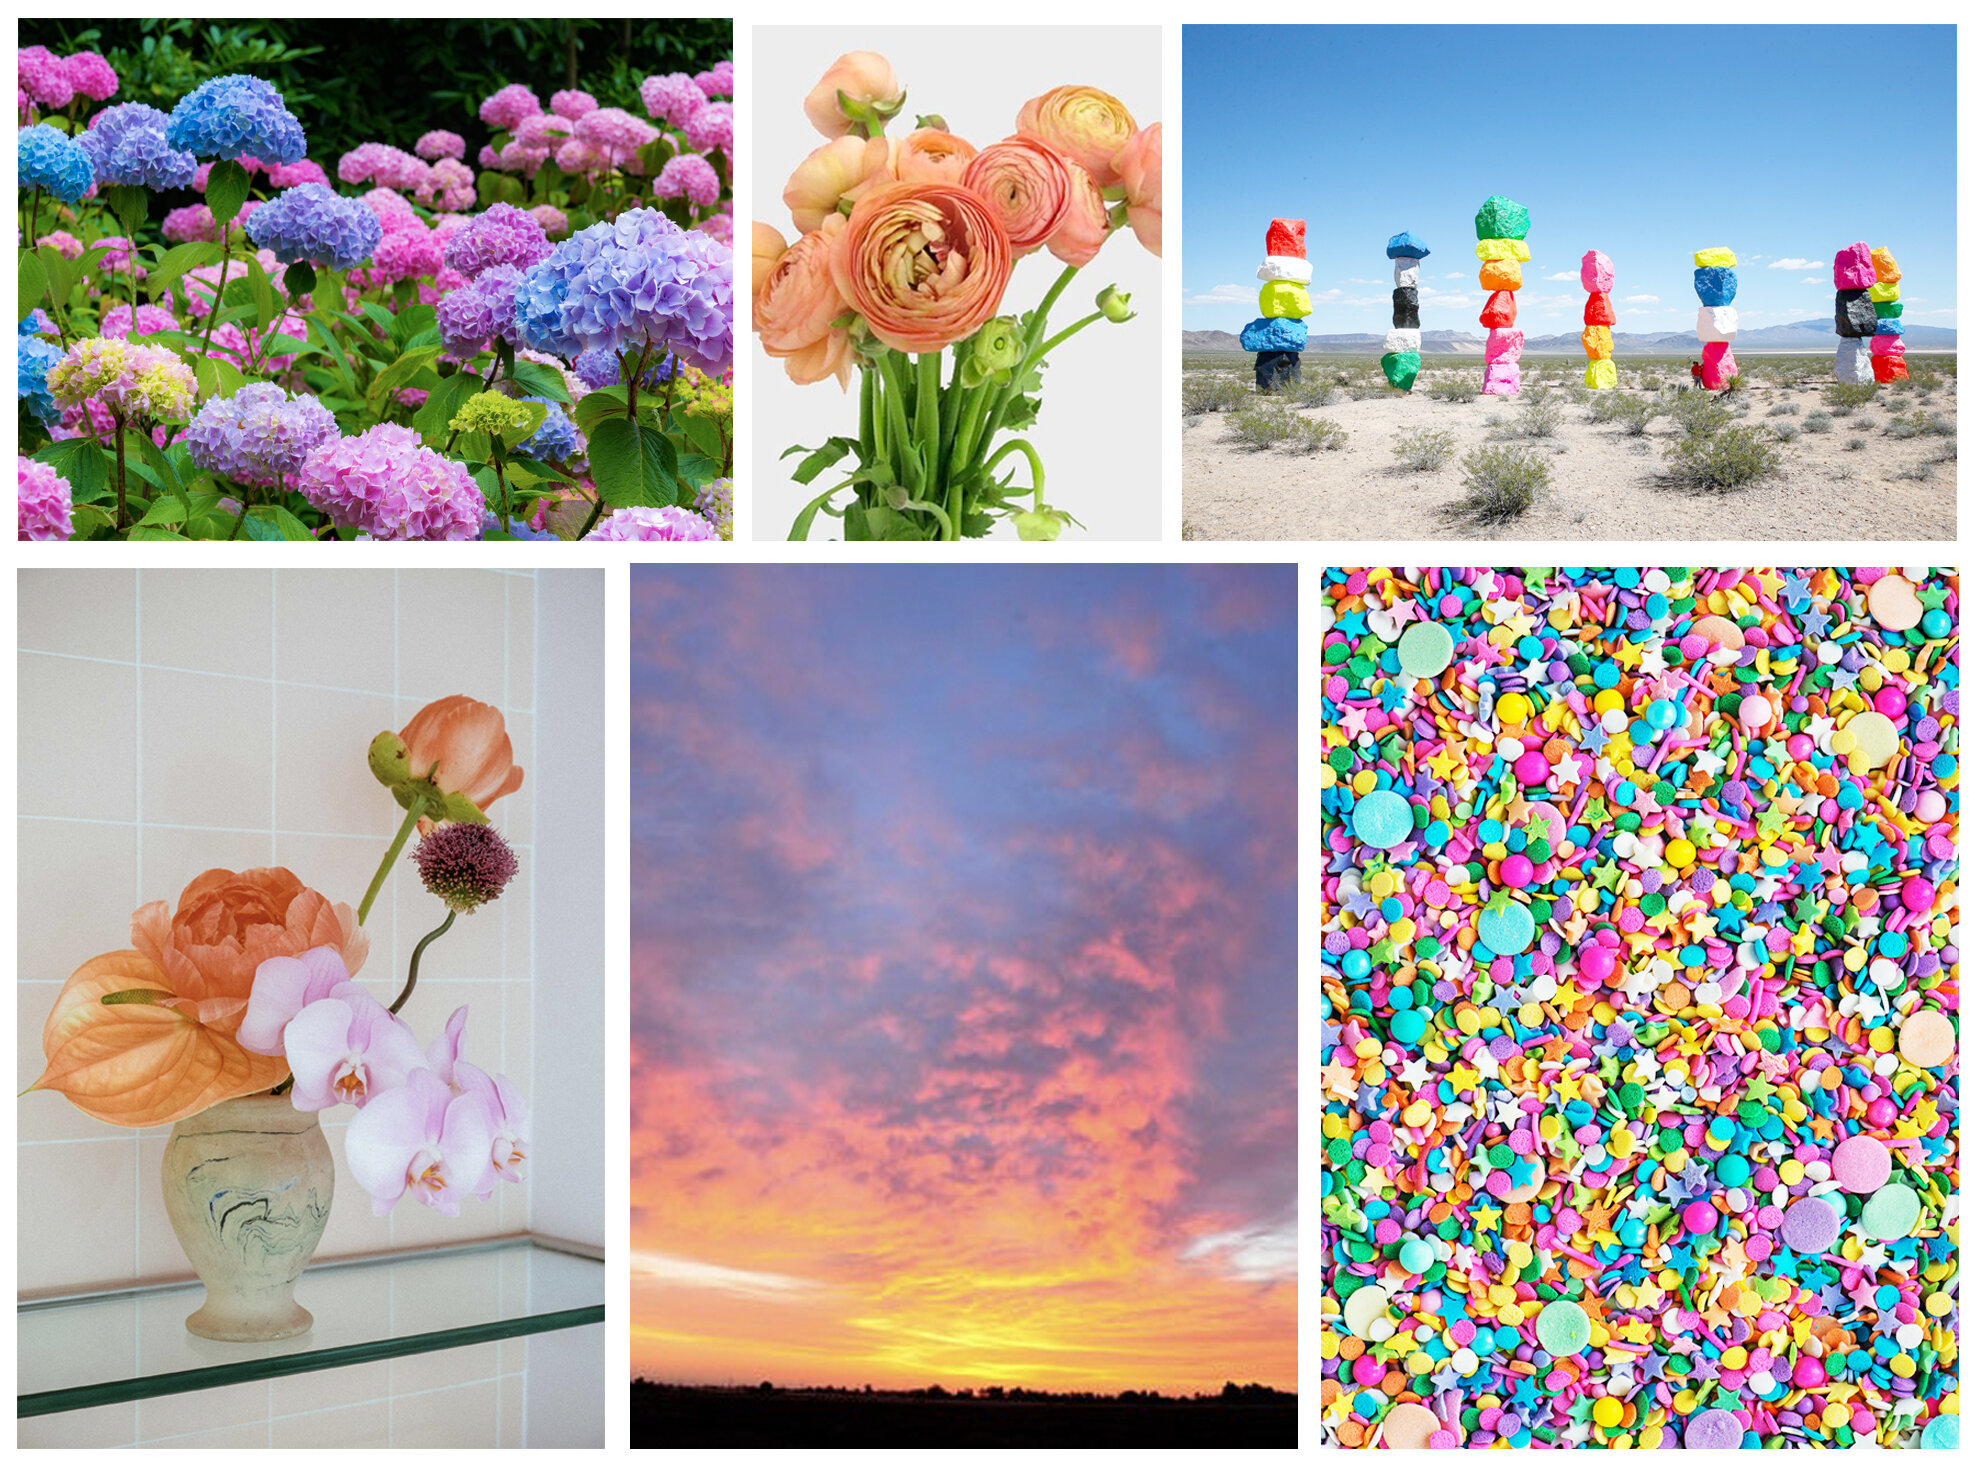
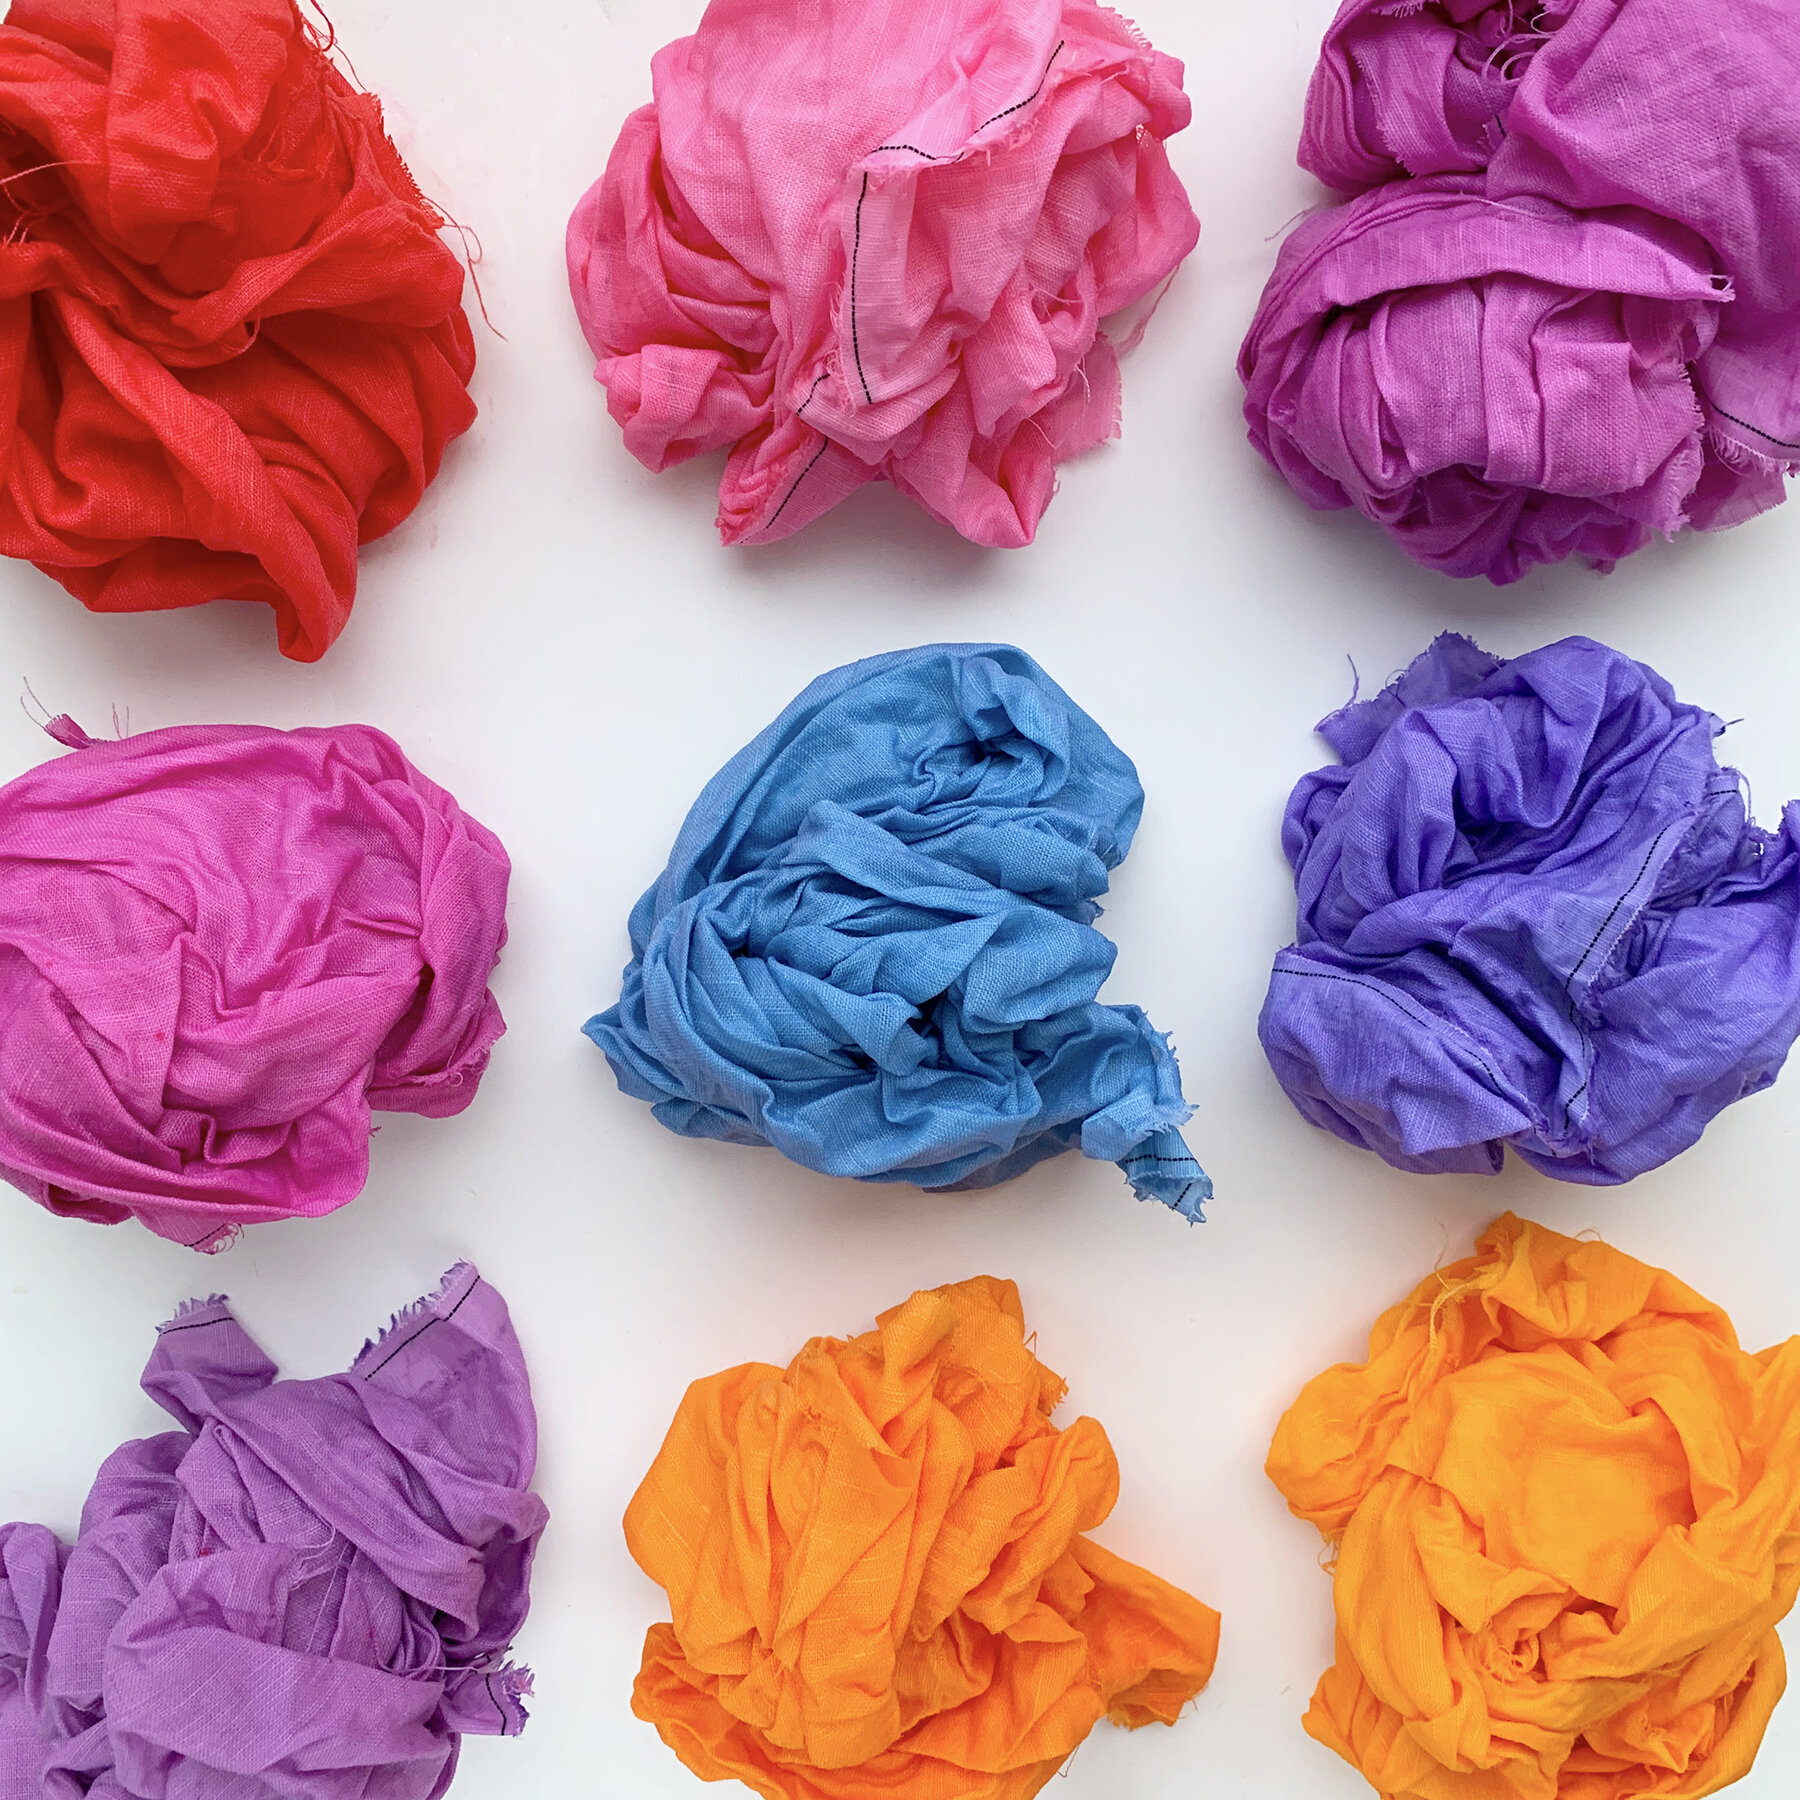
I find inspiration everywhere. Here are a few images with the color quality I’m looking for - pastel and bright.
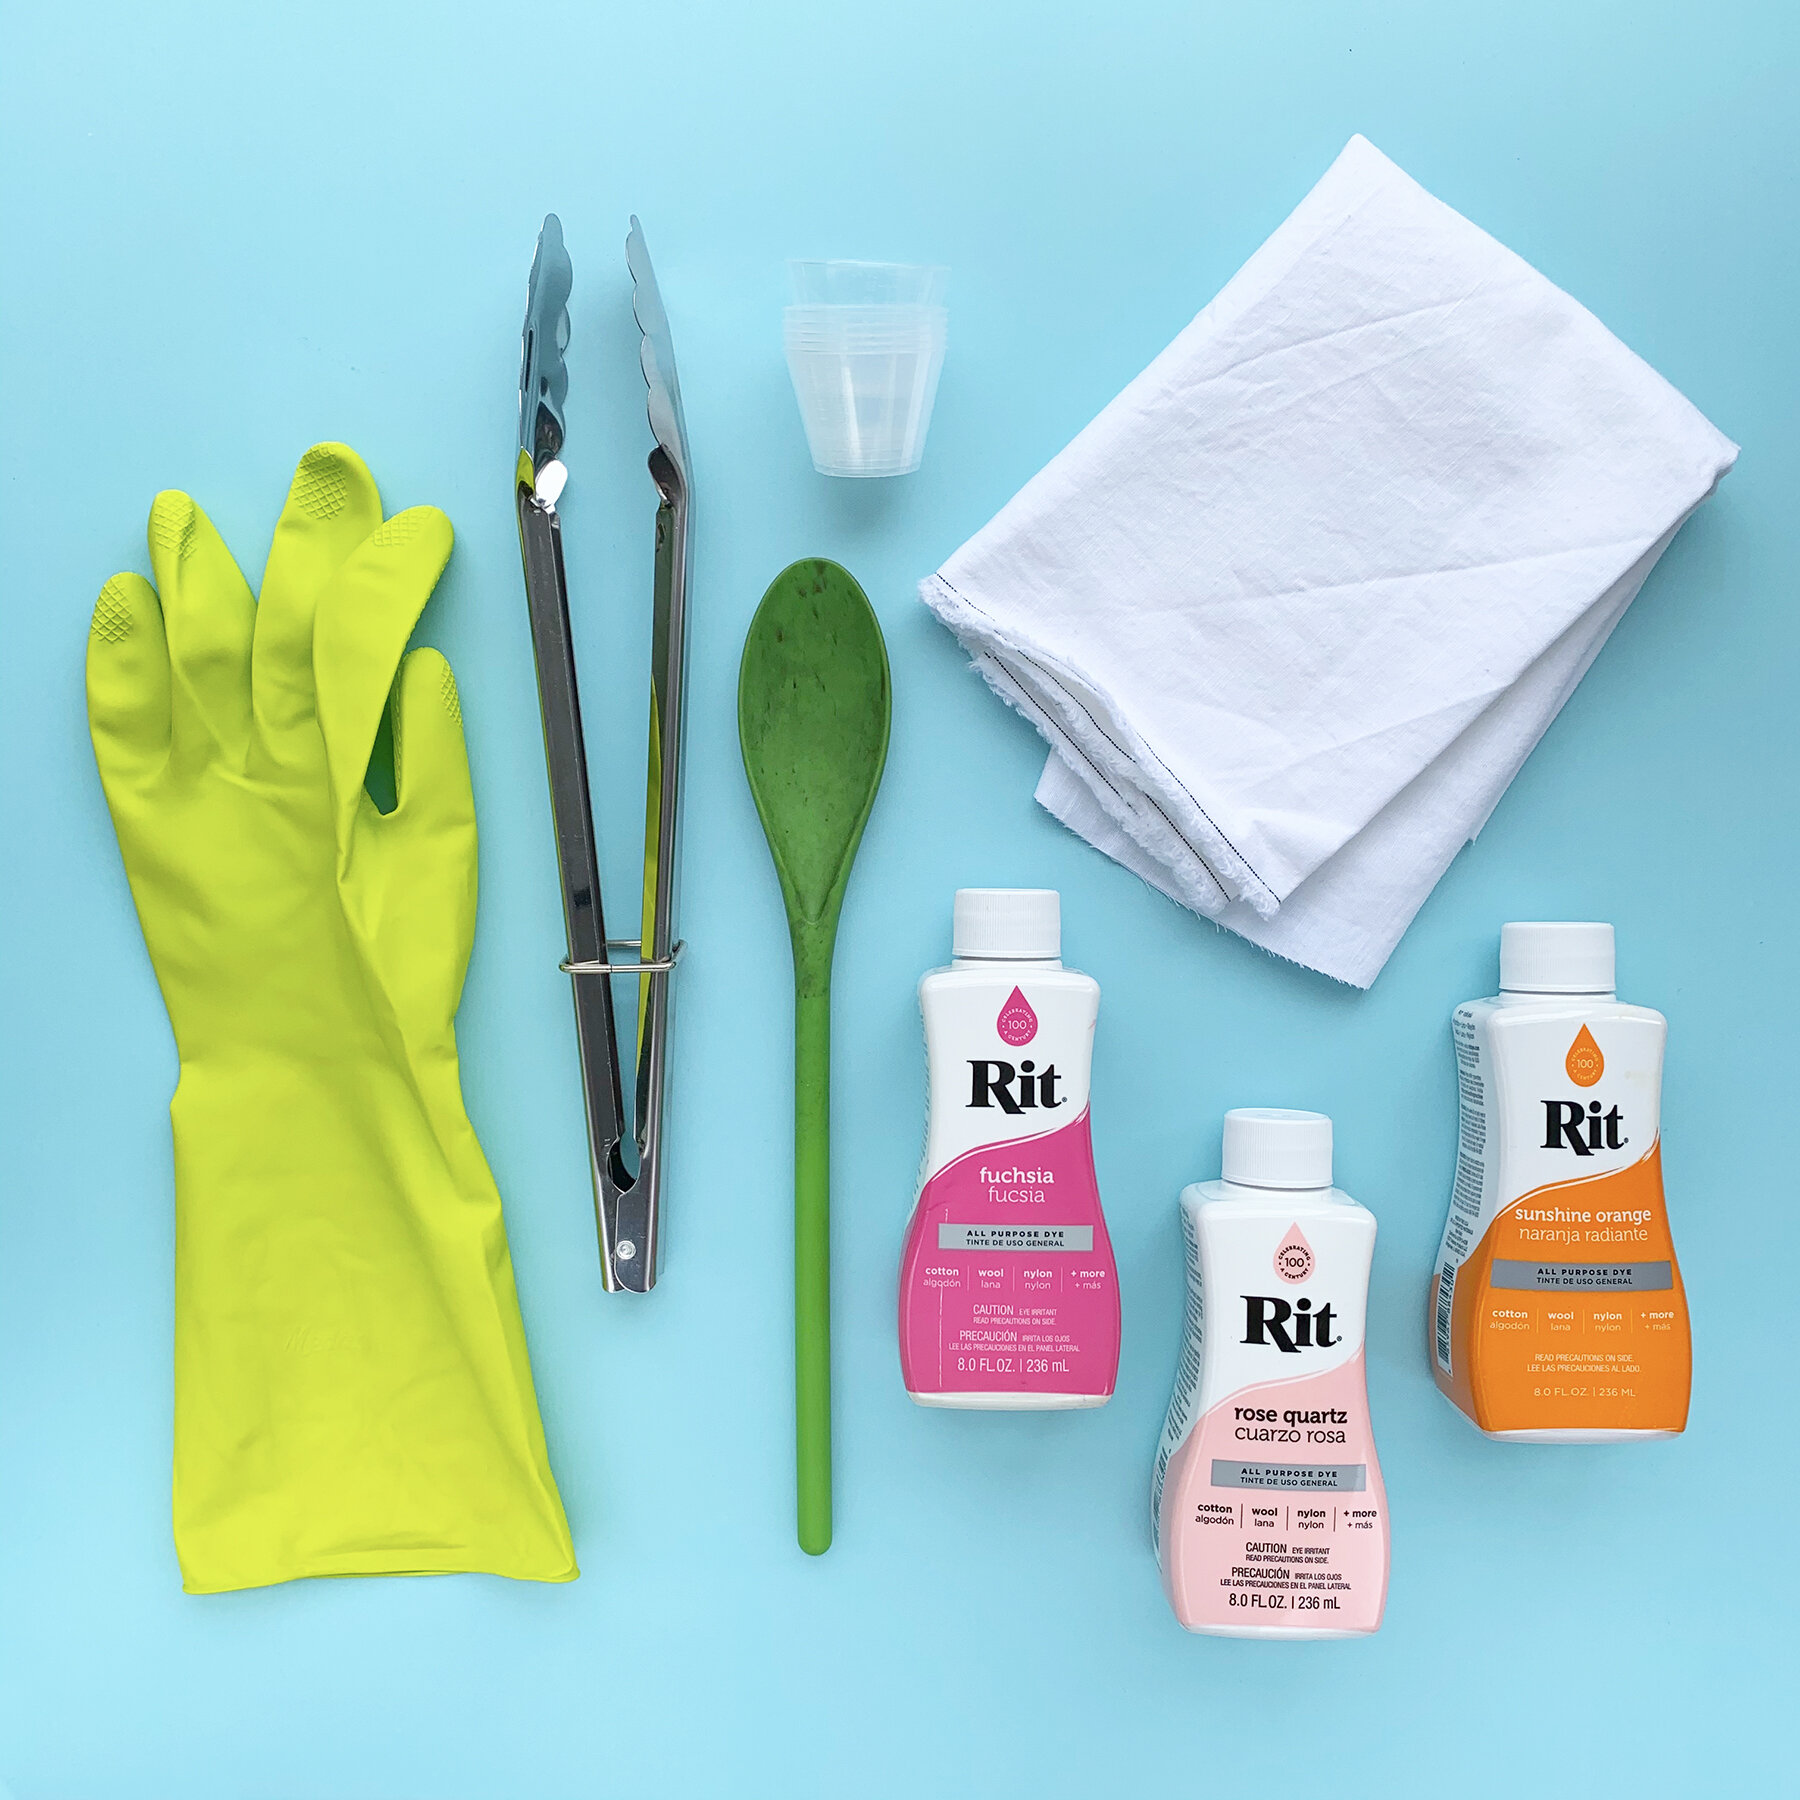
Next, gather your materials for a successful dye job:
Rit Dye. Select colors that coordinate to your inspiration imagery.
Plastic tablecloth or drop cloth to cover and protect your workspace from stains.
Rubber Gloves. I always wear rubber kitchen gloves when dyeing, both to keep the dye from staining my hands and to give a layer of heat protection when handling fabric fresh out of a hot dye pot.
Tongs and easy-to-clean metal or plastic mixing spoons.
Small plastic measuring cups or tablespoon measure.
A container for dyeing. You can use a pot that you do not use to cook food, a large plastic tub or bin, or dye directly in a stainless steel sink.
Fabric. When using Rit All Purpose Dye, use natural fibers such as cotton, linen, silk, and wool. If your fabric has a fiber content of 35% or more of polyester, acrylic, or acetate, then use Rit Dyemore dye, which is designed for synthetic fibers.
Salt (optional). Salt helps push dye into cotton, linen, rayon, and ramie fibers, and can help give you a brighter, richer color. It is most helpful when creating deep, darker colors. For silk, wool, and other protein fibers, add vinegar instead of salt, for the same effect.
Dish soap (optional). Soap helps promote even dyeing by opening up the fibers in your fabric.
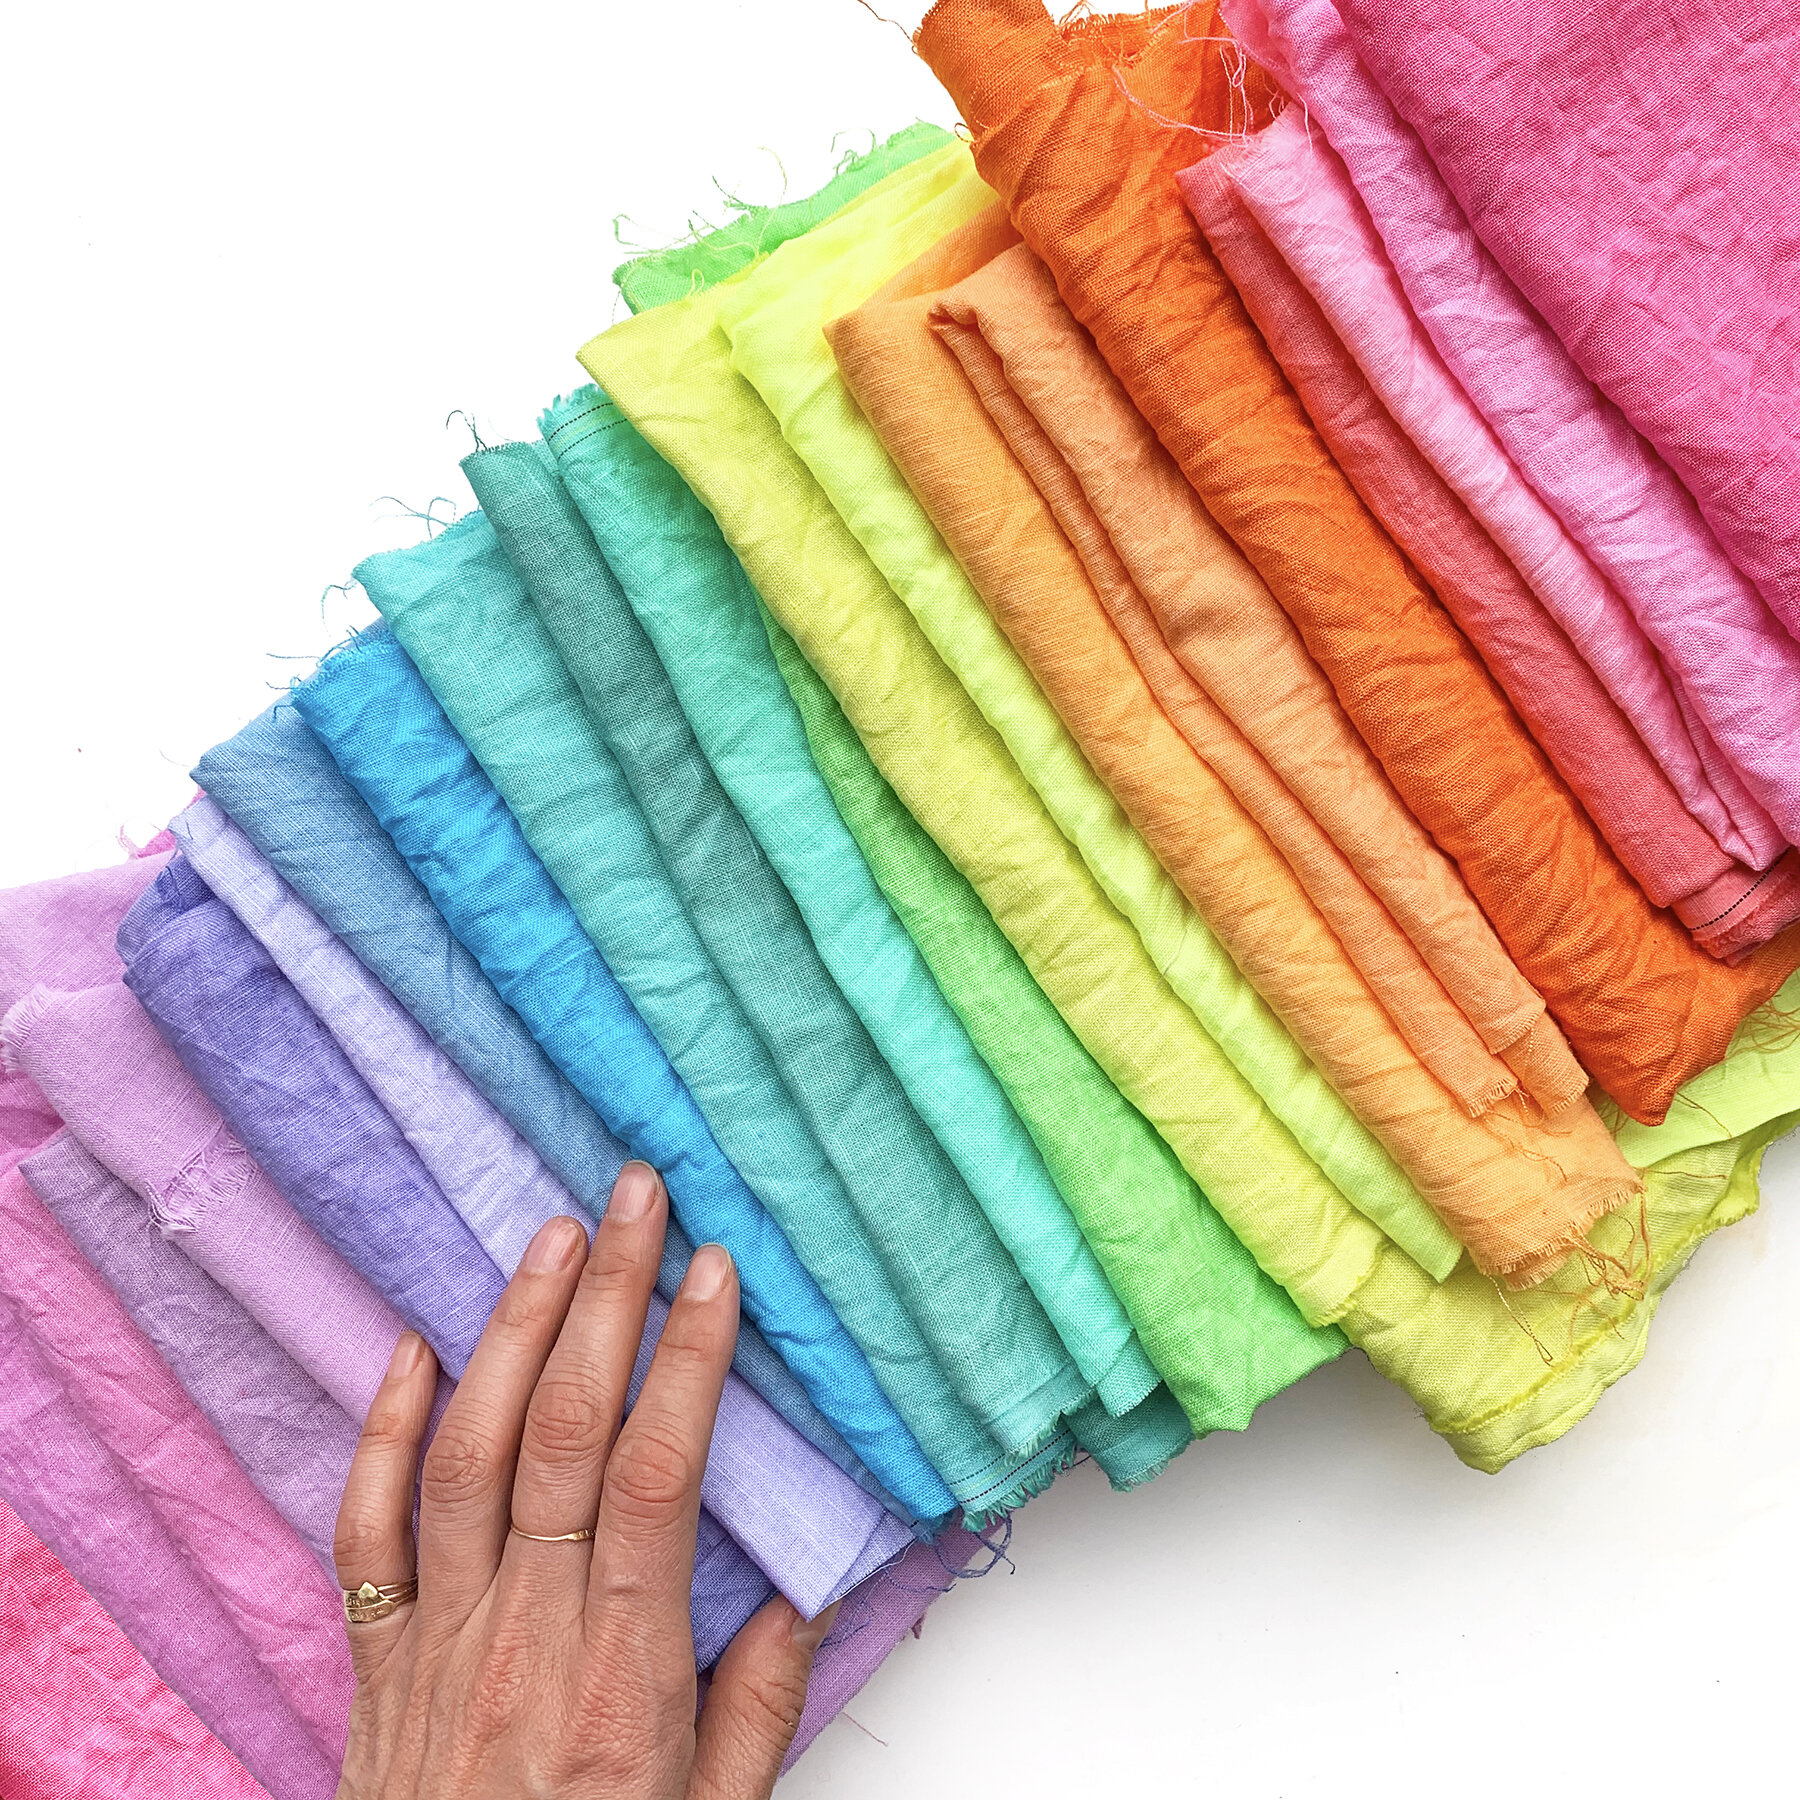
For this project, I am using plain white linen that has already been through the washer and dryer on the hottest settings. I pre-wash my fabric so that if I sew it into a garment, it won’t shrink after sewing. Pre-washing also removes sizing or finishings left on the fabric from the weaving process; washing these out will help the fabric absorb dye. I want to make a few shades of color for this project, so I have cut my yardage into smaller pieces. Each piece will be dyed its own color.

Let’s get started:
Cover your workspace with plastic to protect from spills and stains.
Wet fabric thoroughly. You can soak it in water until fully saturated and squeeze it out, or use it fresh out of the washing machine and still damp. Set aside.
Mix each dye formula. I have provided my recipes in the photos.
Fill your dye pot with hot water (ideally 140ºF, my tap makes hot enough water. You can also use a large pot on the stove); add salt and/or soap if using.
Wearing gloves, add dye and stir until evenly distributed in the water.
Open up your wet fabric (it should not be folded or tightly crumpled) and add it to the dye bath. Stir and agitate for the first 10 minutes, and then leave in dye bath, checking occasionally until desired color is achieved. Be sure to stir and mix your fabric, especially for the first 10 minutes - leaving it sitting still in the dye bath can lead to splotchy results. The color will appear darker when wet and will dry lighter. Because my goal is lighter shades, the fabric does not need to be in the dye bath for very long; usually 10-15 minutes is enough.
When fabric is the desired color, pull it out of the dye bath. Wearing gloves, squeeze out as much dye and water as possible. Rinse your fabric under running water or in another container of fresh water, until water runs clear (dye has stopped coming out of the fabric).
At this point, you can use Rit ColorStay Dye Fixative or you can proceed to washing and drying your fabric. As the name suggests, ColorStay Dye Fixative helps lock the color into your fabric, preventing color from fading or bleeding onto white fabrics. I have washed my fabric in the machine and added fabric softener to the dryer.
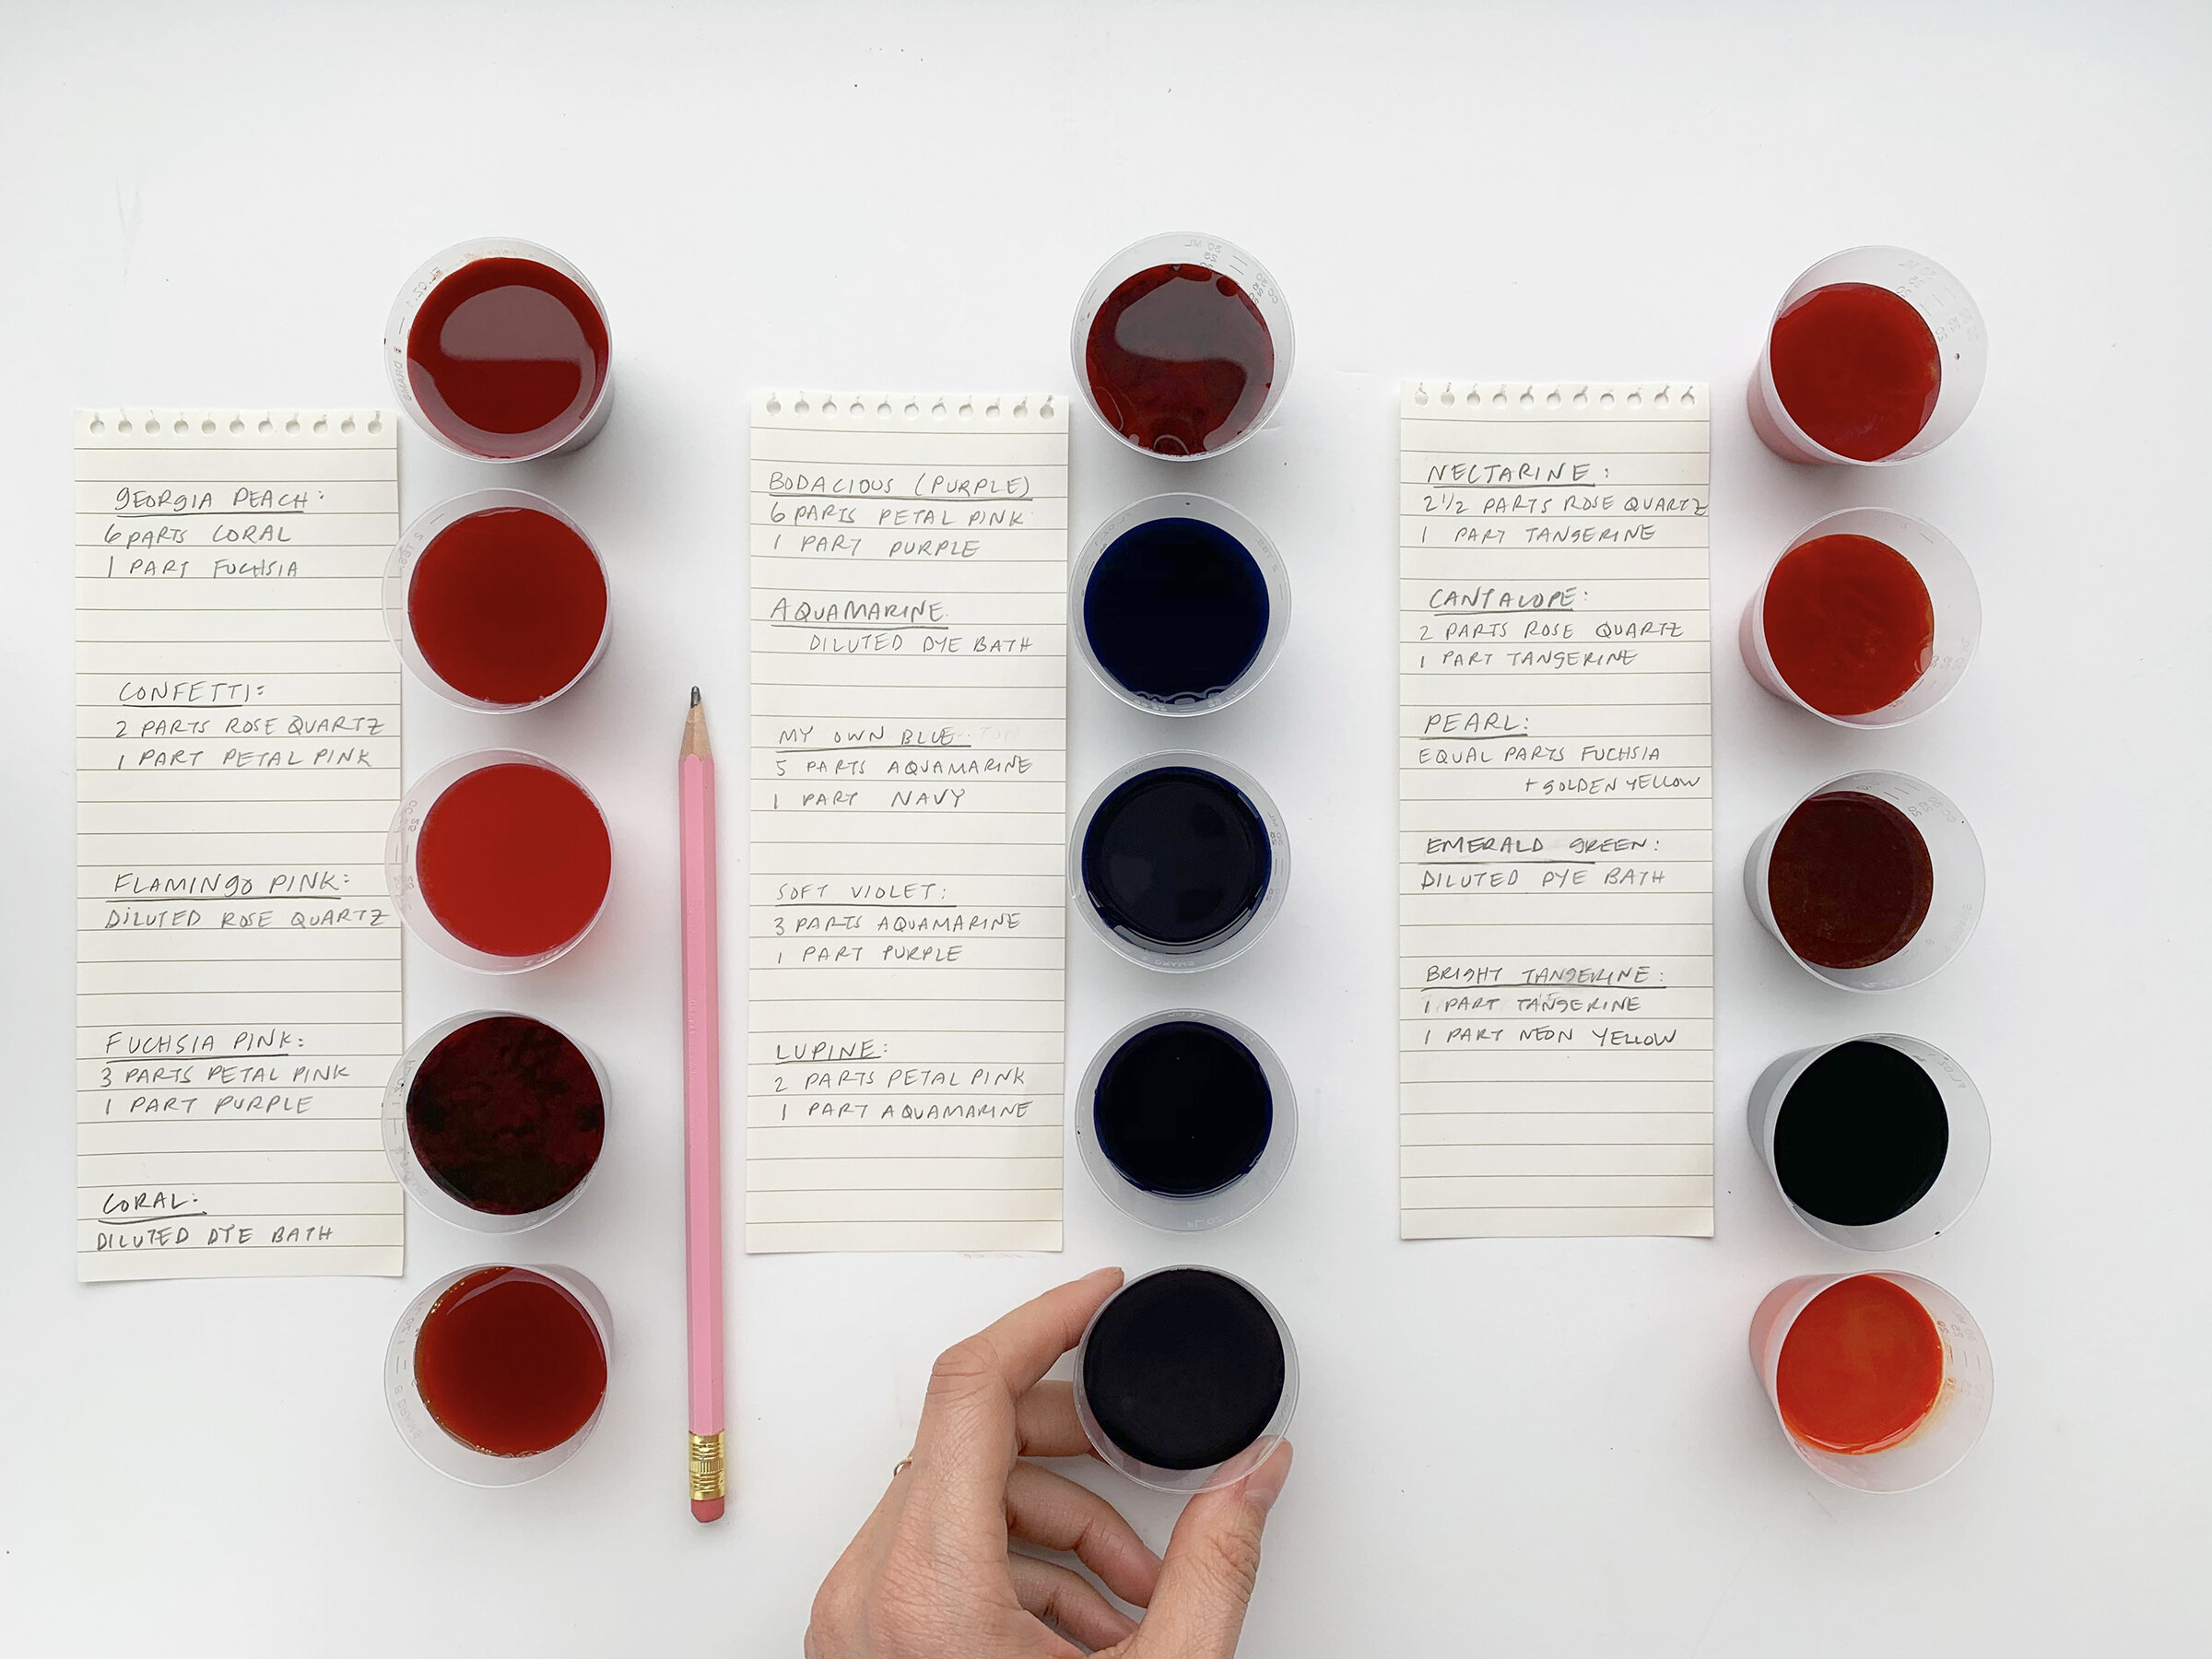
Before beginning, I set up my custom mixed colors for small dye baths. I have about 2 Tablespoons of dye for about 1.5 gallons of water.
Colors will appear darker when wet, but the color should be pretty representative of how they will look dry.
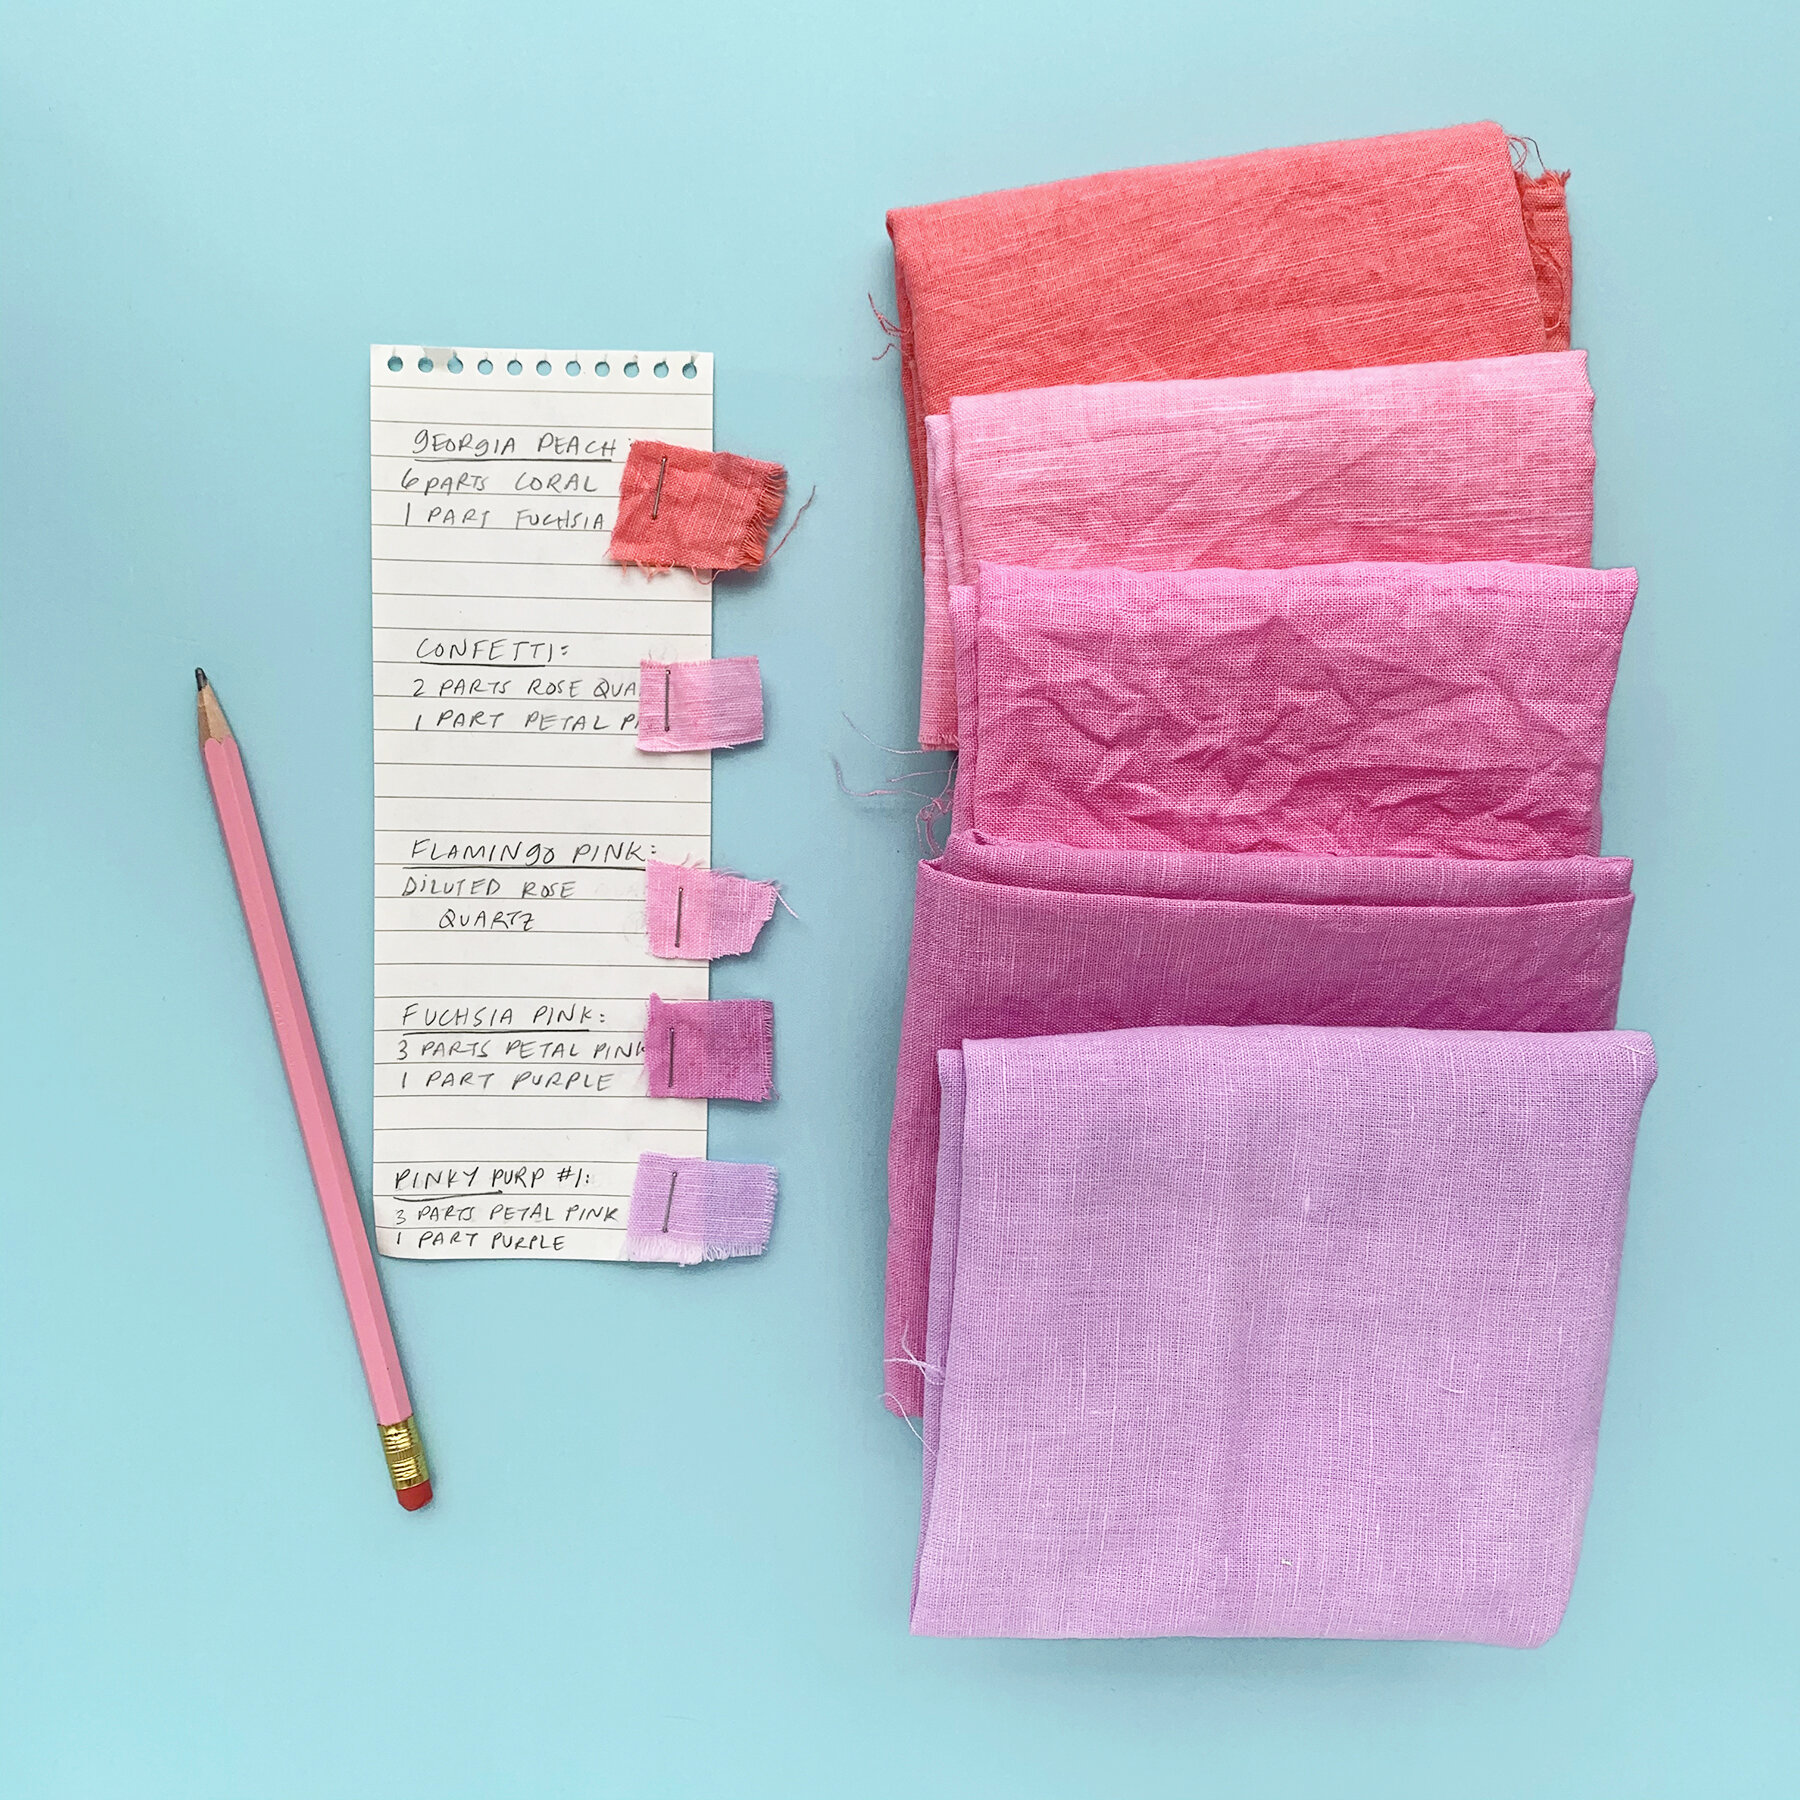

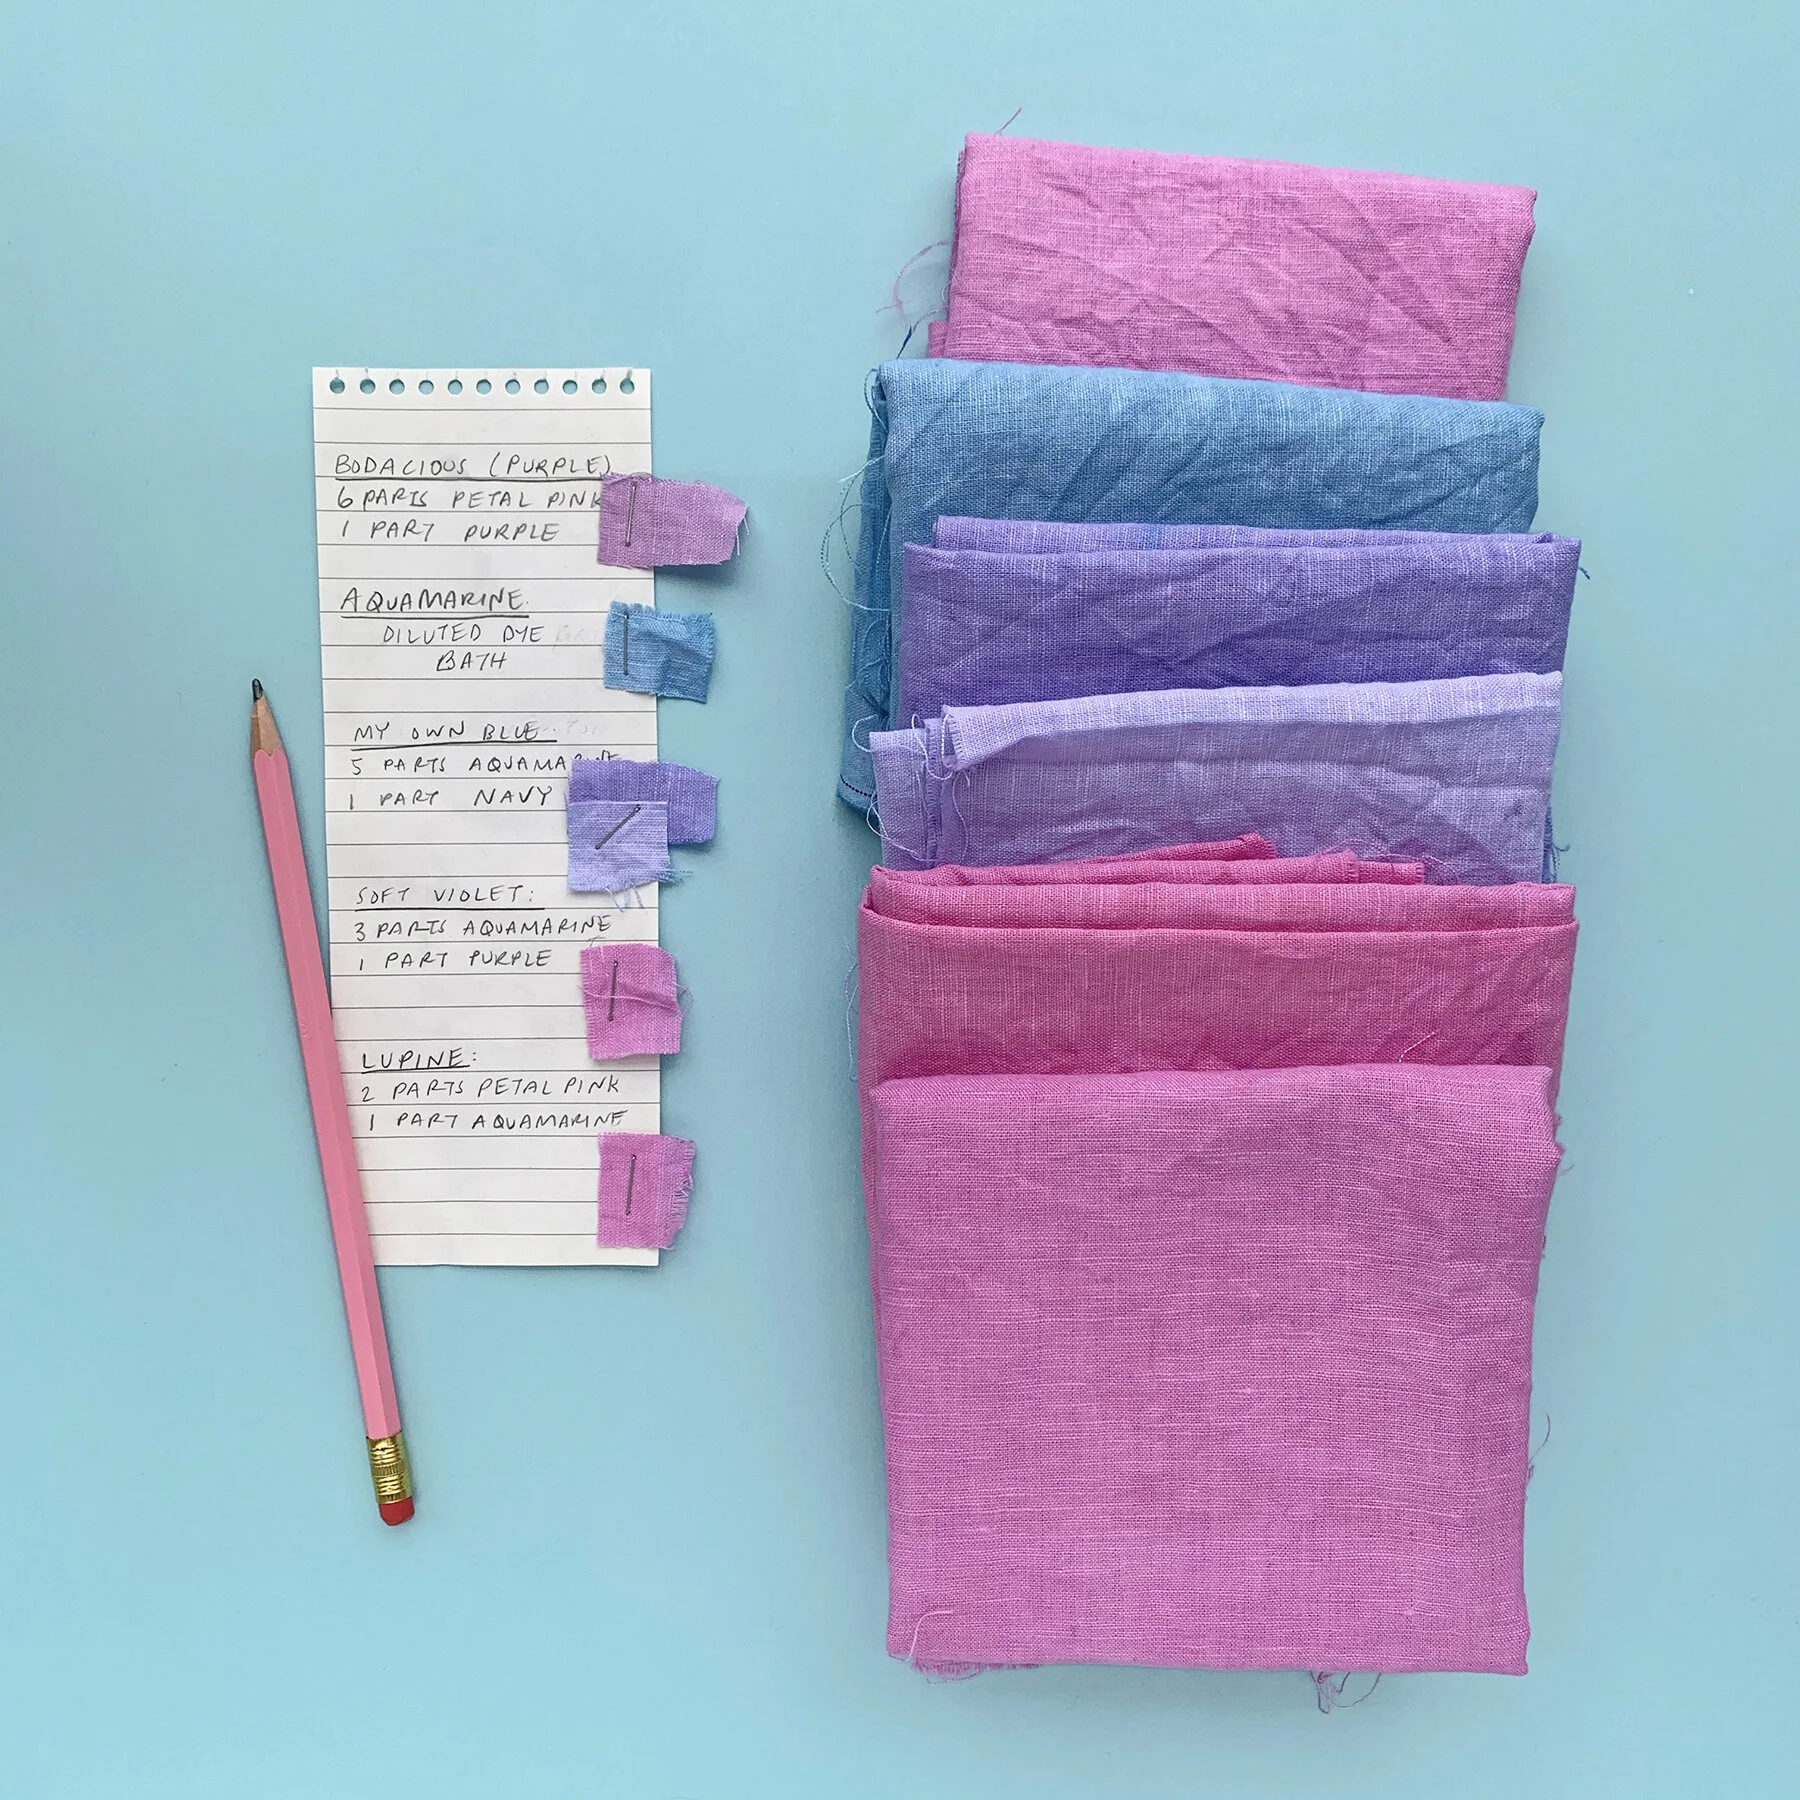
While keeping notes is a bit of extra work, it’s really worth it if you think you will ever want to replicate a color in the future. I write down the general ratios, and attach a small swatch for easy reference. (Tip: If you click any of these images on a desktop, it will pop out so you can read the fine print.)
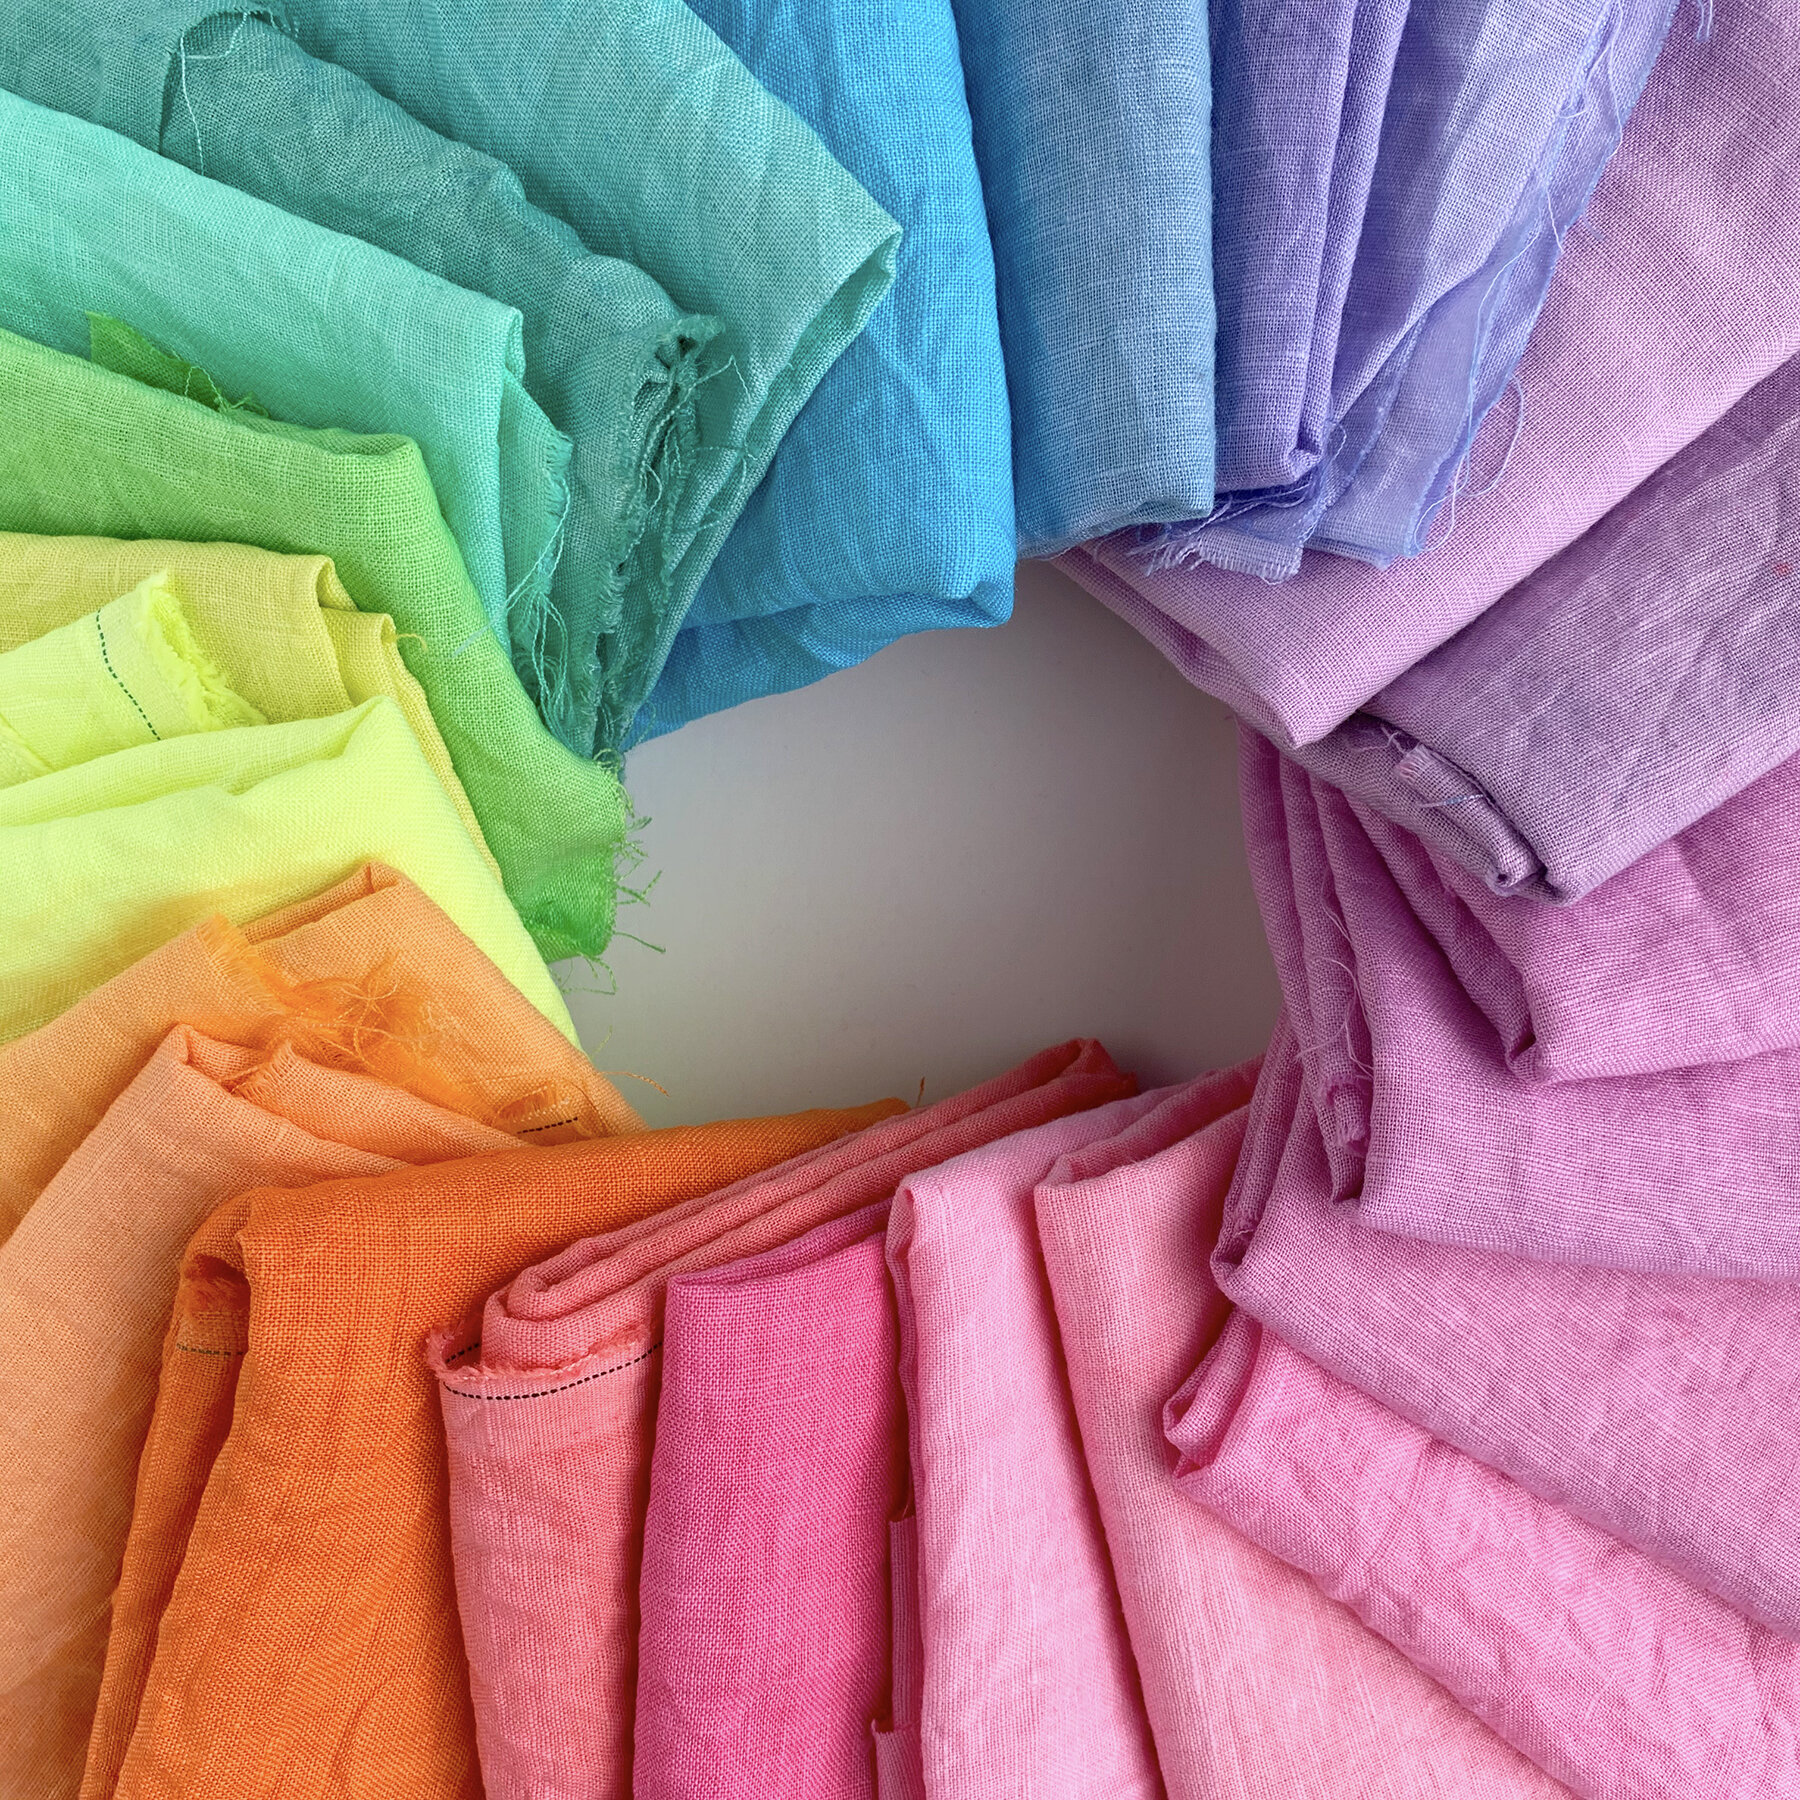
Here is my soft array of custom mixed colors! I can’t begin to tell you how much fun I had dyeing all of these colors. Once you are set up to dye with Rit, the process goes quickly. I am looking forward to piecing these beautiful colors together and sewing them into something quilted (maybe a jacket??), so look forward to seeing more of this linen rainbow! This project got my imagination firing, and I hope you found some inspiration here, too. Let me know if you try any of my color recipes. XO, Martha