A LACY LITTLE NUMBER - Tons of Lace Insertion and Vintage Pattern Confection
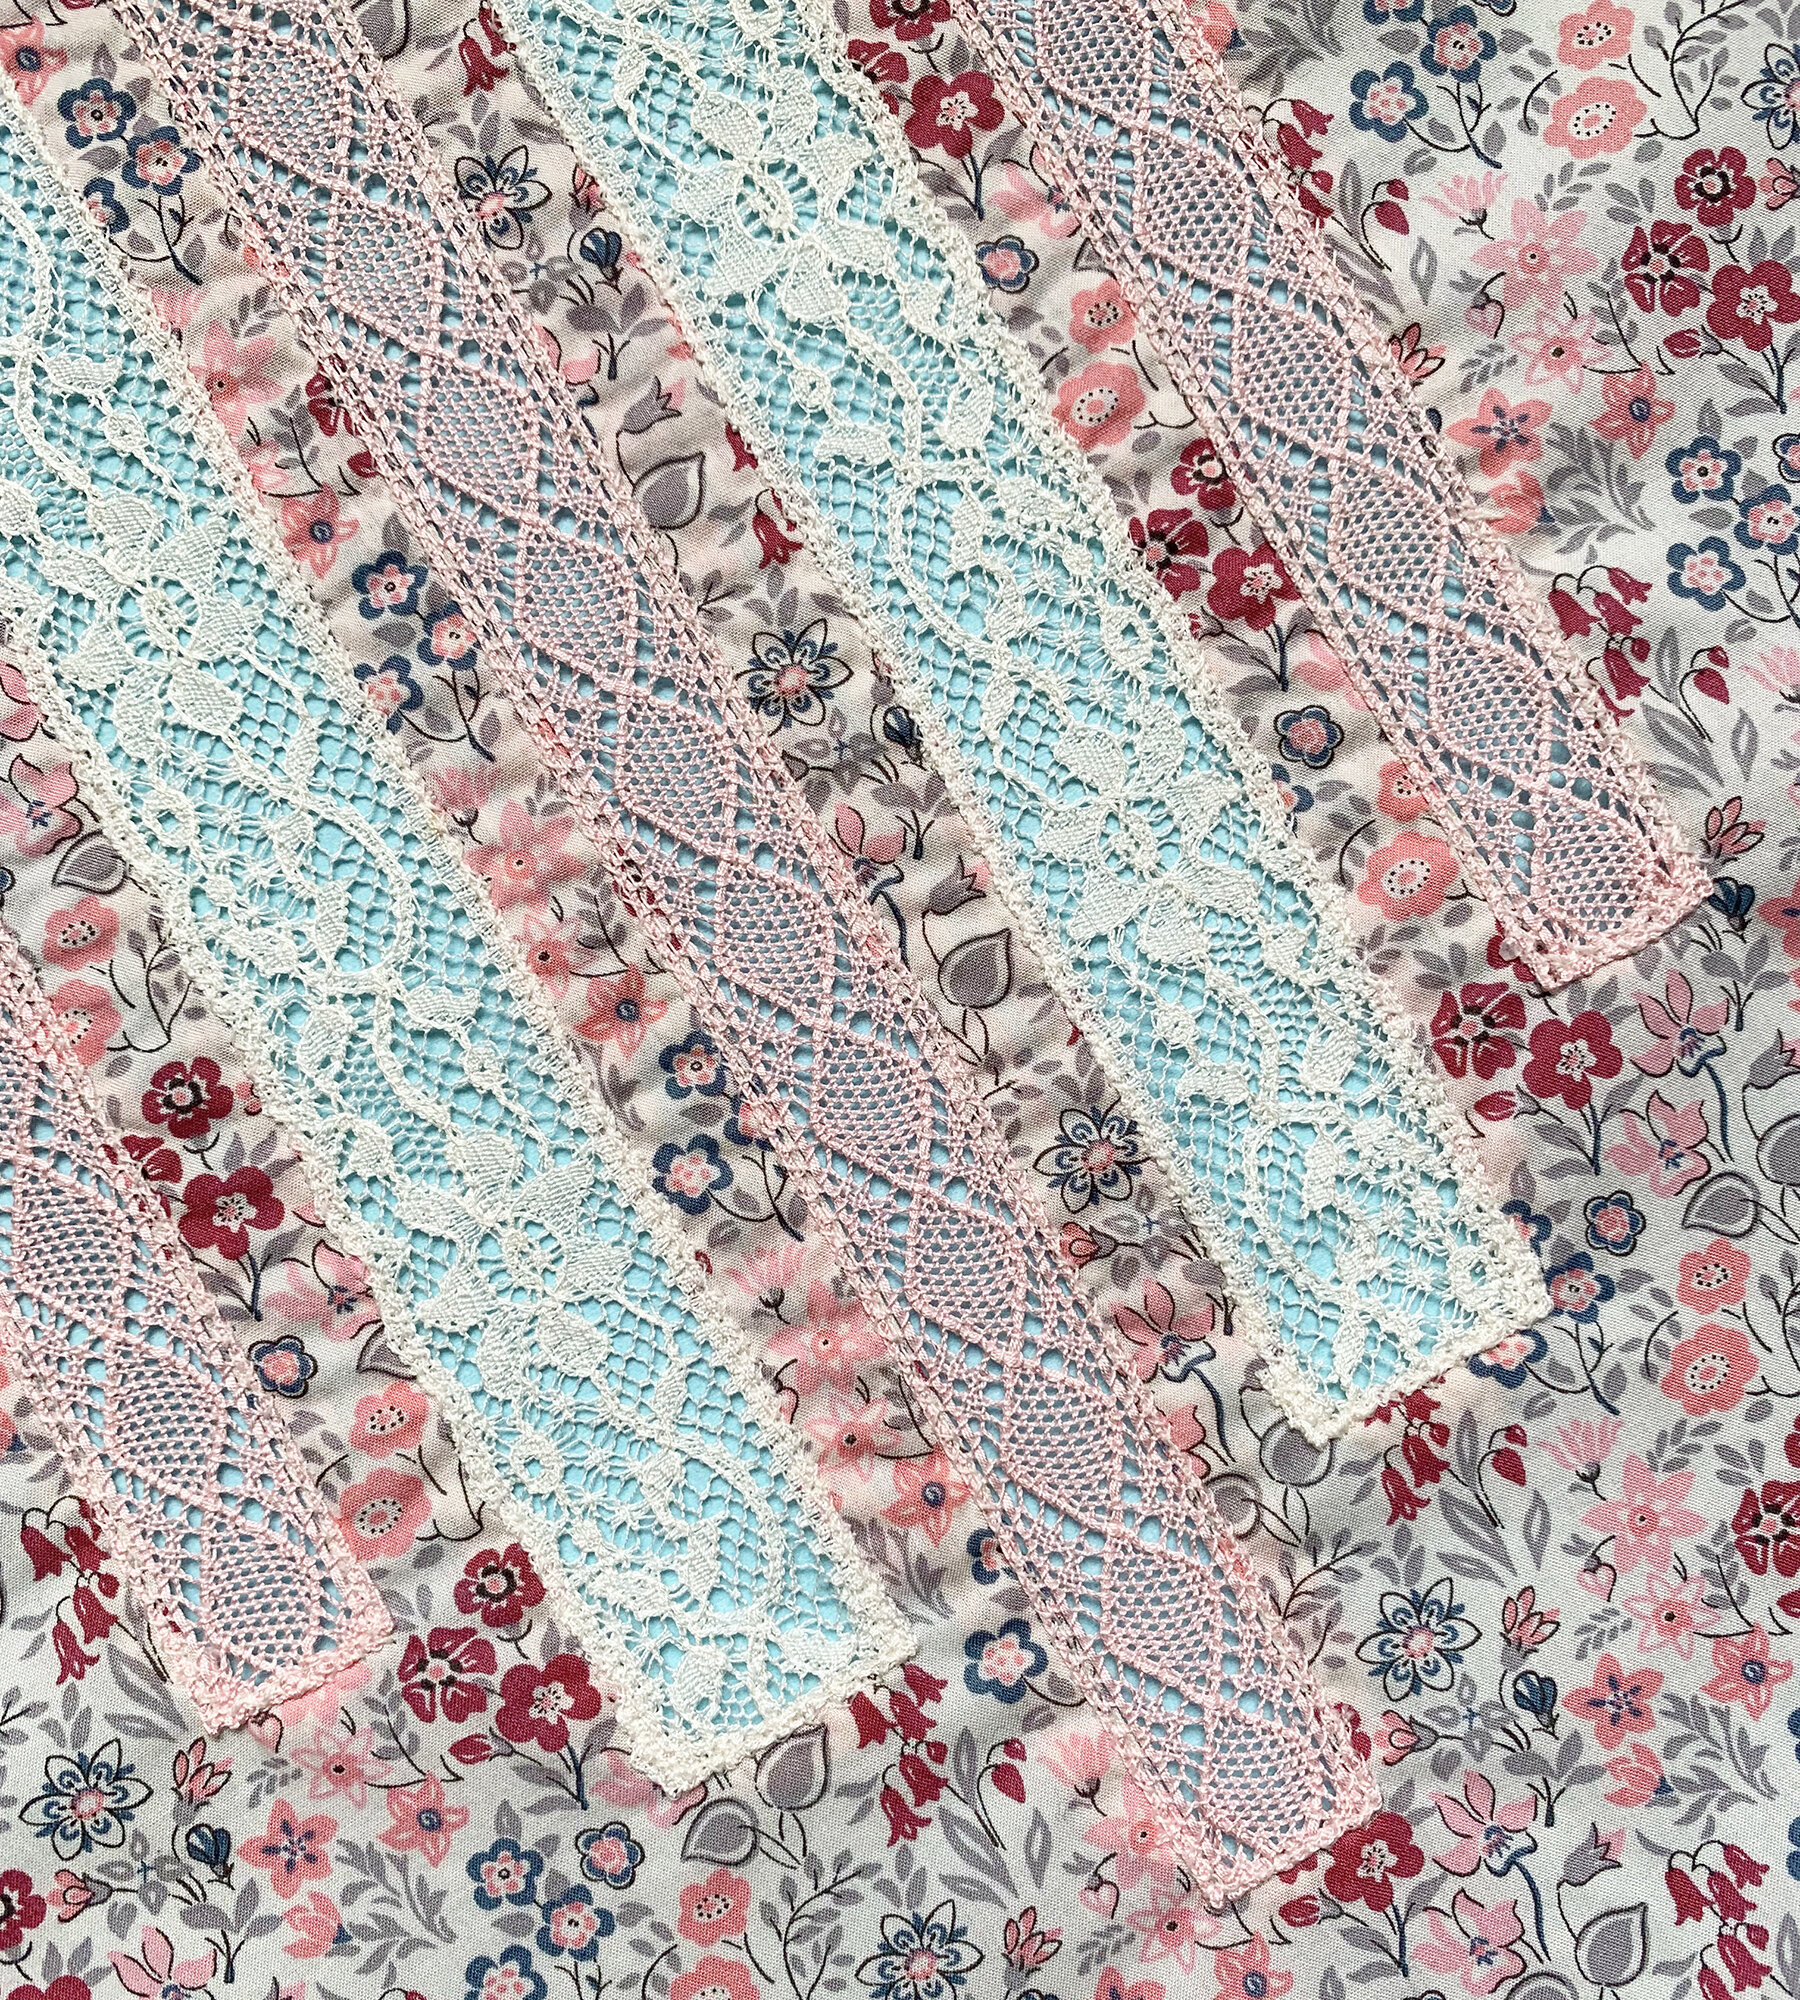
Lace insertion on the sleeves.
We recently took a week long vacation to the islands of western Greece, where I relaxed for the first time in about nine months. I swam multiple times every day, and I felt my jaw unclench and my mind go blank. It was wonderful. When we got home, I felt refreshed, but I did not feel like doing….anything. That happens to me sometimes - I lose creative momentum, and it takes effort to regain it. In these times, I give myself an assignment, a project I must complete, to get the ball rolling again.
So I got to work. I pulled out lengths of fabric and unfolded them, draping them around my sewing room, and I covered the floor in vintage patterns. Things began to clarify, but it wasn’t quite clicking. I wanted a dress, and I didn’t want to worry about fitting, so I was leaning towards something I’d sewn before. But it had to feel special. And most importantly when I’m trying to regain creative energy: I had to learn from this project, so there needed to be a technical challenge.
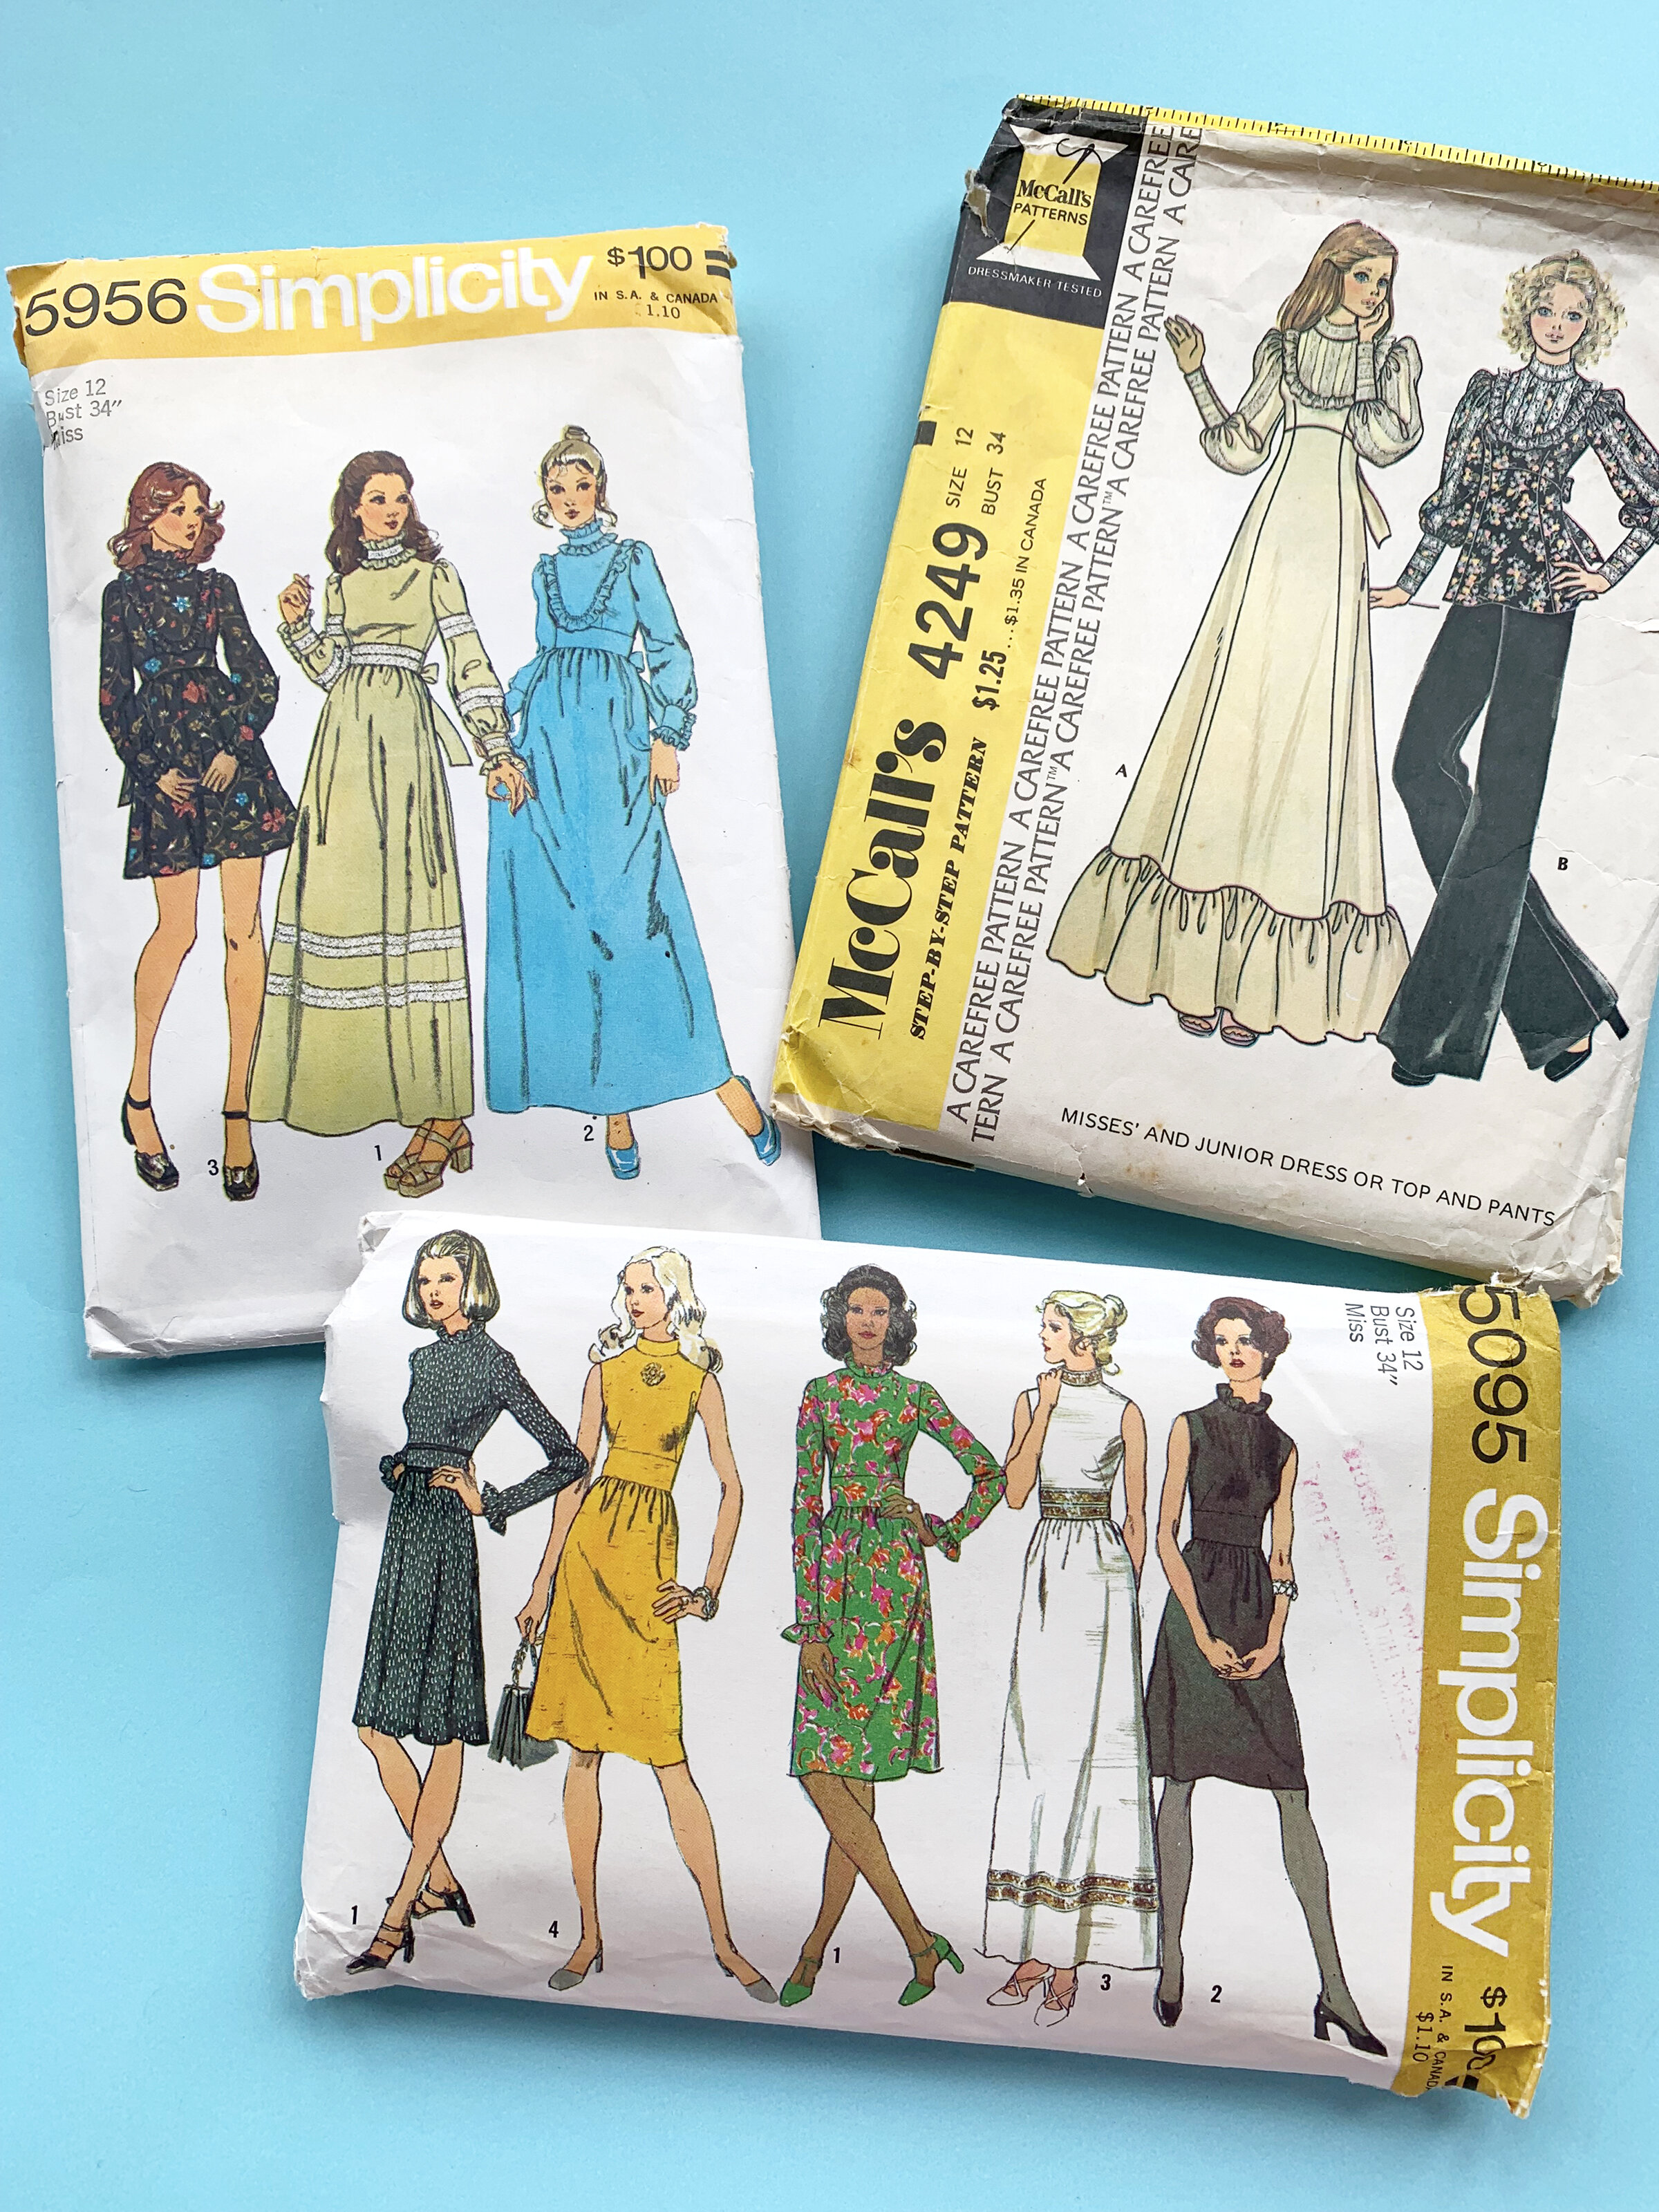
My selection of vintage patterns, all from the early 1970s.
My Aha! moment came when I was looking at McCall’s 4249, a 70s Victorian extravaganza. I wanted: lace insertion, a high neckline, and ruffles. But I didn’t want to use this pattern; I don’t love the sleeve, and anyway, McCall’s from this era require a lot of alterations to fit me (I think they are drafted for a shorter body with different proportions from mine). I made my first lace insertion project exactly a year ago, so I knew how to do it, but practice makes perfect. This project would have a lot of it.
For my pattern, I decided to stick to my beloved, tried & true Simplicity 5956, but with a narrow sleeve from Simplicity 5059. I walked the seam lines to determine that the sleeve would fit in the armscye with no issue (both patterns were definitely drafted on the same block). In 5956, the bodice ruffle is simply applied on, but that wouldn’t work for lace insertion. So I made two pattern pieces - one for what I’ll call the front yoke, where I could insert lace, and one for the bodice. I could then insert a ruffle into that seam.

Lace pinned into place.
I bought this Liberty Tana lawn here in Glasgow for £8/meter, at a shop that has sadly gone out of business. As much as I loved the bargains of the Remnant Kings sales, I will miss their shop much more! This was one of the fabrics I pulled out. Then, rummaging through my lace, it was clearly meant to be! I had two matching laces: 3 yards of pink crochet lace from Mood (purchased as an alternate option for this project), and 2.75 yards of delicate cream lace from East Coast Trimming (from their remnants basket). I wanted to use up every inch of both of them if possible.
Above, you can see how I pinned my lace in place. I started with the yoke. I pinned them in alternate stripes, about 3/8” apart. In today’s post, I will be showing you all the steps, however, if you want to see them in even more detail, check out my lace insertion tutorial. If you find this tutorial inspiring or helpful, please consider making a “tip” to my Kofi account. Any amount is greatly appreciated. Tips help offset the cost of materials used when creating my blog content, as well as helping keep this blog ad free.

The lace has been applied to the fabric here - it is sewn down, but if done properly, you can barely see the stitches.
Lace insertion requires concentration. You need to sew precisely, and consistently. You also MUST use fabric that will not fray or ravel at all, this is crucial. Liberty lawn is the ideal fabric for this kind of project for that reason. It will help you remain precise, because it won’t wiggle away or fray.
Above you can see the lace applied on top of the fabric. It is sewn down, but the stitches are difficult to see, which is just how you want it.

The back side of lace insertion.
Once your lace is sewn down, you get to the fun part: cutting away the fabric. You can see this more clearly in my lace insertion tutorial post from last year. You will clip away the fabric, press it open, and then top stitch with a narrow zig zag. Then you can trim your seam allowances. This is why you must use fabric that does not fray, the cut edge is left exposed. With my fabric, very little will change over time or with laundering, Liberty lawn is tightly woven and extremely stable.

Lace insertion!

The completed yoke, which is now mostly lace.
Once I finished the yoke, I realized I had more lace left to work with than I anticipated! So it was on to the sleeves. I have many full sleeves in my wardrobe, so I was excited to use a more slim one. The sleeve I chose has a dart at the elbow to follow the curve of your arm, what a nice touch! It also has a doubled over bias cut ruffle, which is so lovely, I will absolutely borrow that detail on other garments in the future.
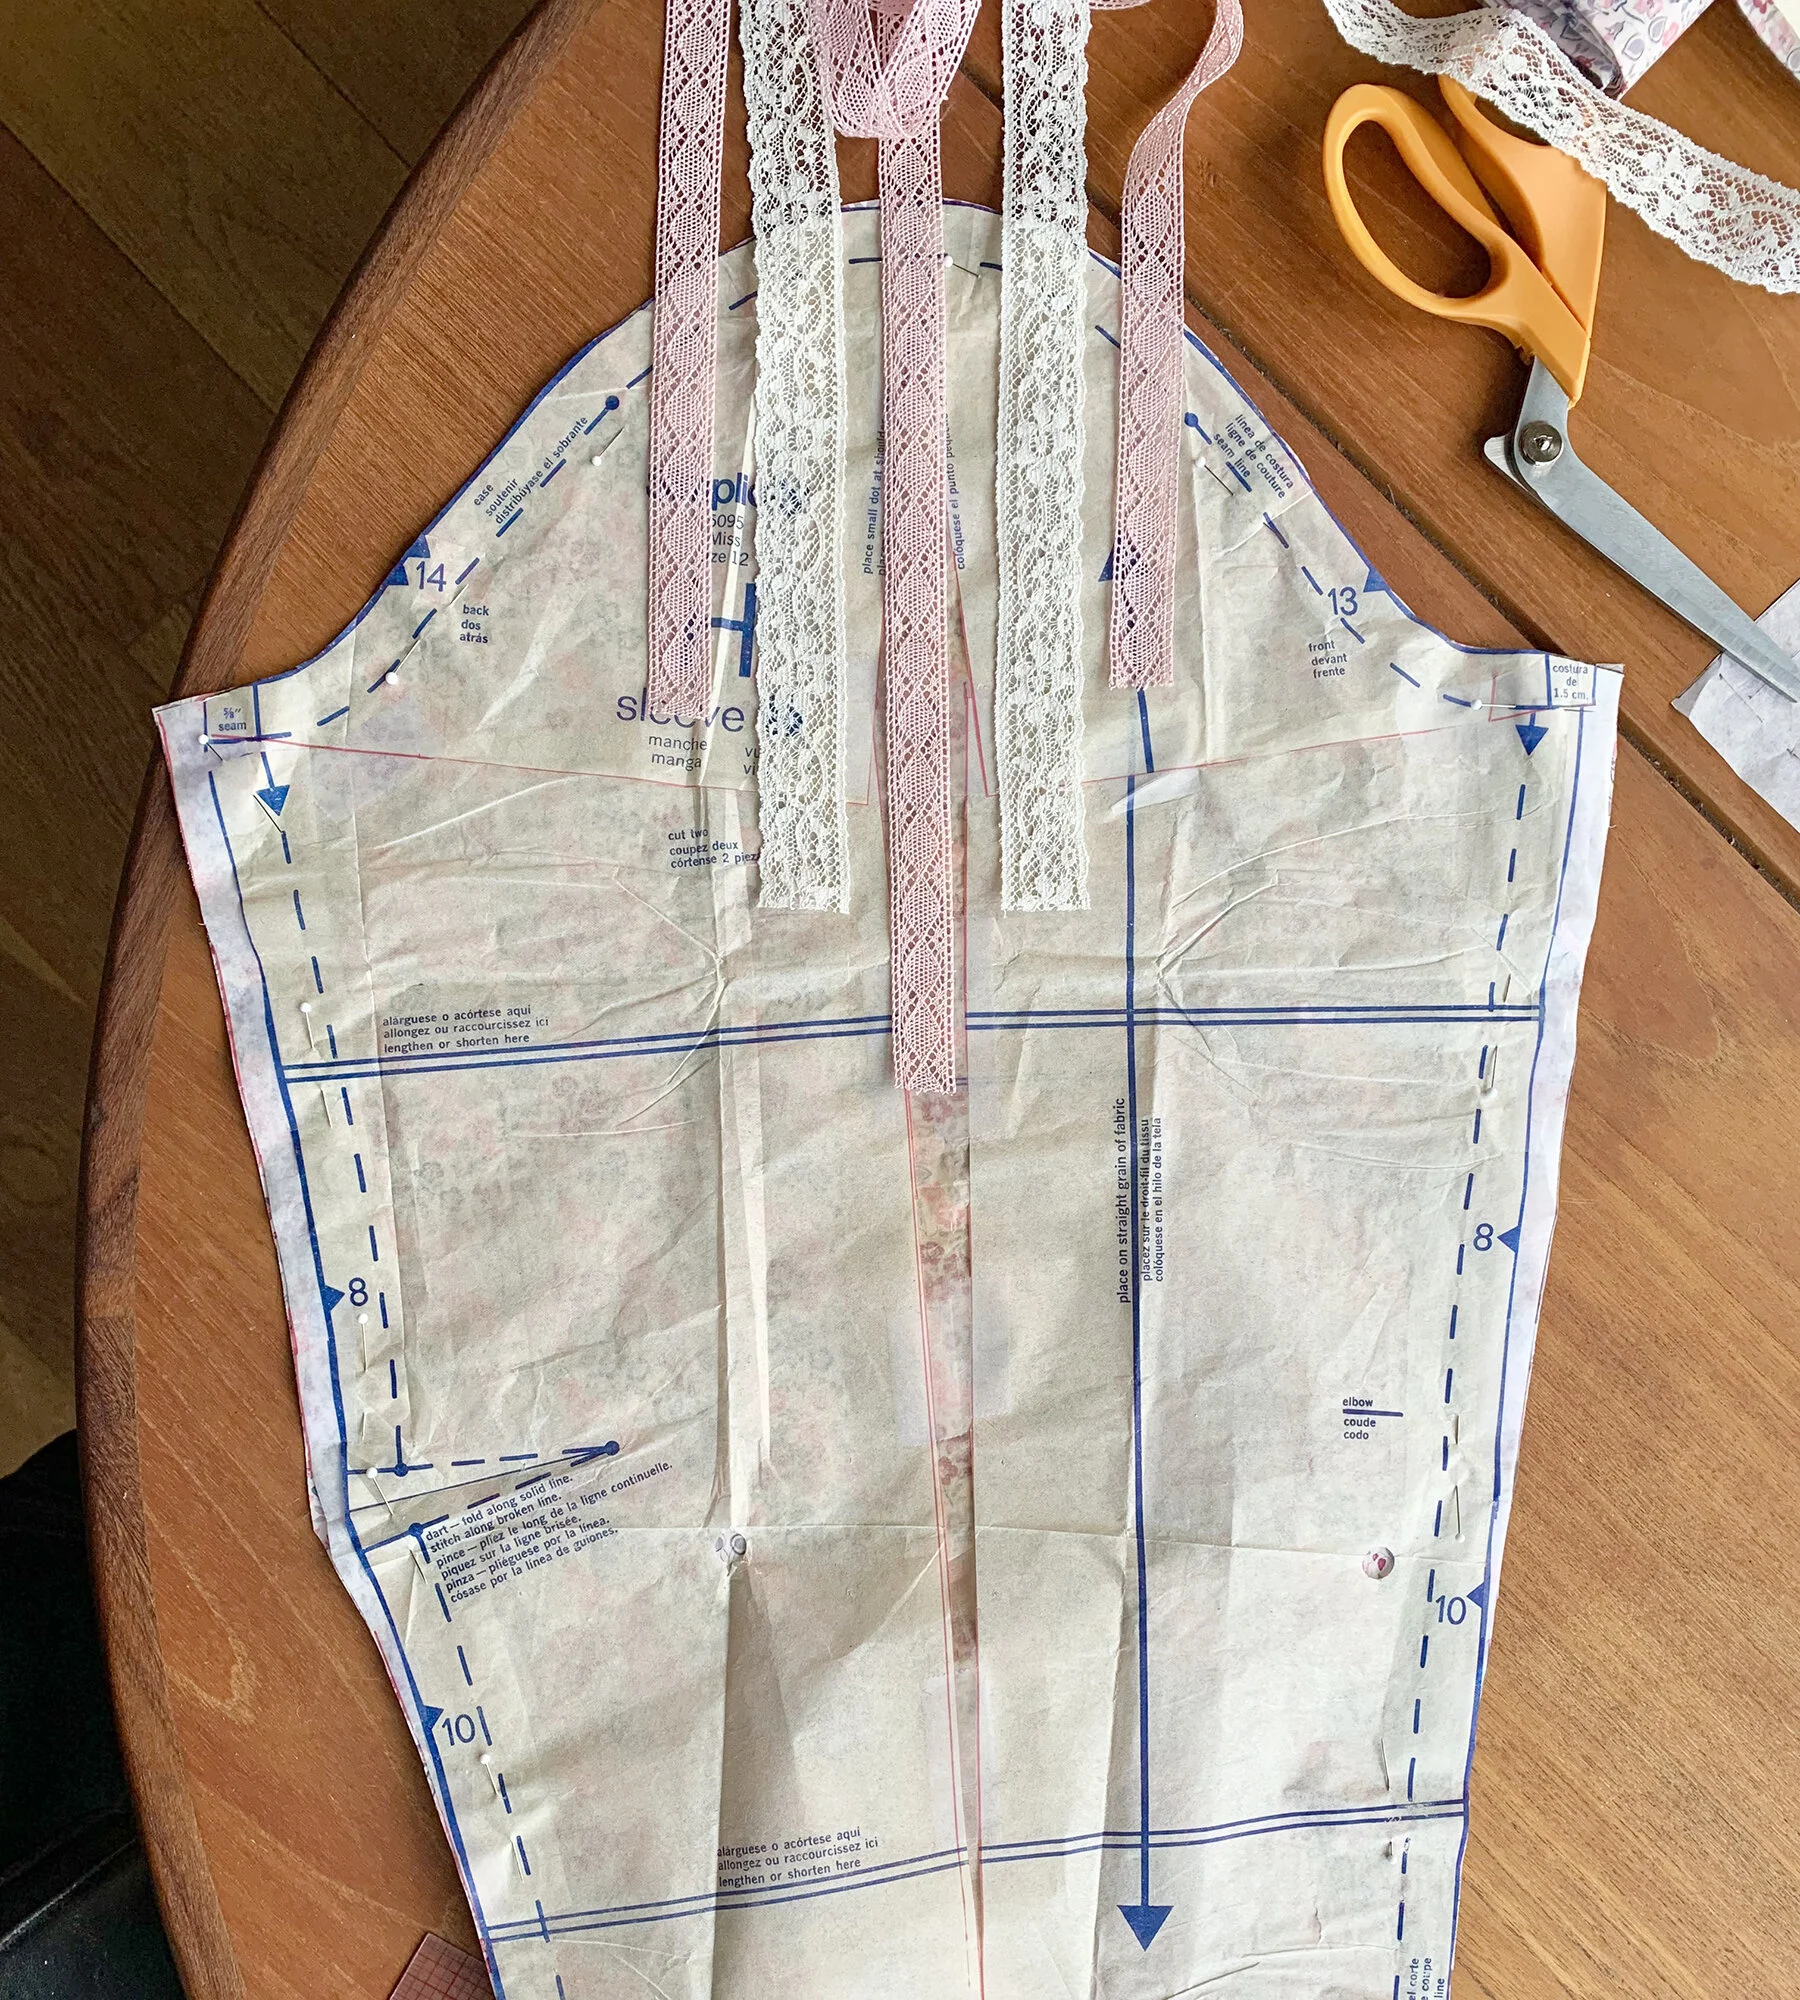
My sleeve pattern piece and preliminary lace placement. I gave this sleeve a 1” full bicep adjustment and added a scant 3/8” to the side seams above the elbow. The sleeve now fits well and has plenty of wearing ease.
After playing around with the lace for a bit, and a consultation with my friend Susan (who has also sewn lace insertion), I decided on the placement of the sleeve lace and got to work.

I am so happy with the lace on the sleeve! I think it elevates the whole dress to have lace insertion in two areas of the garment. After this, there was still a bit of lace left, mostly the cream one….. I decided to add it to the sleeve as a horizontal stripe near the cuff (it was almost the exact amount!).

A bit of lace near the cuffs, and the bias cut cuff ruffles.
At this point, I had two 3” long scraps of the pink lace remaining. Not bad! I thought I could use them to frame my label that I sew into clothes, but I didn’t like how it looked, and it seemed like it might be itchy or lumpy, so I moved on. I have kept them, I’m sure they’ll find their way into a project eventually.

The collar, with a baby hemmed ruffle and two rouleau button loops.
Since I was already being fussy, I decided to go all the way. I added two little bias cut rouleau button loops at the back neck, instead of the hook and eyes called for in the pattern. I hemmed the ruffle with my rolled hem foot as usual.

The yoke and bodice sewn together, with a ruffle inserted into the seam.
Sewing the yoke to the bodice was tricky! Ugh. That was a really difficult curve to sew without any puckers, and adding a ruffle into the mix only complicated things. But I got it done, and it looks just like I envisioned. I love the sheer panel at the bust, to offset the modesty of such a high neckline.
Now that all the lace insertion is complete, and the front bodice is put together, I can assemble the dress. Construction is my favorite part of sewing! Since I know this pattern fits me well, it was a pleasure to just put the pieces together without worrying about any fitting tweaks. I’ll pick up here on my next post - I’ll show you the interior finishing, some more details, and of course, the finished dress. XO, Martha