GALAXY JACKET - Part 2: Devil in the Details

Galaxy on the outside, purple on the inside.
In my last post, I went through my planning process for this jacket. “Planning” is a little loose here, because I kept running into small, irritating hiccups, but I also kept rolling with it. Fabric dictates a lot, and I have learned the hard way that it’s best not to fight it (too much).
I struggled a bit with the pockets, but once I got them attached to the jacket front, I knew things would start coming together quickly. Phew! I was ready to begin construction. Let’s look at some of the details that make this jacket an absolute pleasure to wear.

First of all, check out these pockets! I love the lack of top stitching. I won’t lie, the pockets are a bit bulky. But I find it less noticeable when I’m wearing the jacket than I did when I was sewing it. I like to put my phone and wallet in the top open patch pockets, and then the side open pockets are free for my hands. It’s quite nice! I don’t usually need a purse, because everything fits in all my pockets.

I mentioned in my last post that I realized I must reduce bulk wherever possible, which gave me an excuse to dye some corduroy to match my violet lining. In terms of bulk, this was absolutely necessary, I wouldn’t have even been able to get the work under my machine’s foot without doing this. I think it looks great too. I am a little concerned that the cotton corduroy will lose its shape over time…I’m not sure why, it just makes me a little nervous. It’s much thinner than the wool. But I’ll deal with that if and when it happens, I guess.
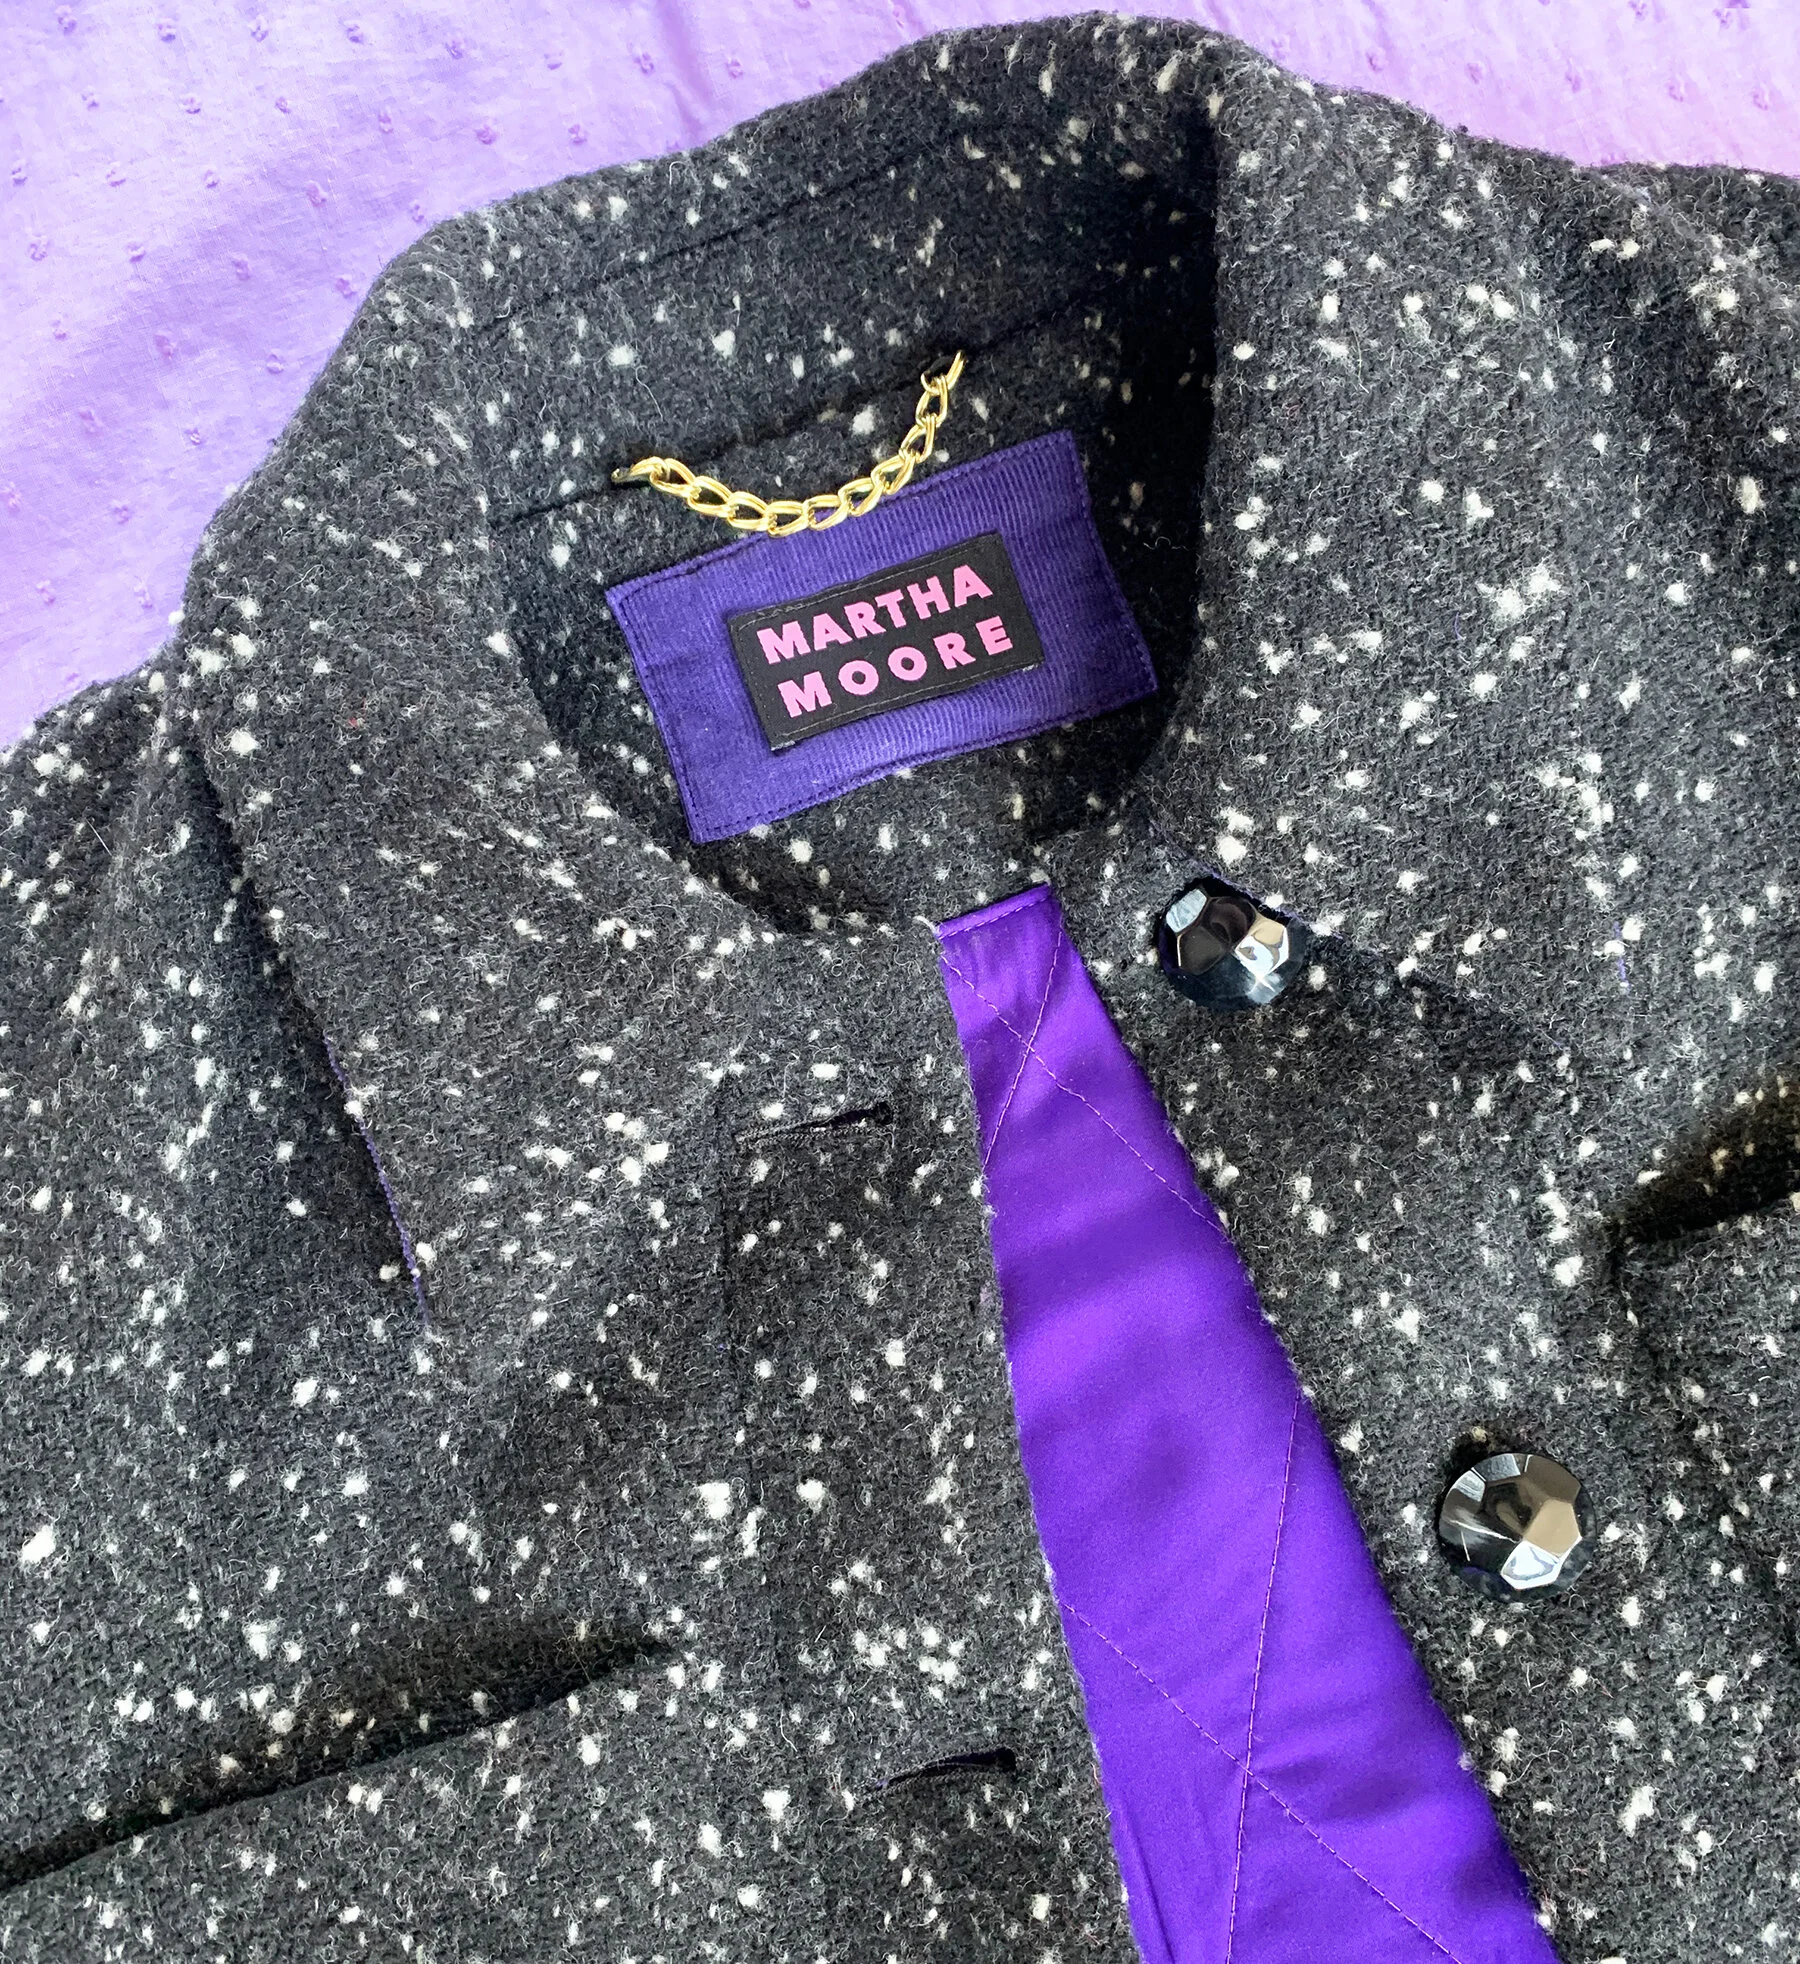
I wanted to use my dyed corduroy in at least one other location to make it clear that using it was a deliberate design choice. It looks just right on the back neck facing, backing my label. I always add a chain to the back neck of my wool coats, both so I can easily hang them on a hook, and because it looks luxe. If you are familiar with my jewelry, then you’ll recognize it is the signature Buried Diamond chunky charm chain!

I considered using corduroy as the inside of my cuffs as well, but ultimately decided to leave them as I originally drafted them. This way, there’s no seam allowance at the folded edge (better for buttonholes). I hand sewed the interior seam to avoid problems and for a clean finish.
When attaching my wool shell and my lining at the slit in the sleeve, I positioned everything as you would when bagging a lining. I sewed them together at the slit, then under stitched, and finally attached the cuff.

The Isabel Marant jacket that inspired me has a lining that hangs separately from the jacket shell. I prefer my coats to be completely sealed - I don’t want to be able to look inside and see interfacing, or the white flannel quilted to the back of my luminous violet rayon/silk lining. So I opted to draft myself a curvy hem facing that encloses the edge of my lining.
Once again to reduce bulk, I Hong Kong finished the cut edge of the facing. The edge is wrapped in bias cut strips of lining. I then used stitch in the ditch to seal everything up. It looks super clean, and lays nice and flat.
Before sealing everything up, I added sleeve heads, which give the sleeve a nice bit of shape. I initially added shoulder pads as well, because I have narrow, sloping shoulders, and they help me look a bit more “sharp”. But they also looked a little …vintage? I guess. So, I removed the shoulder pads, but kept the sleeve heads.

Here you can see that I had the same approach on the front facing, which is a simple fold over facing. I’m so glad I went with foldover, which creates the flattest surface for buttonholes.
To create some wearing ease for myself, I made the lining 1/2” longer than the shell, and just eased it in towards the hem. Usually lining has that pleat at the bottom, but because my lining is quilted, that seemed bulky, and anyway I’m not sure how I would have navigated that in relation to such dramatically curved hem. Having worn this a bunch of times, it feels good, so I think it’s gonna work out fine. I hand stitched the lining to the shell at the shoulder seams, and made some thread chains attaching the two at the bottom of the armscye, so everything stays in place.
Oh, and btw, I still have not finished the hand sewing in the jacket - at the corner there where the facings meet. It’s fine! I’ll get to it eventually.

Speaking of buttonholes, gotta get buttons first! I love buying buttons. I found these at Pacific Trimming and it was love at first sight. No other button could compare. I like that they feel substantial, have a galaxyish swirl, and the faceted look is a bit feminine, in contrast to the more masculine tweed. Buttons in my pocket, I was ready for buttonholes.
Oh, and there was no way in hell I’d bother attempting these sewing these buttonholes myself. My sewing machine makes beautiful buttonholes - on fabrics it can handle. But I showed you the thread nests caused when I sewed too many layers of this wool in the last post. I wasn’t going to risk that kind of result.

So I headed to Jonathan Embroidery in Midtown. Jonathan is an amazing place, with a bunch of industrial machines that only make buttonholes. The machines sew the buttonhole and cut it open in one fell swoop. It can feel scary to hand over your project to the women who run the machines, but they do beautiful work. They are true pros.
Due to Covid, the shop functions a bit differently these days. As always, you will want to have your buttonhole placements marked (I used tailors tacks, because chalk just looks like it belongs on this fabric). I brought in my jacket with tailors tacks, a scrap of fabric with the same interfacing as the area getting buttonholes (for them to practice on), and my buttons (I had one size smaller buttons for my cuffs). The shop has a table set up, which you cannot go past; customers wait on one side, the machines and sewers are on the other side. In Before Times, you could go stand right next to the buttonhole machines, but now, you place your work on the table, and tell the sewers what you want. I requested keyhole buttonholes. In about 5 minutes, my buttonholes were perfectly executed, and I was charged $7 (it costs $1 per buttonhole).
Personally, I have always had a positive experience at Jonathan. I don’t go often, but when my “good” machine is in the shop, or if I have a difficult fabric, I have them do my buttonholes. The buttonholes are PROFESSIONAL and you can’t argue with the price. But I’d be remiss if I didn’t mention that the woman who runs the shop was not wearing a mask. At all. She has a plexiglass partition up by the cash wrap, but she walks around the whole shop, and the partition is just one surface, not a cube or something. Several other customers removed their masks to speak; there was no enforcement of mask wearing or social distancing. I was in and out quickly, however I won’t feel comfortable going back, especially considering Covid is spiking right now.

I left the shop quickly with my coat in a bag, and walked a few blocks to Broadway, where the street is blocked off to traffic so people can walk with more space around them. I pulled out my jacket and felt a woosh of excitement and relief that the buttonholes were perfect.
Lemme tell ya. As I mentioned in my previous post, I didn’t really enjoy myself while sewing this project. There were so many tasks to complete, and I felt clumsy a lot of the time. It was something about the fabric, and it’s been a year since I’ve sewn a coat, and I could feel myself being out of practice with it. I was also in the midst of getting some uncomfortable dental work and always had a headache. But as I sealed up the hem facings, and hand sewed on my big shiny buttons, I started seeing an actual jacket. The sum is greater than the parts, and I had just been in the weeds. I warmed up to this jacket quickly! Up next, I’ll show you the completed project, hope you love it as much as I do! XO, Martha