OVER DYEING A PRINT: HOW TO DYE A PRINT TO BE ANY COLOR USING RIT DYE

Have you ever found *the perfect fabric* but it wasn’t the right color? I bet you knew you could dye it. But what if it was a print, or a stripe, or a woven plaid? Then what? Surprise: you can still dye it!
This is one of my favorite tricks with printed or patterned fabric. This post is sponsored by Rit Dye, and I’ll be using Rit All Purpose Dye to show you how I over dye printed fabric.
It is easiest to imagine dyeing a print on a white colored ground, because you know that the white will take the dye in a clean way, and you can play around with how much contrast is in the print. So let’s start there. (But I'll be showing you what some multi-colored prints look like when dyed, too.)

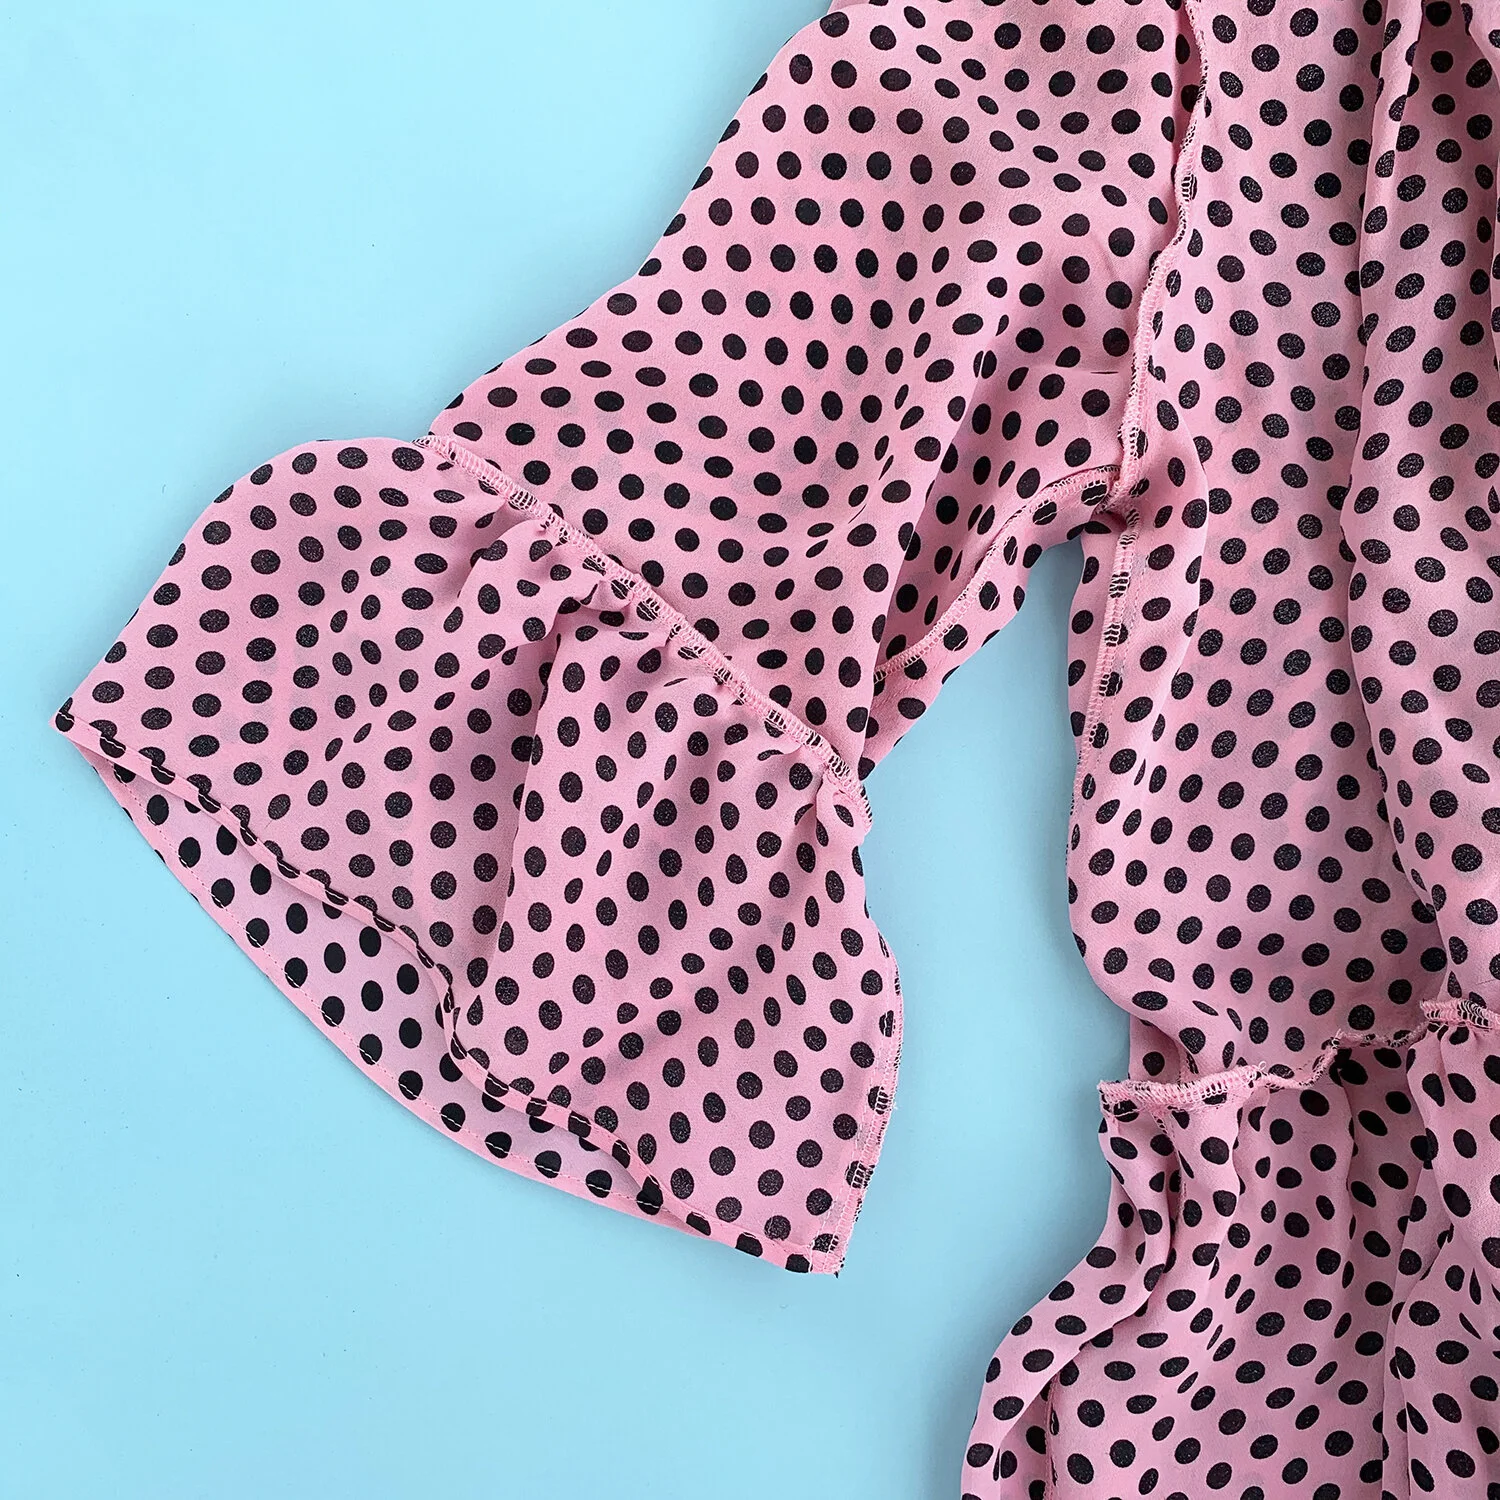
For this project, I started with a printed fabric on an optic white ground. I love the classic polka dot, but it’s just too high contrast for the kind of soft dress I’d like to make with this fabric. So I am going to dye it a lovely candy pink.
By the way, everything in this post can be applied to a garment you have already sewn up, or a garment you purchased. Just check the fiber content before you begin; if you wish to use Rit All Purpose Dye, you will want a natural fiber content such as cotton, linen, wool, or silk. If your fabric contains 35% or more of synthetic fibers such as polyester, acrylic, or acetate, use Rit DyeMore.

Make sure you wet your fabric thoroughly. I either dye fabric straight from the washing machine, or I soak fabric for an hour or so before I begin.
Gather your materials for a successful dye job:
Rit Dye. If you’re interested in mixing your own custom color, you can read more about how I did that here.
Plastic tablecloth or drop cloth to cover and protect your workspace from stains.
Rubber Gloves.
Tongs or easy-to-clean metal or plastic mixing spoons.
Measuring cups or spoons.
A container for dyeing. You can use a pot that you do not use to cook food, a large plastic tub or bin, or dye directly in a stainless steel sink.
Fabric. When using Rit All Purpose Dye, use natural fibers such as cotton, linen, silk, and wool. If your fabric has a fiber content of 35% or more of polyester, acrylic, or acetate, then use Rit Dyemore dye, which is designed for synthetic fibers.
Salt or vinegar (optional). Salt helps push dye into cotton, linen, rayon, and ramie fibers, and can help give you a brighter, richer color. It is most helpful when creating deep, darker colors. For silk, wool, and other protein fibers, add vinegar instead of salt, for the same effect.
Dish soap (optional). Soap helps promote even dyeing by opening up the fibers in your fabric.

I dyed this project in my sink. My tap water gets extremely hot. If that is not the case for you, I recommend dyeing in a pot on the stove so you can get your water hot enough.
Let’s get started:
Cover your workspace with plastic to protect from spills and stains.
Wet fabric thoroughly. You can soak it in water until fully saturated and squeeze it out, or use it fresh out of the washing machine and still damp. Set aside.
Shake your dye bottle well and measure out the quantity you will be using.
Fill your dye pot with hot water (ideally 140ºF, You can also use a large pot on the stove if you need to add heat); add salt and/or soap if using.
Wearing gloves, add dye and stir until evenly distributed in the water.
Open up your wet fabric (it should not be folded or tightly crumpled) and add it to the dye bath. Stir and agitate for the first 10 minutes, and then leave in dye bath, checking occasionally until desired color is achieved. Be sure to stir and mix your fabric, especially for the first 10 minutes - leaving it sitting still in the dye bath can lead to splotchy results. The color will appear darker when wet and will dry lighter. Because my goal is lighter shades, the fabric does not need to be in the dye bath for very long; usually 10-15 minutes is enough.
When fabric is the desired color, pull it out of the dye bath. Wearing gloves, squeeze out as much dye and water as possible. Rinse your fabric under running water or in another container of fresh water, until water runs clear (dye has stopped coming out of the fabric).
At this point, you can use Rit Color Stay Dye Fixative or you can proceed to washing and drying your fabric. As the name suggests, ColorStay Dye Fixative helps lock the color into your fabric, preventing color from fading or bleeding onto white fabrics. I have washed my fabric in the machine and added fabric softener to the dryer.

After dyeing my fabric, I sewed it up into an easy breezey dress using McCall’s 7948.
I dyed 3 yards of silk georgette fabric, which was 58” wide (an ideal amount for sewing a dress, btw). This is a lightweight fabric that absorbs dye quickly. I used one 1/2 bottle of Petal Pink Rit All Purpose Dye. Keep an eye on your fabric while it is in the dye bath, making sure to stir and agitate it for the first 10 minutes, and then checking on it occasionally until the desired color is achieved.

There are benefits to dyeing your fabric before you sew a garment. Here you can see that I was able to match my thread color exactly to the ground color of my print. If you are sewing a garment that you think you will dye later, consider using silk thread, as polyester thread will not take the dye (I prefer polyester thread as it is the strongest option and tends to create the least amount of lint in my sewing machine). Alternatively, white topstitching on an overdyed garment could be a design element.
On the left you can see the inside of the neckline. The slit is faced, and the facing has interfacing (what a weird sentence). I used silk organza as interfacing, and you can see it peeking out if you look closely. If I did it again, I’d add some organza to my dye bath, so my interfacing would be a perfect color match! Please note, this only works with a sew-in interfacing such as organza; if you are using fusible interfacing, don’t dye it, as the heat of the dye bath will melt all the glue.

Another benefit of dyeing your fabric before you sew a garment is that you can test out a few colors on scraps before commiting to dyeing the whole garment. If you ever sew a dress that you think you may want to dye in the future, save a few scraps for these tests!
When dyeing over a print or even a solid color, basic color rules apply: You can dye your fabric a darker color, but not a lighter color. Colors will mix just like paints, for example, Blue + Yellow = Green. Analogous colors (colors next to each other on the color wheel - think blue and violet as shown here) will give more vibrant and predictable dyeing results, while complimentary colors (colors opposite each other on the color wheel - think red and green) may become muddy or murky.
Here I dyed 3 shades of Petal Pink - I acheived the slightly darker shades of pink just by leaving the fabric in the dye bath for longer - this was 10 minutes, 15 minutes, and just shy of 25 minutes in the same dye bath. For the violet shades, I started with the middle shade of pink, and then dyed them further. I tested by overdyeing with Rit Purple, equal parts Rit Purple and Rit Aquamarine, and Rit Aquamarine. Ultimately, I’m really happy with the Petal Pink! But I know what my dress would look like if I wanted to keep going and dye it a darker shade.
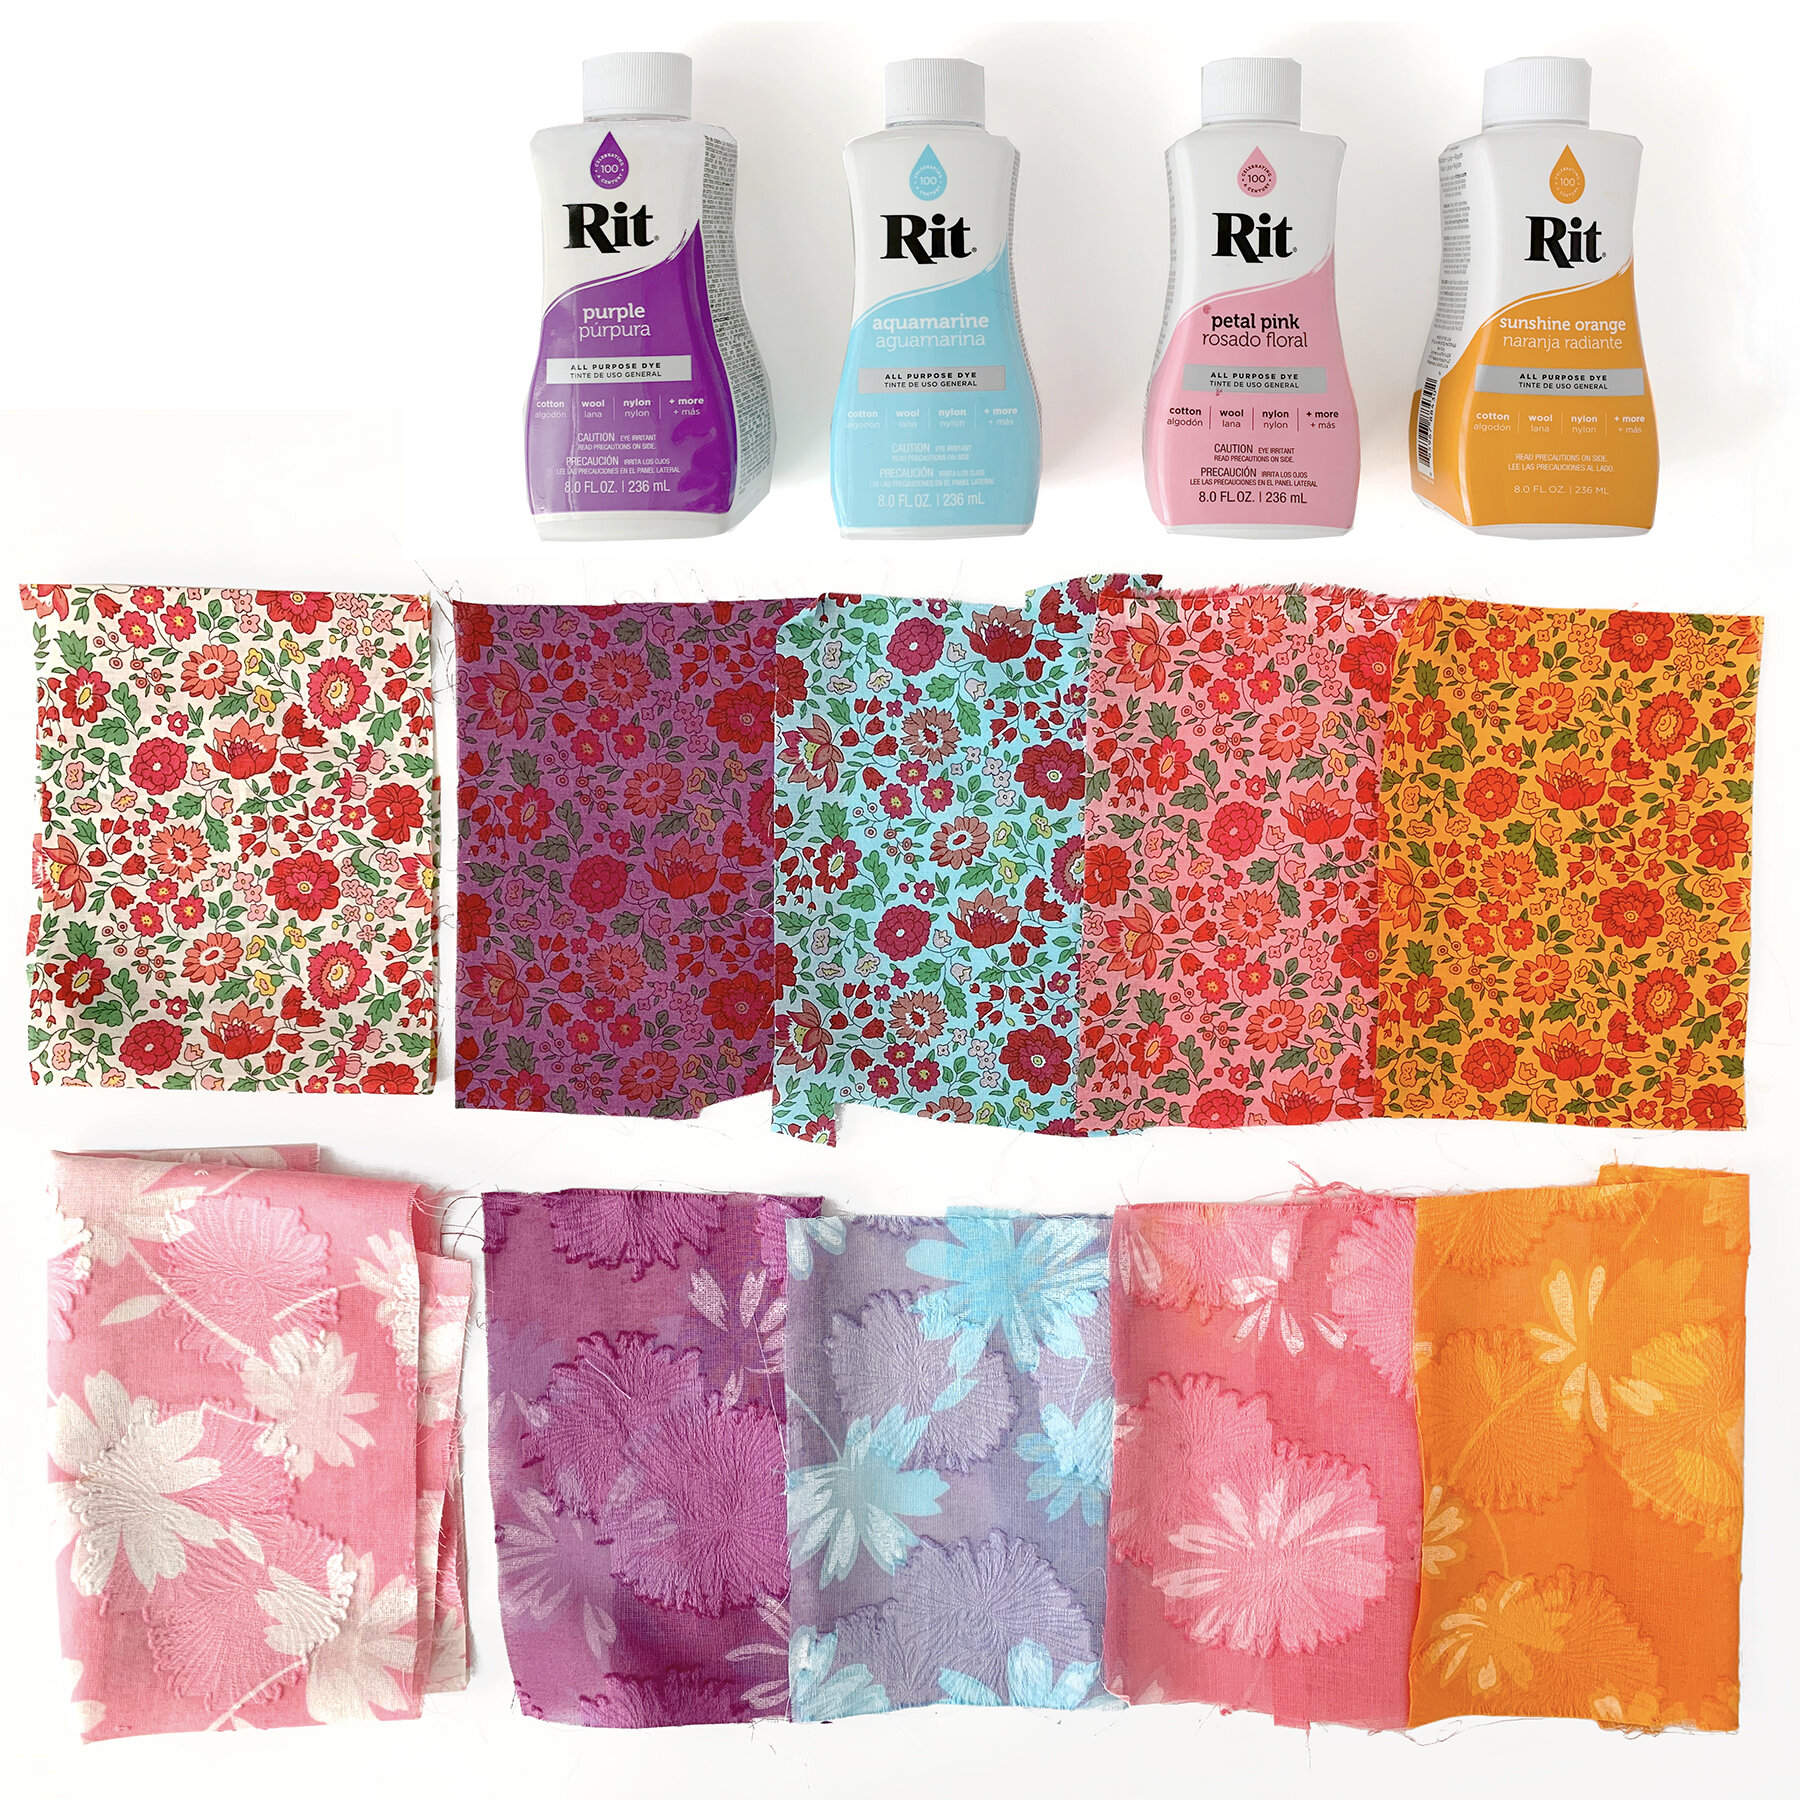
The swatches on the far left are the original fabrics. I dyed both fabrics in the same dye bath, so you can see how they reacted slightly differently to each color.
So what happens if you dye a print with more colors in it? I was curious, too, so I made some tests. Here you can see both Liberty Tana cotton lawn and a Japanese cotton that has a chalky white pigment as one of the print colors. Both of these fabrics took the dye color quickly and beautifully. I love how the dye unifies the prints, and softens the contrast in both examples.
It’s pretty safe to say that I am on a dyeing streak. Overdyeing prints with Rit opens up so many possibilities for customization, and I love anything that allows me to make more special and unique creations. I’m always dreaming up new creations, so there will likely be more dyed fabric in my future. How about yours? XO, Martha