PURPLE PAJAMA PERFECTION: CLOSET CORE PATTERNS CAROLYN PAJAMAS

Wanna know what’s been on my Sewing To Do list since 2018? Pajamas. In my own defense, I do not sleep in pajamas most of the time, and I have sewn myself two sets of pajamas since then. Unfortunately, I was having trouble a finding PJs pattern that I found comfortable: one set I made had tapered leg pants that twisted around my legs; the other set had a button up top with a cut-on dolman sleeve that I simple couldn’t stand. So maybe three times is the charm!! Enter: Closet Core Patterns Carolyn Pajamas.

If you have thought about sewing pajamas, I bet you’ve seen this pattern around. It has 44 reviews on Pattern Review and over 1000 entries to the #carolynpajamas hashtag on Instagram. It has the classic fit and contrast piping that make it a standout. I’m here to confirm: the hype is real. The top is the star. The drafting of the facing is cleverly constructed (maybe a little tricky to sew the first time around), resulting in a super clean garment interior.

I decided to make a muslin, figuring I could use up a large cut of fabric from my stash and give myself the gift of warm PJs once fall rolls around (it is currently 90ºF here in Brooklyn). I used this Rifle Paper Co. (quilting) cotton that has been in my stash for years. I don’t remember buying this, but I know I bought it because it reminds me so much of my Grandmother. I made my own piping with scraps of Liberty Tana lawn leftover from a nightgown dress (that I still need to blog about, yikes).
I wanted to make this project easy for myself, so decided I would not make my usual flat pattern modifications (such as: narrow shoulder adjustment, lengthening bodice, etc.). Pajama patterns usually have an easy fit, so I expected it to be somewhat forgiving. Based on measurements, I selected size 10 on top (my full bust is 36), and graded to 12 at the hip. The fit of the top is great! Not too loose, not too fitted. Ideal for pajamas. I do not think any adjustments are needed for future versions.
For the bottoms, my hip measurement puts me at size 16 (44”), but I read reviews saying the bottoms were close fitting for PJ pants, so I sized up to 18. My thoughts here are…I could definitely make a 16 and be comfortable, but the 18 has the amount of ease I’d look for if i were buying RTW sleepwear. My envelope goes up to size 20 (48” hip), and I have to say, that doesn’t feel like an inclusive size range to me. I haven’t written about size inclusivity in patterns before, and realized I have a lot to say! So I might save that for a dedicated blog post (and I’ll add a gentle reminder that RTW numerical sizing and sewing pattern sizing, have pretty much nothing in common). I read that Closet Core is expanding the size range on this pattern, and I’m happy to hear it. Everyone should be able to sew themselves some fancy pajamas!
Ok, I felt confident about the fit and enjoyed sewing my (very wearable) muslin. So let’s talk about the Purple Pajamz! As always, I started with the fabric. I have a full bolt of white linen I purchased from Fabric Mart, because you know I love to dye my own colors. It’s a pretty lightweight linen…I’m not sure if it’s handkerchief weight, but something like that. It’s ideal for the kinds of garments I like to sew.
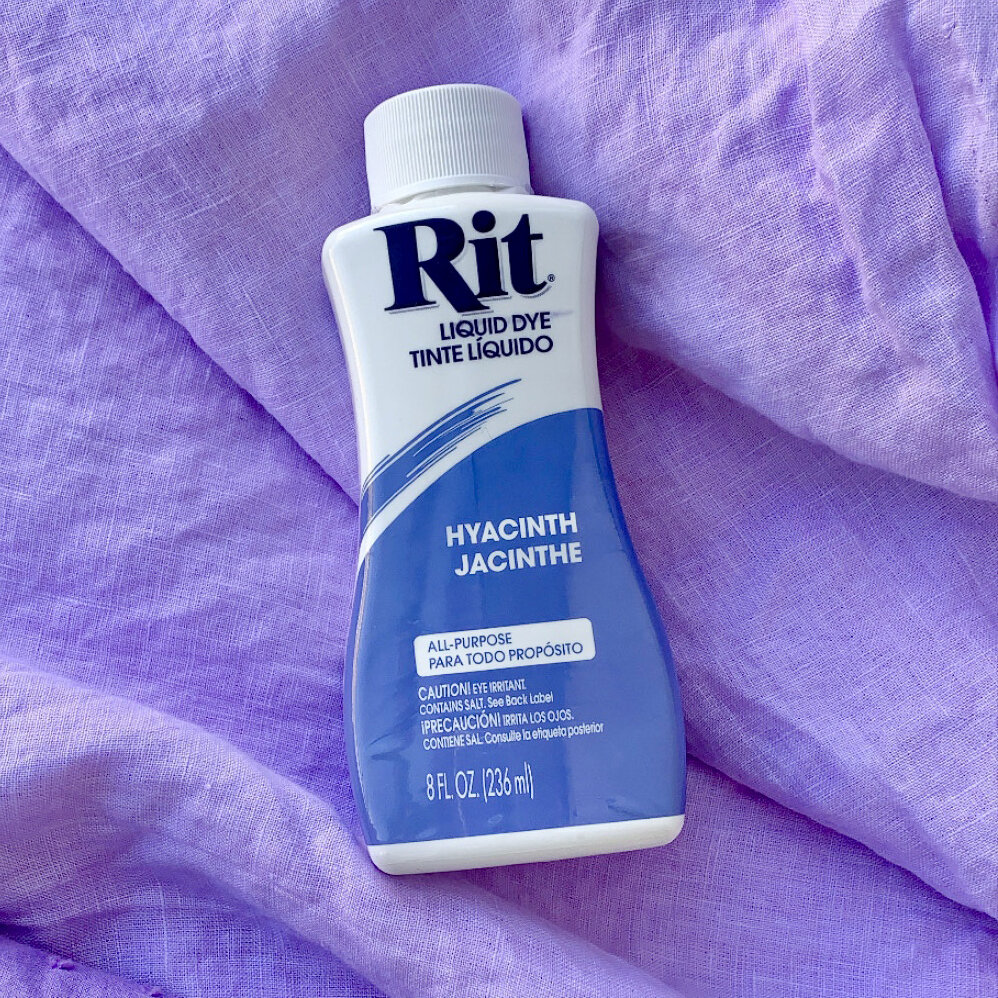
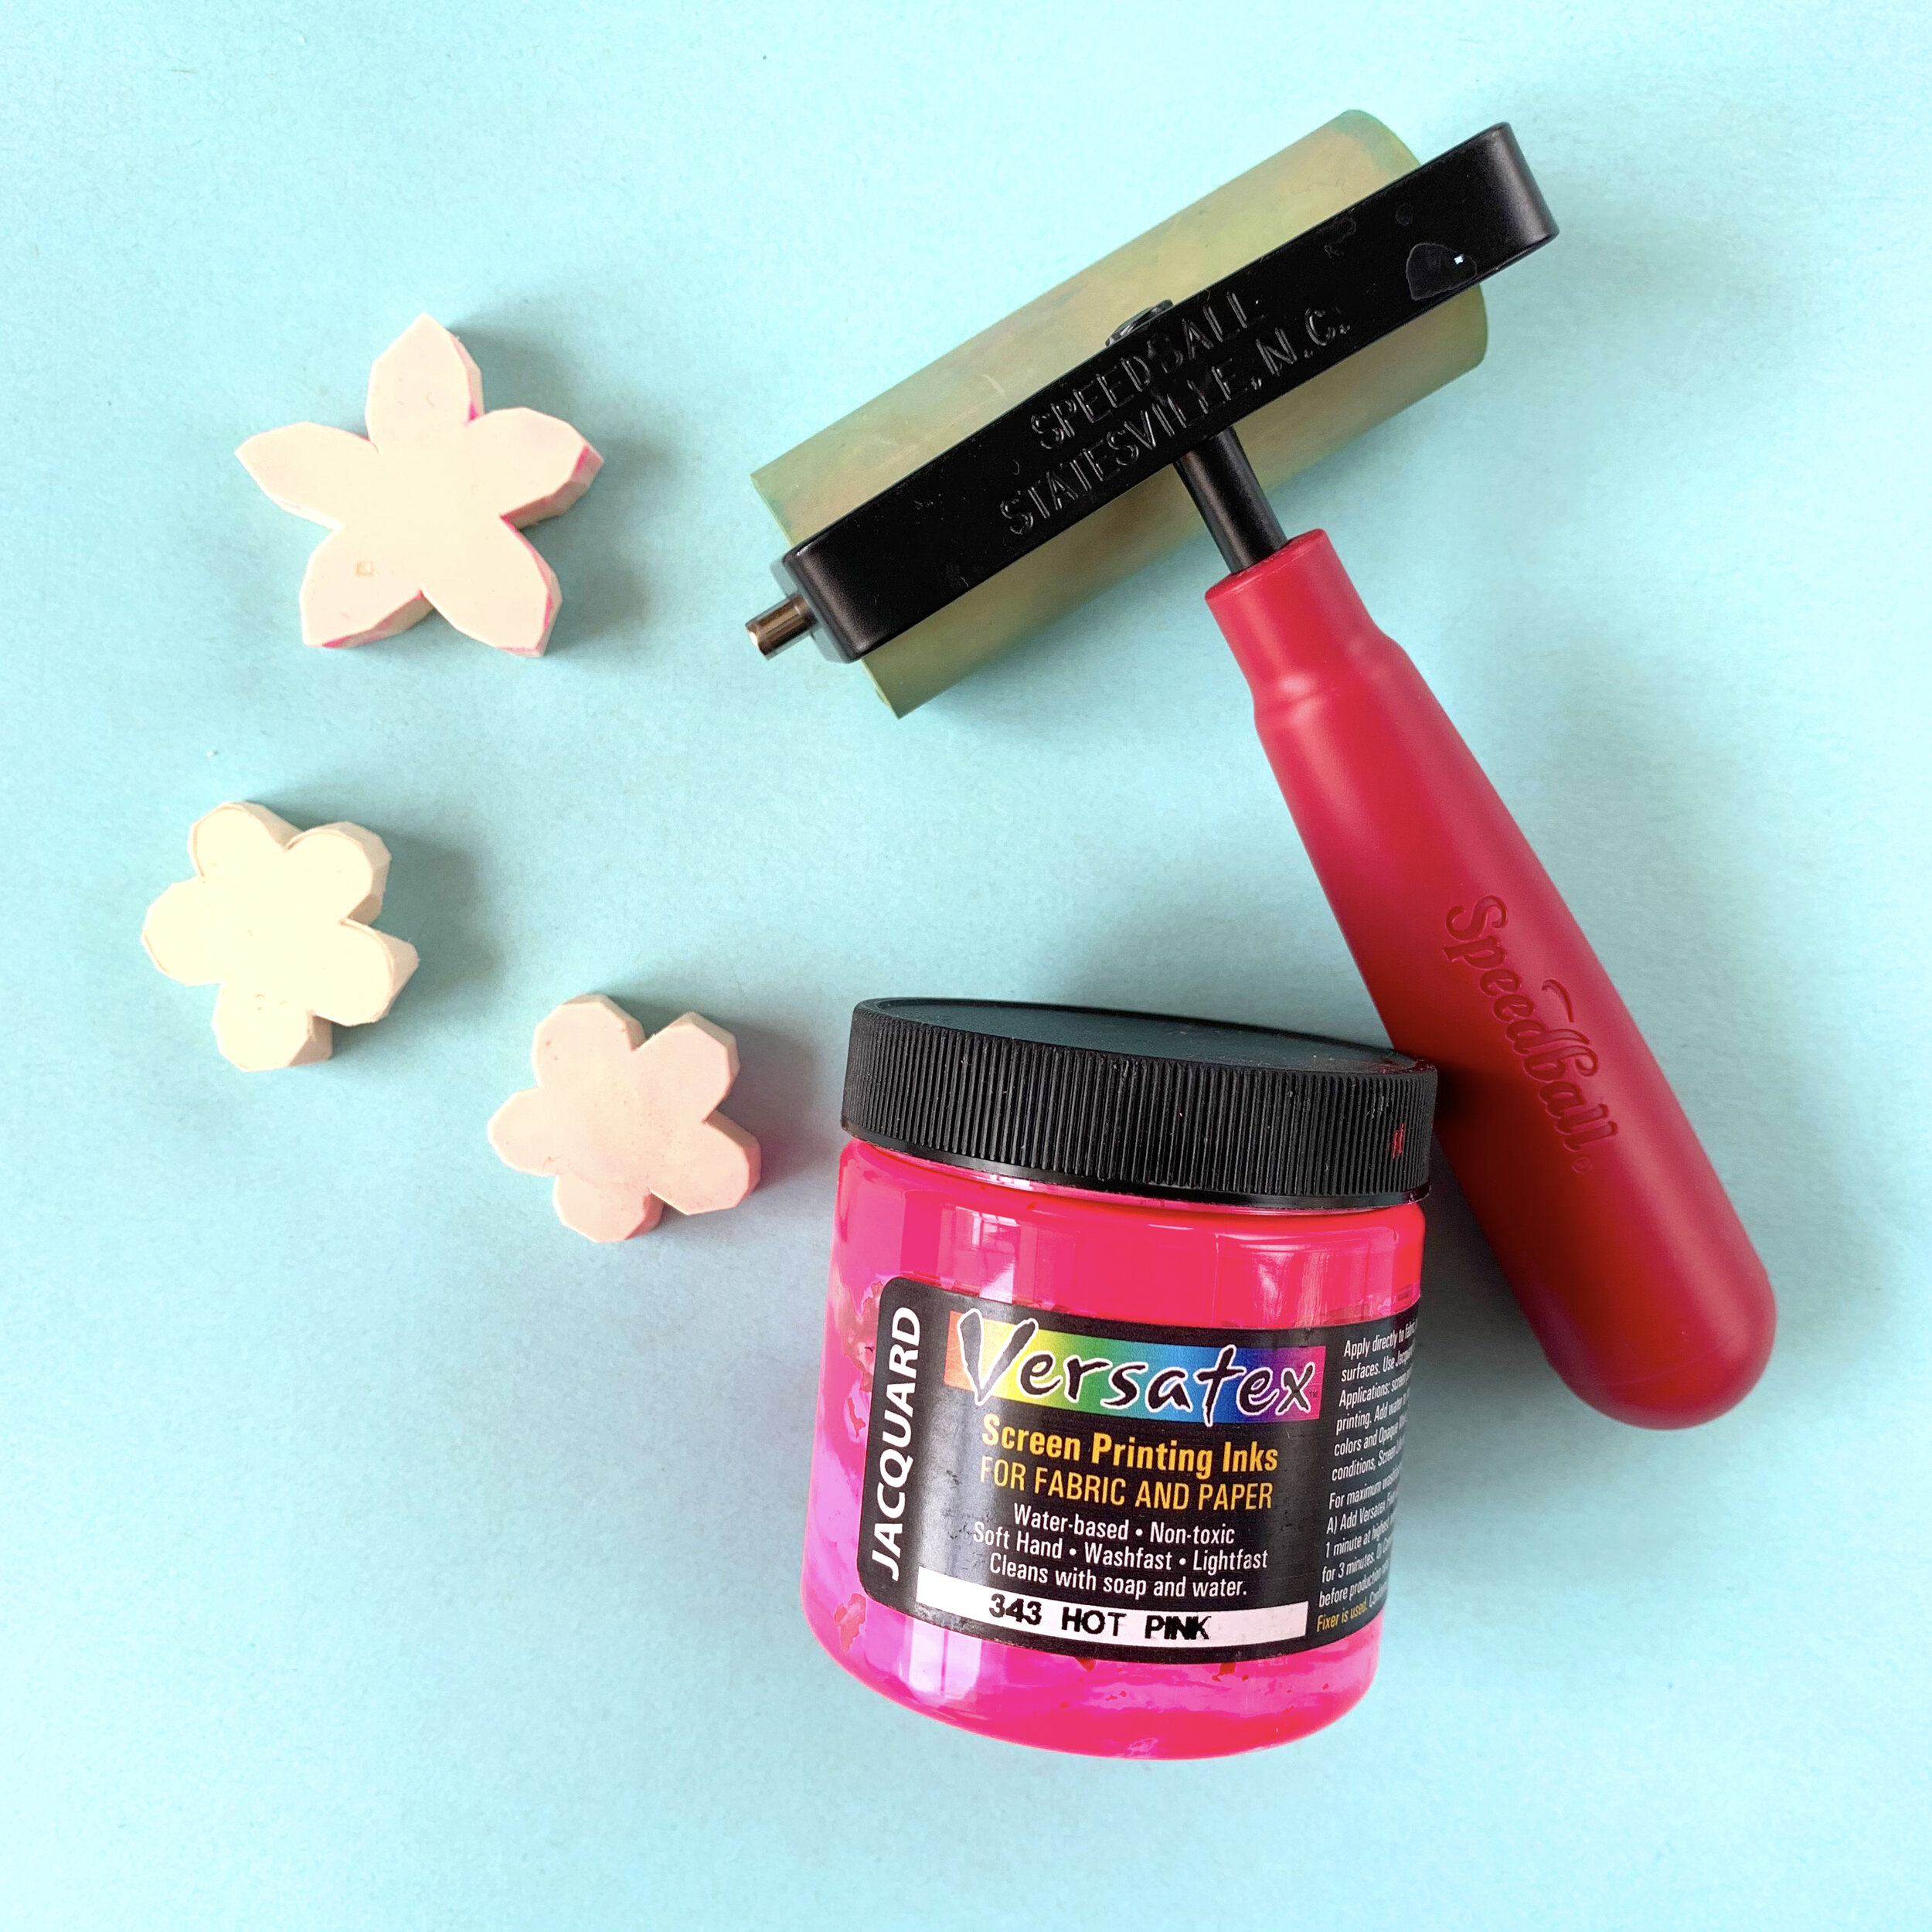
I dyed this fabric with Rit All-Purpose dye in Hyacinth. This color! Is! Gorgeous! I will be using it again, taking it to a darker shade next time. For more info & tips on dyeing, check out my post all about it. After dyeing the fabric, I pressed it well, and did some simple block printing. I used Jaquard Products fabric screen printing ink - I have used this ink for screen printing quite a bit, and I love the product. It works great for block printing, and softens up with washing. I mixed myself several shades of pink to use across my yardage.

I know some people don’t care if their serger threads match their fabrics, but I do. I care deeply. Which is why I have 4 spools of multiple shades of pink thread on had at all times, including neon. I also had a matching shade of purple thread, but because I chose not to use piping, contrast top stitching seemed like a great plan. I love how the button holes came out!
I used Mother of Pearl shell buttons from Pacific Trimming. I have used this shape, which is available in a few sizes, on a number of other projects. I love how the flower silhouette echos the print, and matches other items in my wardrobe.
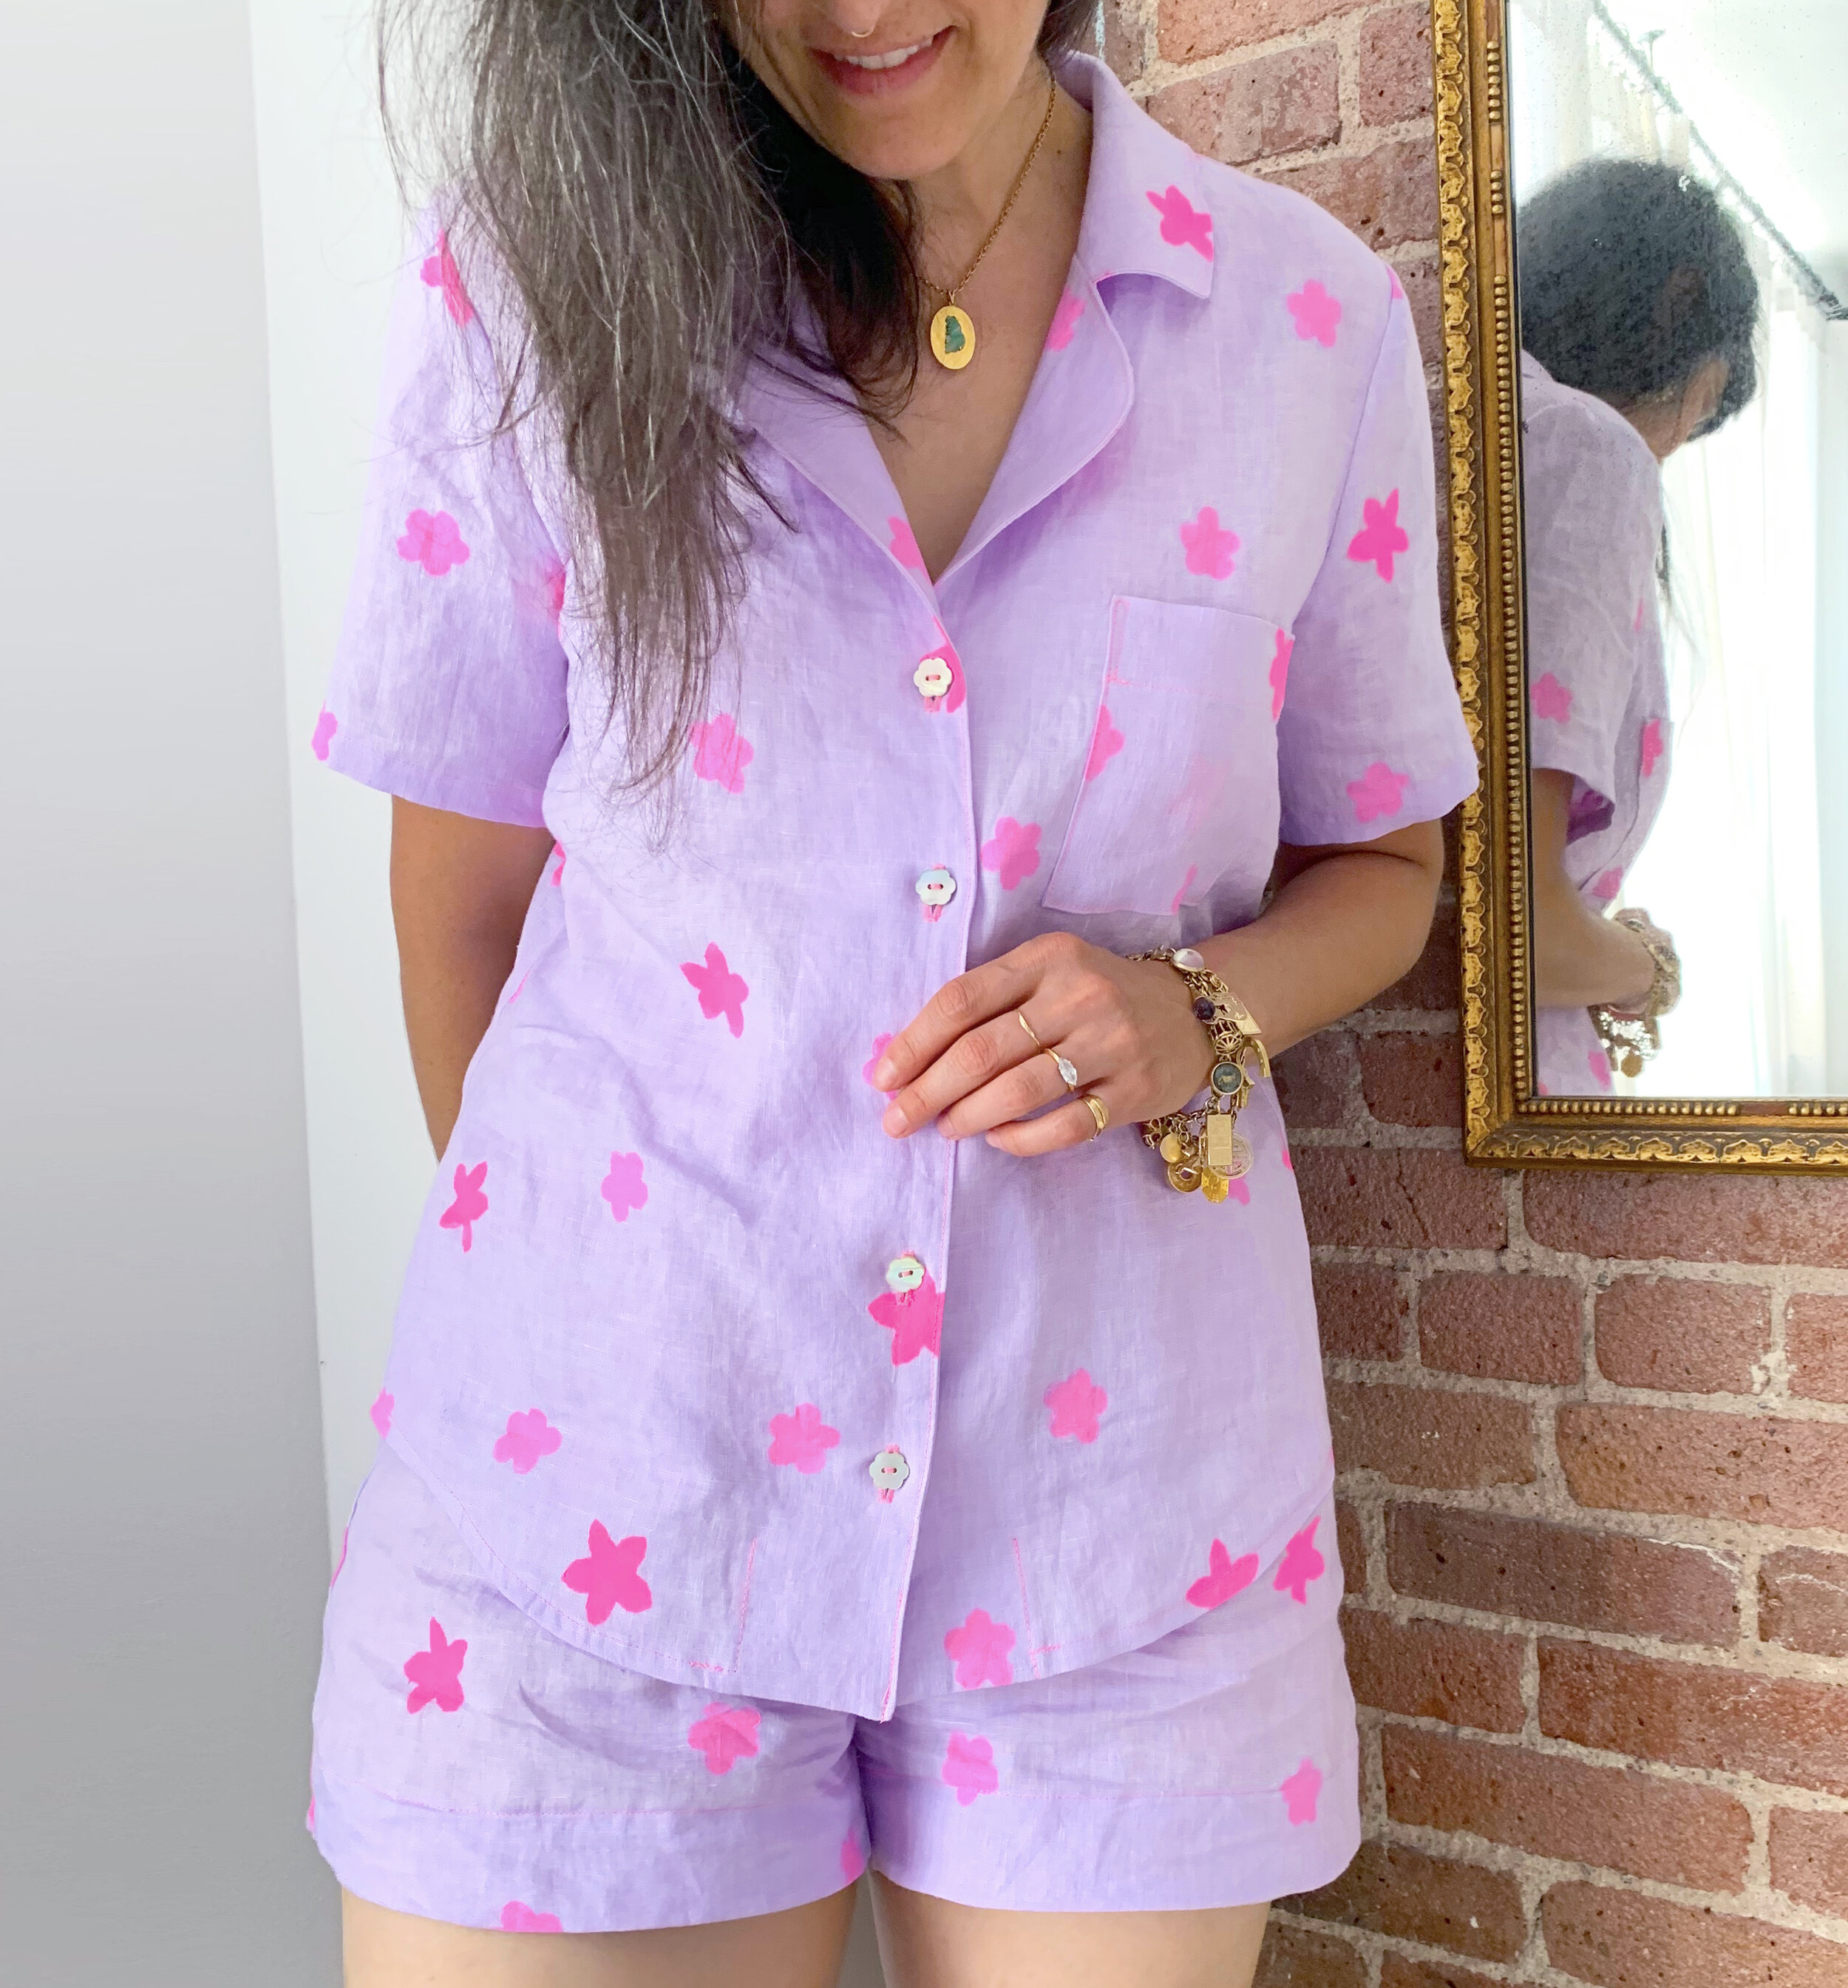
While I didn’t make any changes to the fit of this version, I changed a few things for personal style and preference. I lengthened the short sleeve pattern piece by 4” and hemmed it just shy of 1”. I also shortened the top by 1” - usually I lengthen tops 1”, always! I think the length is great as drafted, I just wanted it to hit me a little higher when worn.

I lengthened the shorts 3”, and then when I tried them on, unhemmed, I realized I didn’t want to lose any length! So I quickly drafted up some hem facings (2” tall, including seam allowances), and sewed them on with a scant 3/8” seam allowance, so minimal length would be lost. I understitched them, and top stitched the hem in place. I love how these give the leg opening a bit of structure and a clean finish. I’ll do it again on my next version.
I also left off pockets on my shorts (I gave them a fair chance on the muslin!). Yes, No Pockets. Don’t @ me. I leave pockets off a lot of my garments because I don’t like to add bulk at the hips, I sometimes find them to be bunchy and uncomfortable, and honestly, I do fine without them. I think on future versions, I will add a big patch pocket to the back right side, just in case I need to slip my phone in there. I might even add one to this pair, it’s an easy addition.
A detail of this pattern that I like more than I expected is the faux fly. It is drafted to have a sharp “L” shape, which is softened with a curve just because I prefer the look. This seems minor, but it helps you immediately see which side of your shorts goes in the front when you are putting them on.
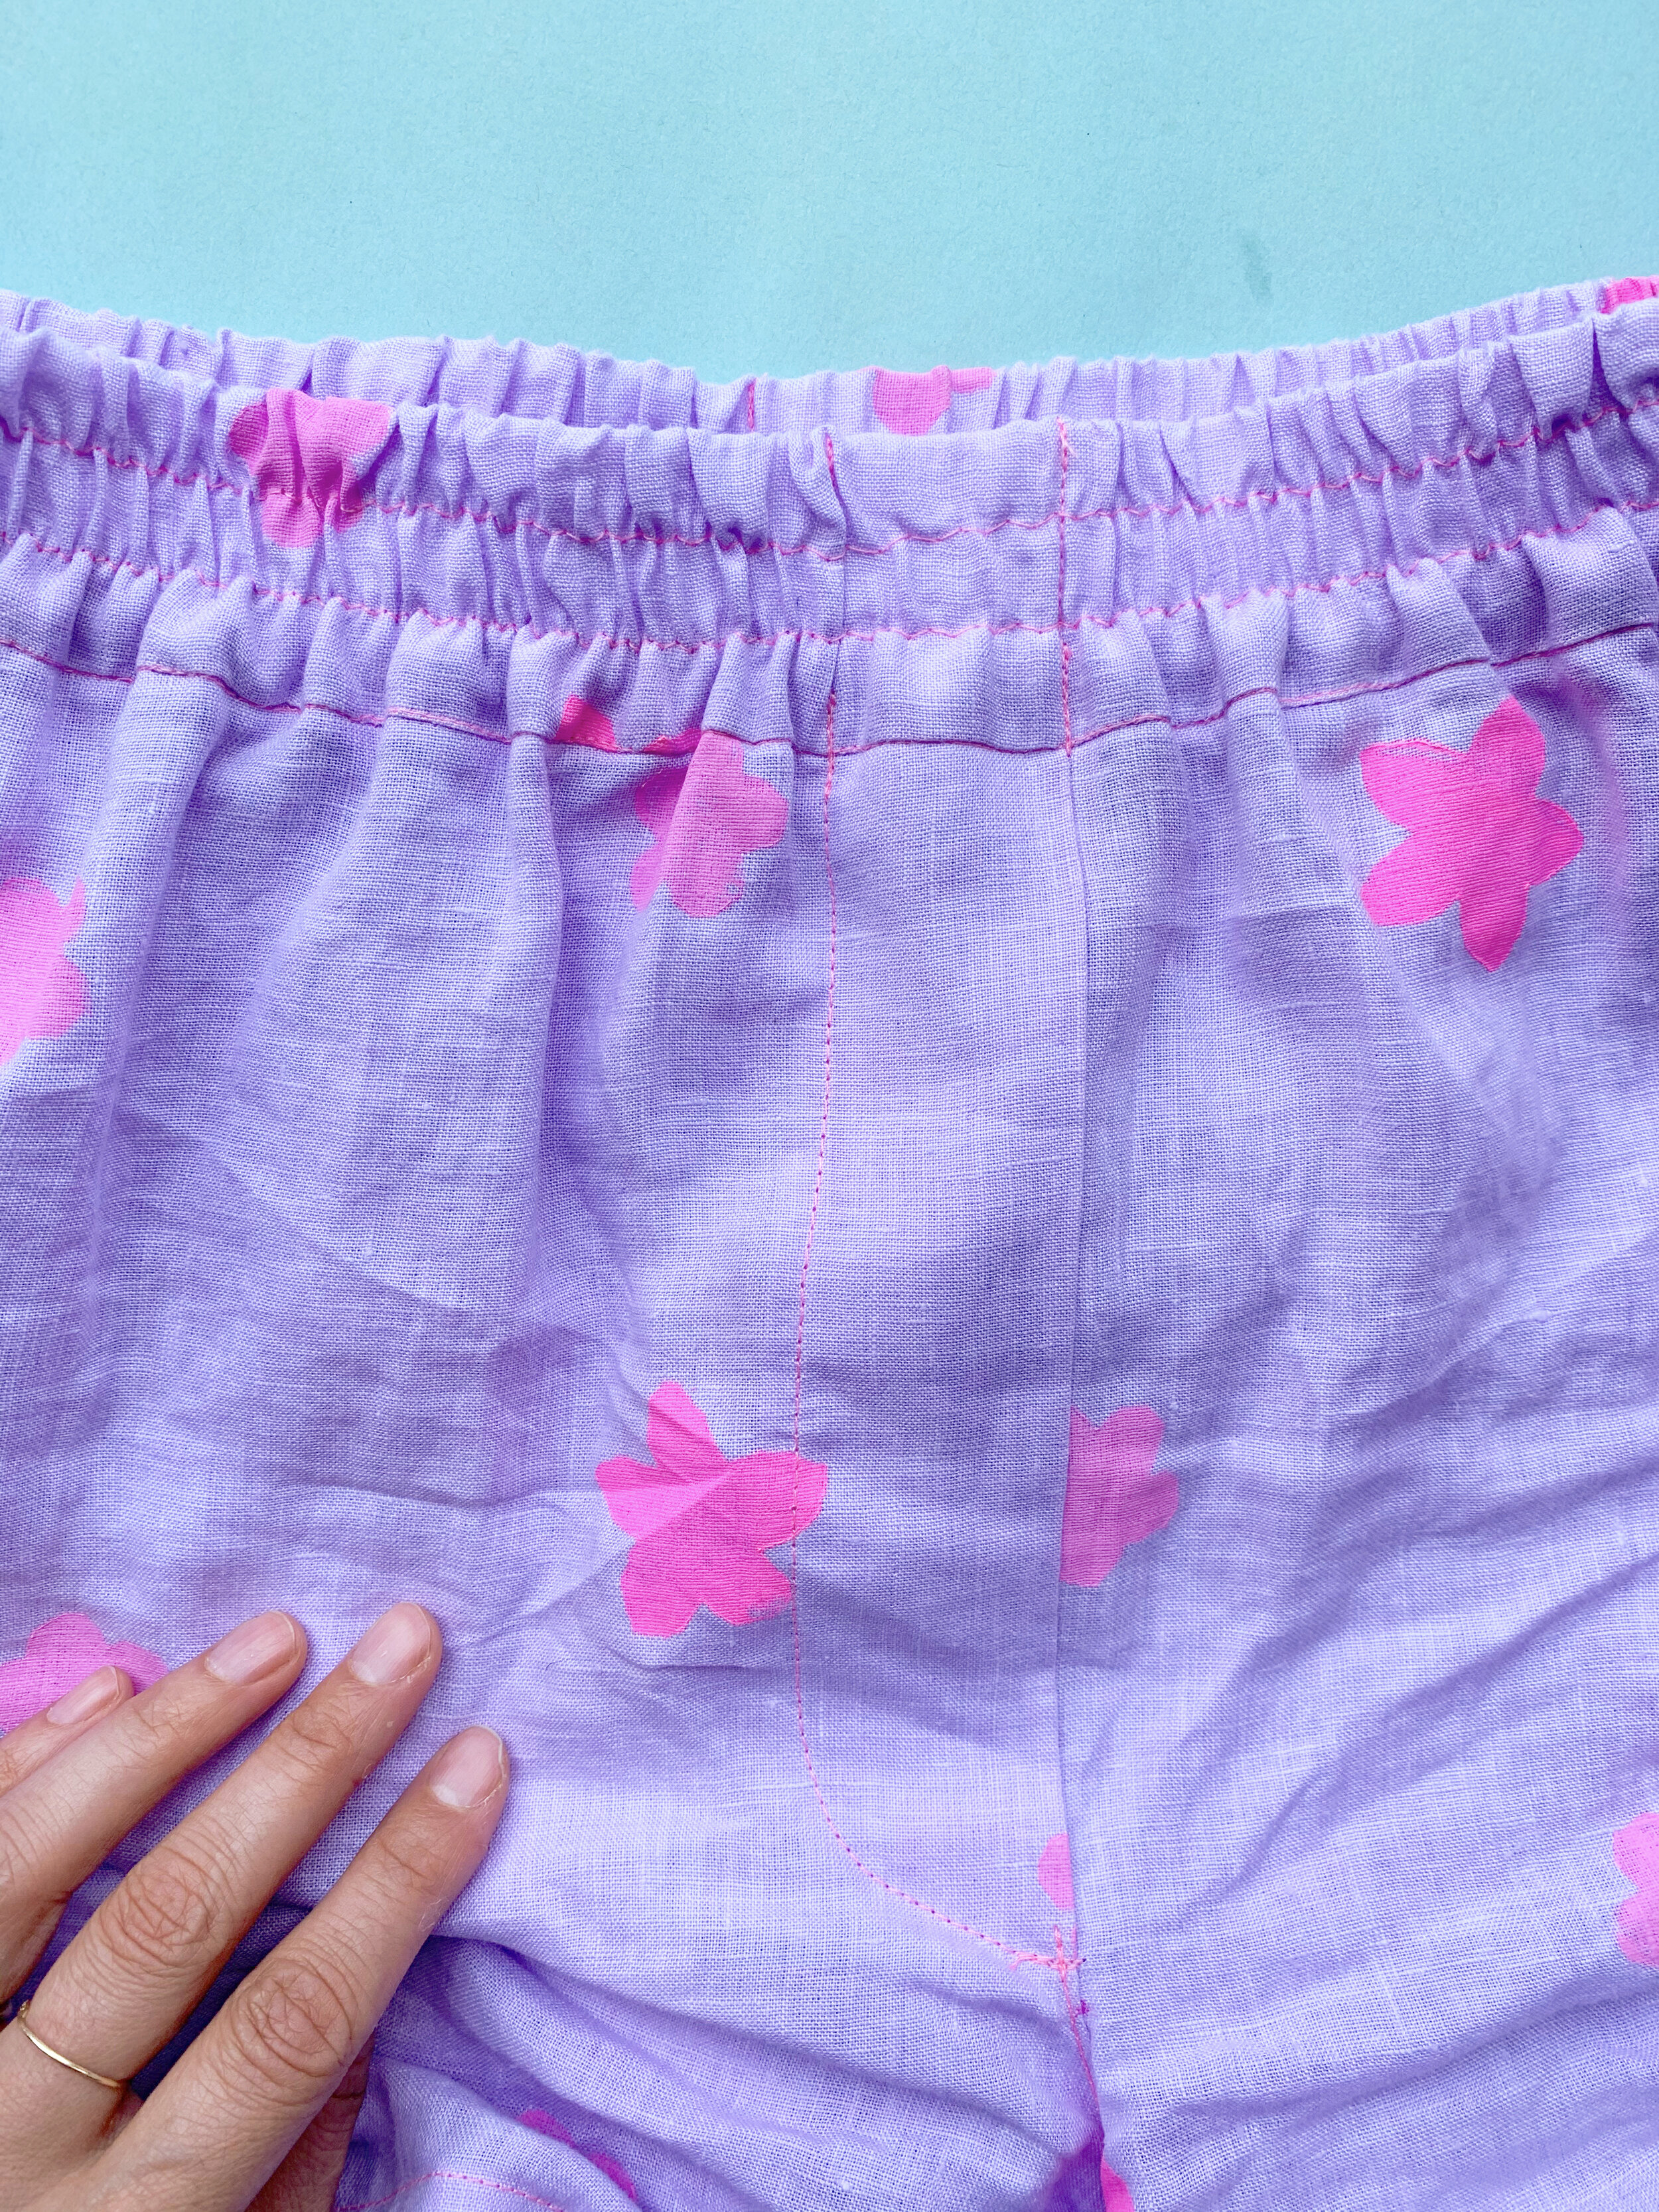
The waistband technique is totally fine - remember, I sewed the pattern exactly as drafted for my muslin - but the fabric is a little scrunchie around your body when worn. The pattern has you anchor the elastic at the side seams, front, and back, but I went one step further and sewed the waistband down with 2 rows of zigzag stitches, as seen here. Just make sure to stretch your elastic so the fabric is completely flat, when sewing these rows of stitching.

While I have not slept in these pajamas (I don’t get wearing structured clothing to bed…I wear a slip or nightgown…but I’m looking forward to wearing my warm pair), I have been wearing these around the apartment NON-STOP. They are the ultimate Stay Home uniform. I will be making more. I recommend you do, too! XO, Martha