A DRESS FROM A DREAM, DON'T JUDGE A BOOK BY ITS COVER: VINTAGE SIMPLICITY 9783

Paintings by my fiancé, Jason Sho Green.
I have been sewing constantly during quarantine. I’ve sewn everything from a stuffed dog, to pajamas, to several elaborate dresses. I’ve had days where I slipped into the ever elusive and wonderful flow state, and days where literally everything goes wrong. (Sorry, I’m behind on documenting my projects, but I’ll post about the other vintage nightgown dress that I cut a hole in…soon!)
I started making mistakes more frequently, and my frustration was boiling over. I stepped away from sewing for a few days, and felt uninspired, directionless. But then I had a dream about someone…..and when I woke up I had a vision for this dress. I’m serious! I wrote down that it would need ruffles, and must be a soft purple. I decided to give myself this dream dress as a sewing assignment - the outcome was less important than the process, and so the process had to have many steps. I would dye the fabric, make the piping, alter the pattern, and keep myself busy until I was back in the swing of things.
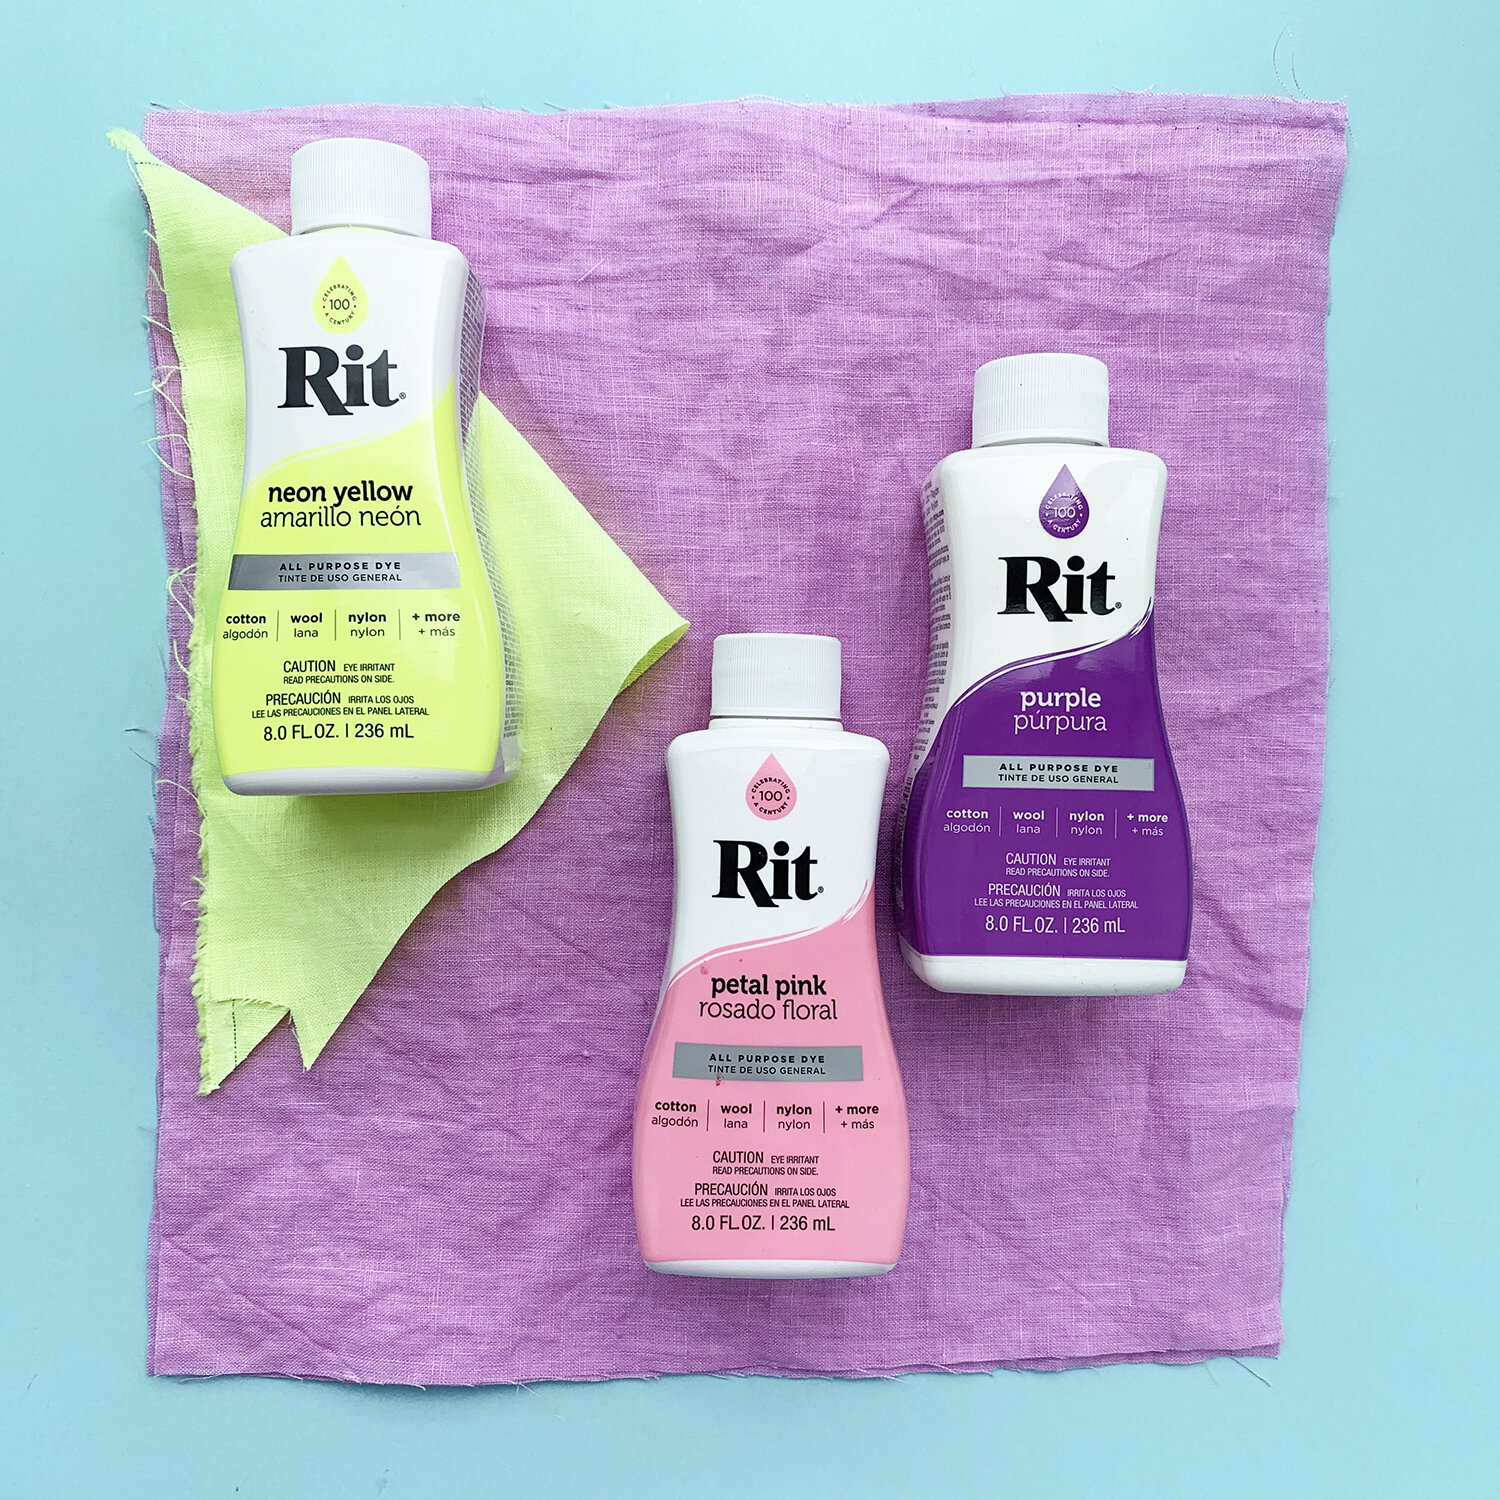
As ever, let’s start with the fabric. I love dyeing linen to be the exact color I crave, so that was my first step. I pawed through my rainbow of dyed linen swatches from a project I created in partnership with Rit Dye, and decided on a purple. I loved how it looked with neon, so the colors were settled. I used Rit Neon Yellow on white linen from Gray Line Linen in Manhattan. For the purple, I used equal parts Petal Pink and Purple dye on a very very pale pink linen from Fabric Mart. That fabric has since sold out (things move quickly on their site, especially during their amazing sales), but every linen I have purchased from them has been wonderful. When the prices are low, take a chance!
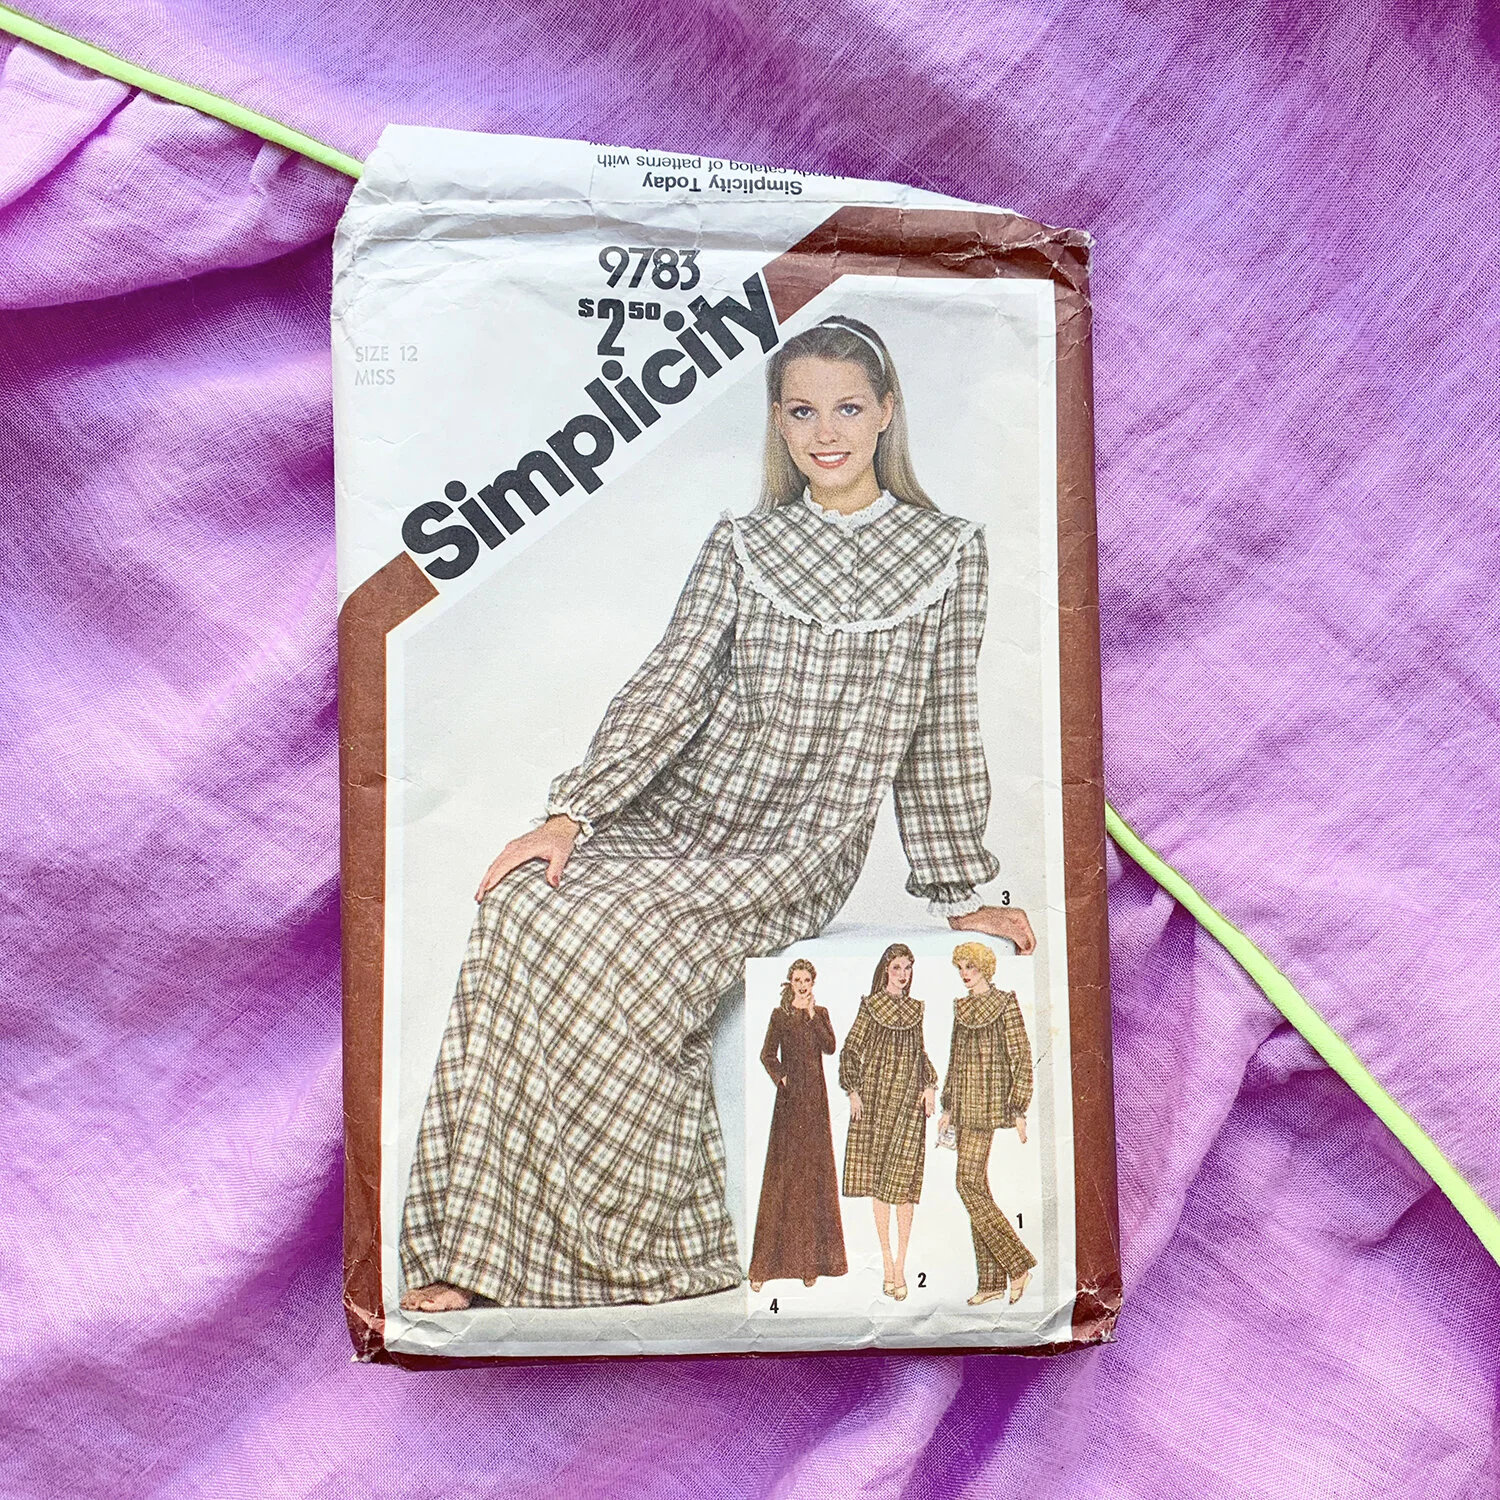
With my fabric selected, I just needed to nail down the pattern. I knew I would start with a nightgown pattern, as I often do. I took a look through my pattern collection and narrowed it down to a couple of patterns with ruffled yokes. Don’t judge a book (pattern) by it’s cover! This one is so dated and drab. But I chose this pattern because it has very simple lines, ideal for modifying as needed. I also like that the shoulders; while raglan, they sit more like a set in sleeve at the shoulder. I don’t prefer raglan sleeves, but they are common on nightgown patterns, because they are so easy to sew and easy to fit. Basically, I saw the images on this envelope as an ideal jumping off point, a blank canvas onto which I could apply my ideas.

Before cutting anything out, I made 5 yards of piping with the neon linen. I forgot to take photos of this step, but it’s just basic piping: bias cut strips of fabric folded over cotton cord and basted together. I then got to work constructing the yoke. I like to get the most complicated parts of a project completed first.
My flat pattern adjustments were a 1” narrow shoulder adjustment, and I lowered the center front neckline 5/8”, blending to nothing at the shoulder seam. Those are both standard adjustments for me. I added piping where the pattern calls for gathered lace trim, and a ruffle at the yoke. I cut the ruffle 4” wide and 80” long, and hemmed it with my rolled hem foot to keep things light and airy. The buttons and buttonholes were a whole debacle, we’ll get to that later.

Next up, sleeves. I love the long sleeve of this pattern as drafted, but I have sewn myself many long sleeve linen dresses, so I wanted something a little different. I decided to go short sleeved, and added a folded elastic channel to the cuff, which creates a ruffle. This technique is well explained in McCall’s 7947 (a current pattern!), which I wrote about here. Then, to echo the piping detail at the yoke, I wanted to add a fabric tie. I first used this sleeve design in this green gingham top. I was excited to use grommets again! For this I made a basic spaghetti strap with neatly finished ends. Here is my tutorial for making skinny spaghetti straps.
My flat pattern adjustments to the sleeve were to add 3” of width, for extra overall puff, and the cuff I just described. I drafted them to end just above my elbow. I determined that length tissue fitting the pattern piece, and going from there.

I’m glad I added ruffles wherever possible - it’s fun to have set details that you want to have echo across one garment. With ruffles, piping, and little ties, this has fun, repeated details that pull it all together.
Oh, and yes, I added pockets.

For the length of this dress, I cut the main bodice pieces 5-1/2” shorter than View B. When trying the dress on the first few times, I felt so cute! It wasn’t an overwhelming amount of fabric, and felt fresh. But the reality is, I do not like to show my calves, and strongly favor a midi length skirt these days. I further shortened the skirt 4” at center front, curving and blending to nothing at the side seams, to create a sublte high-low hemline. I then added a 10” ruffle, and of course, more piping.

Let’s revisit the yoke, shall we? If you follow me on Instagram, then you know that I really wanted neon yellow buttons. I considered dyeing some buttons, but didn’t have any that felt like the right choice. I went so far as to make a silicone button mold and cast some neon resin buttons, only to confirm my suspicions that I don’t like resin buttons. I’ve written about this before, I have a strong preference for natural materials and heavy weight buttons - resin is neither of those things. So I opted for a mis-match of natural shell Mother of Pearl buttons from my stash. All are extras from past projects, except the hand carved cat, which I recently scored on eBay. I have ordered a self fabric covered button kit, and may replace these buttons when it arrives. Or maybe not! I will decide when I have all my options in front of me.
The buttonholes were torture: my machine does not do well with any seams, let alone piping, getting in the way of a buttonhole. But even the ones in the middle didn’t go well! Each of the buttonholes was sewn once, ripped out, re-sewn. And now they’re perfect. I didn’t lose my patience, and I guess all’s well that ends well. Also, I hate this row of top stitching going around the yoke, but even after trimming and grading the seam allowances of the yoke, yoke lining, piping, and ruffle, I needed to tame it all with that row of stitching.
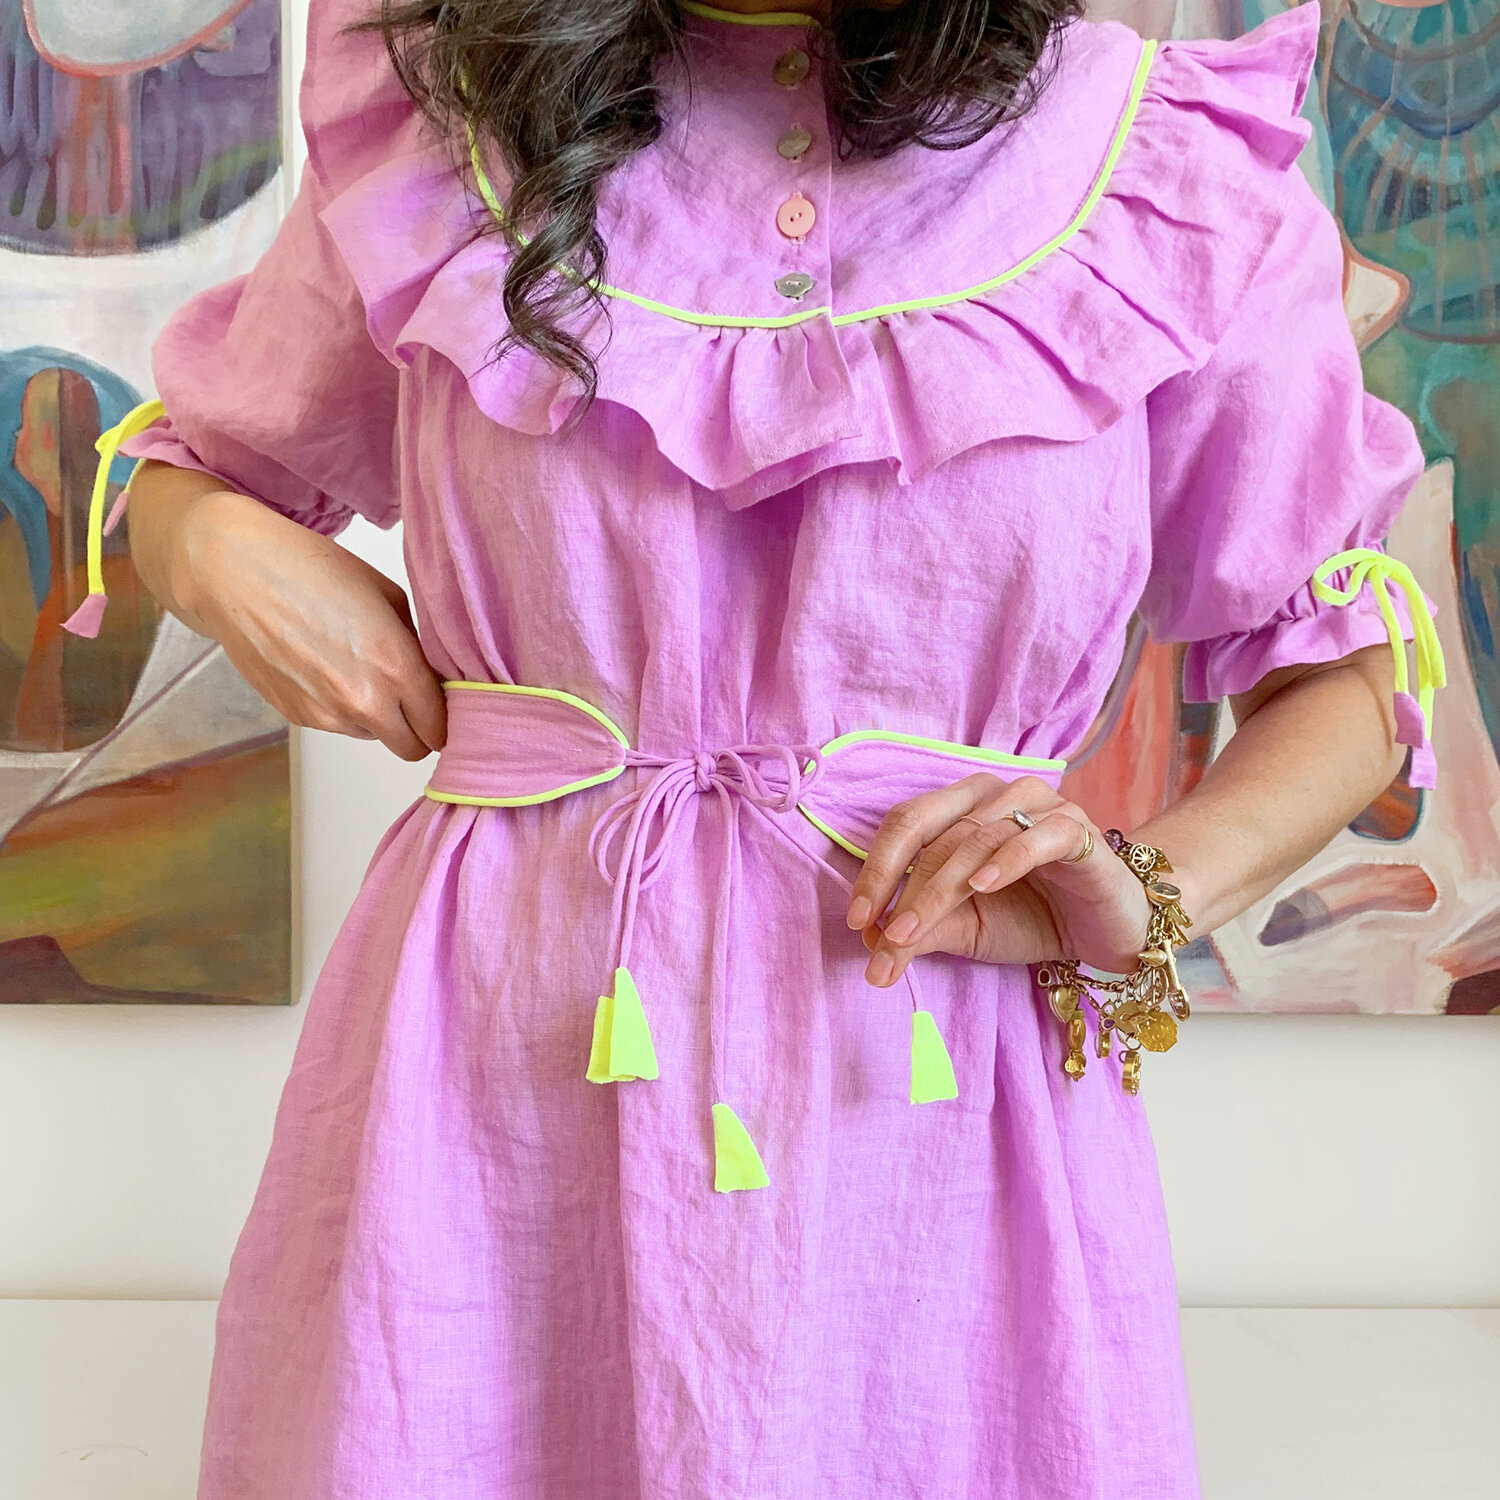
Last, but most certainly not least, we have the belt. I tend to dislike dresses that don’t have a waist seam (I like to show my waist), but I knew it would work here because this linen has wonderful drape, and would gather beautifully into a belt. But a regular self fabric sash wasn’t going to cut it here. I didn’t really plan this belt, I just knew what I had to do, and executed it. I added flannel in between the layers to create a trapunto effect with my stitching.
I will be creating a separate post only about the belt in the coming days, so please be patient while I get that together! It has more to it than can be explained in one or two sentences, here. Stay tuned!
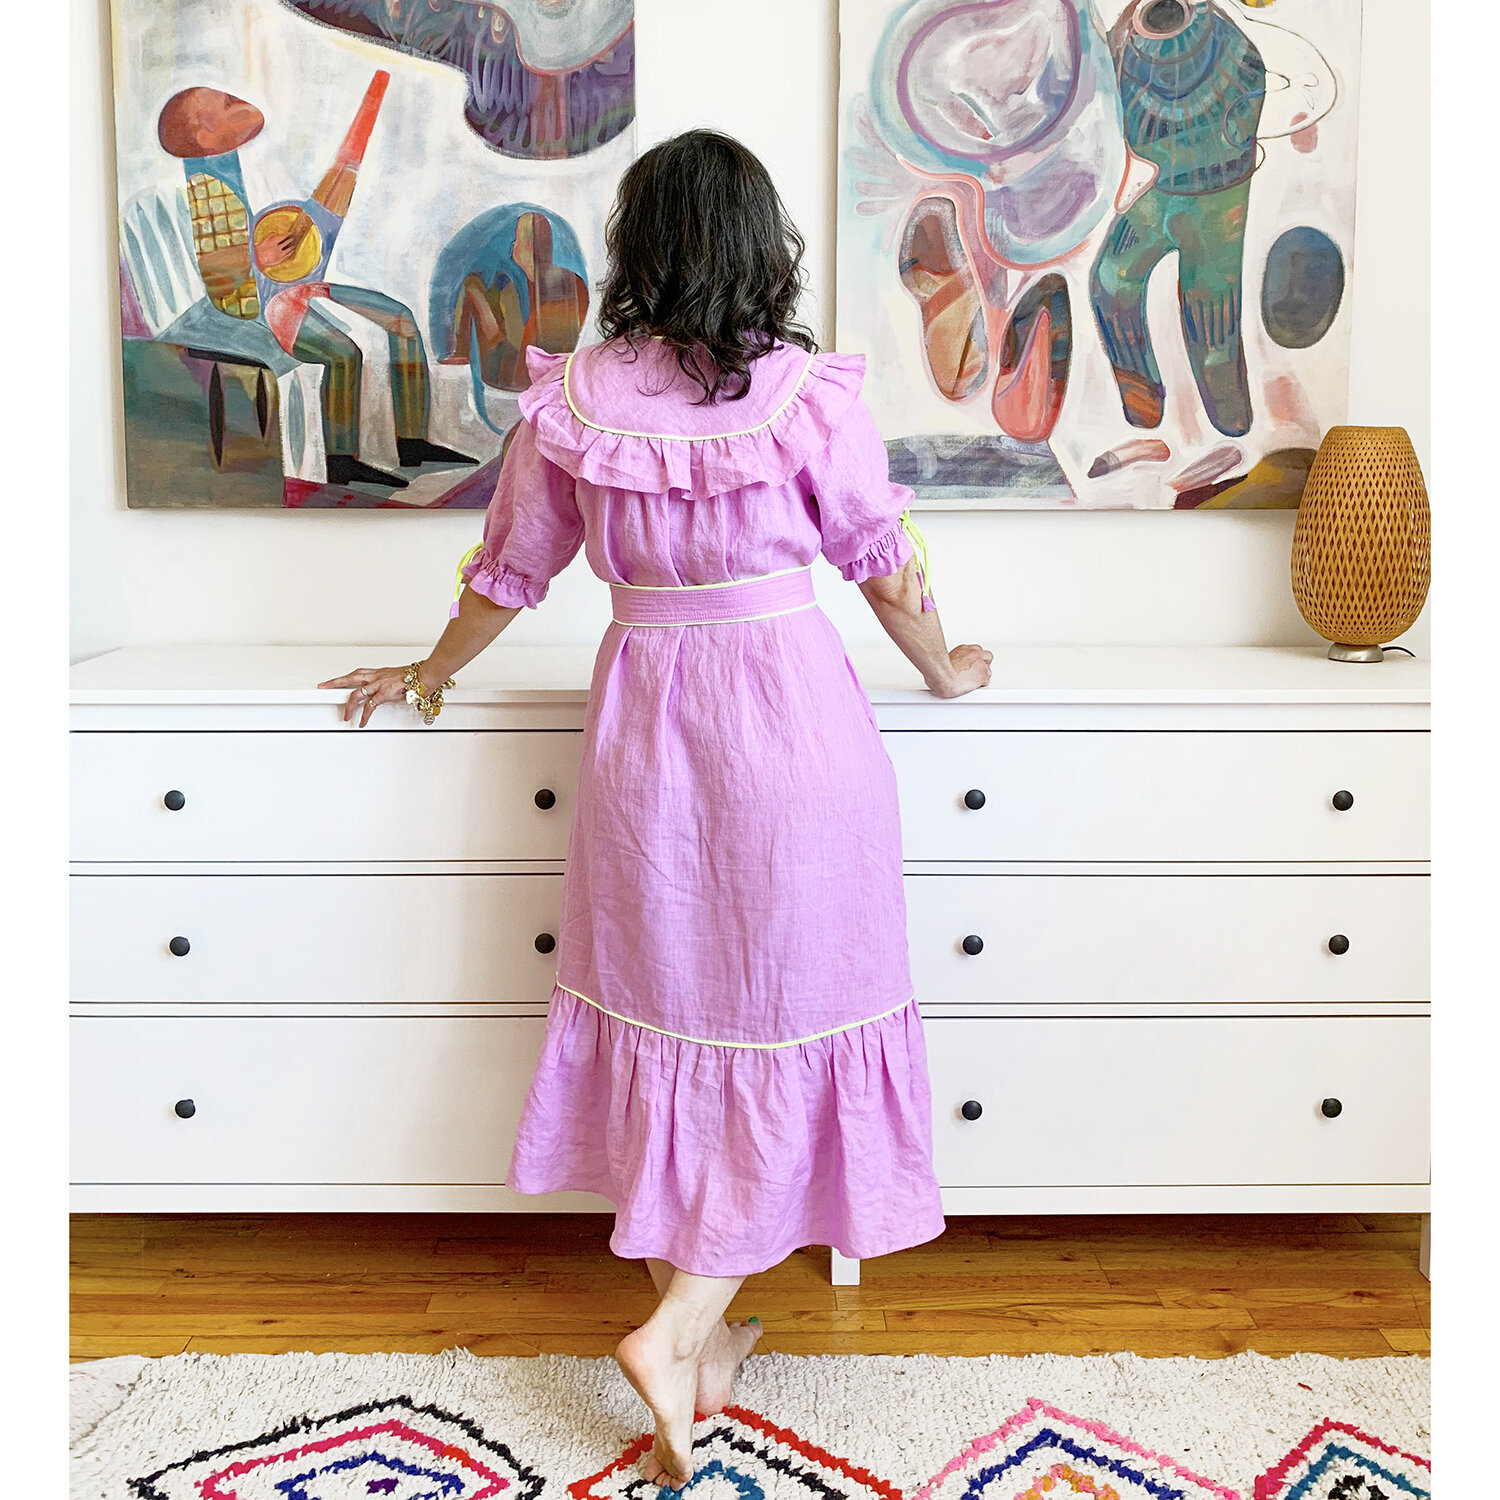
One of my favorite things about this dress is that the details carry all around the dress, not just on the front. I think it is special and flowing from every angle. It’s comfortable enough to sleep in (ha!), but dressy enough for a party. I think it looks best when moving - think dancing or running through a field of wildflowers.

She’s just the right amount of Little Bo Peep, but also somehow very current. It’s the dress from the dream (if I’m honest, it was a nightmare….lol yikes). I am already planning to sew this pattern again, but as pajamas. So after all that, I got back into the swing of things. Phew! I’m ready to keep sewing. XO, Martha